Get started with Docker MCP Toolkit
メモThis page describes the MCP Toolkit interface in Docker Desktop 4.62 and later. Earlier versions have a different UI. Upgrade to follow these instructions exactly.
The Docker MCP Toolkit makes it easy to set up, manage, and run containerized Model Context Protocol (MCP) servers in profiles, and connect them to AI agents. It provides secure defaults and support for a growing ecosystem of LLM-based clients. This page shows you how to get started quickly with the Docker MCP Toolkit.
Setup
Before you begin, make sure you meet the following requirements to get started with Docker MCP Toolkit.
- Download and install the latest version of Docker Desktop.
- Open the Docker Desktop settings and select Beta features.
- Select Enable Docker MCP Toolkit.
- Select Apply.
The Learning center in Docker Desktop provides walkthroughs and resources to help you get started with Docker products and features. On the MCP Toolkit page, the Get started walkthrough guides you through installing an MCP server, connecting a client, and testing your setup.
Alternatively, follow the step-by-step instructions on this page:
- Create a profile - Your workspace for organizing servers
- Add MCP servers to your profile - Select tools from the catalog
- Connect clients - Link AI applications to your profile
- Verify connections - Test that everything works
Once configured, your AI applications can use all the servers in your profile.
情報Prefer working from the terminal? See Use MCP Toolkit from the CLI for instructions on using the
docker mcpcommands.
Create a profile
Profiles organize your MCP servers into collections. Create a profile for your work:
メモIf you're upgrading from a previous version of MCP Toolkit, your existing server configurations are already in a
defaultprofile. You can continue using the default profile or create new profiles for different projects.
- In Docker Desktop, select MCP Toolkit and select the Profiles tab.
- Select Create profile.
- Enter a name for your profile (e.g., "Frontend development").
- Optionally, add servers and clients now, or add them later.
- Select Create.
Your new profile appears in the profiles list.
Add MCP servers
- In Docker Desktop, select MCP Toolkit and select the Catalog tab.
- Browse the catalog and select the servers you want to add.
- Select the Add to button and choose whether you want to add the servers to an existing profile, or create a new profile.
If a server requires configuration, a Configuration Required badge appears next to the server's name. You must complete the mandatory configuration before you can use the server.
You've now successfully added MCP servers to your profile. Next, connect an MCP client to use the servers in your profile.
Connect clients
To connect a client to MCP Toolkit:
- In Docker Desktop, select MCP Toolkit and select the Clients tab.
- Find your application in the list.
- Select Connect to configure the client.
If your client isn't listed, you can connect the MCP Toolkit manually over
stdio by configuring your client to run the gateway with your profile:
docker mcp gateway run --profile my_profileFor example, if your client uses a JSON file to configure MCP servers, you may add an entry like:
{
  "servers": {
    "MCP_DOCKER": {
      "command": "docker",
      "args": ["mcp", "gateway", "run", "--profile", "my_profile"],
      "type": "stdio"
    }
  }
}
Consult the documentation of the application you're using for instructions on how to set up MCP servers manually.
Verify connections
Refer to the relevant section for instructions on how to verify that your setup is working:
- Claude Code
- Claude Desktop
- OpenAI Codex
- Continue
- Cursor
- Gemini
- Goose
- LM Studio
- OpenCode
- Sema4.ai
- Visual Studio Code
- Zed
Claude Code
If you configured the MCP Toolkit for a specific project, navigate to the
relevant project directory. Then run claude mcp list. The output should show
MCP_DOCKER with a "connected" status:
$ claude mcp list
Checking MCP server health...

MCP_DOCKER: docker mcp gateway run - ✓ Connected
Test the connection by submitting a prompt that invokes one of your installed MCP servers:
$ claude "Use the GitHub MCP server to show me my open pull requests"
Claude Desktop
Restart Claude Desktop and check the Search and tools menu in the chat
input. You should see the MCP_DOCKER server listed and enabled:

Test the connection by submitting a prompt that invokes one of your installed MCP servers:
Use the GitHub MCP server to show me my open pull requestsCodex
Run codex mcp list to view active MCP servers and their statuses. The
MCP_DOCKER server should appear in the list with an "enabled" status:
$ codex mcp list
Name        Command  Args             Env  Cwd  Status   Auth
MCP_DOCKER  docker   mcp gateway run  -    -    enabled  Unsupported
Test the connection by submitting a prompt that invokes one of your installed MCP servers:
$ codex "Use the GitHub MCP server to show me my open pull requests"
Continue
Launch the Continue terminal UI by running cn. Use the /mcp command to view
active MCP servers and their statuses. The MCP_DOCKER server should appear in
the list with a "connected" status:
   MCP Servers

   ➤ 🟢 MCP_DOCKER (🔧75 📝3)
     🔄 Restart all servers
     ⏹️ Stop all servers
     🔍 Explore MCP Servers
     Back

   ↑/↓ to navigate, Enter to select, Esc to go back
Test the connection by submitting a prompt that invokes one of your installed MCP servers:
$ cn "Use the GitHub MCP server to show me my open pull requests"
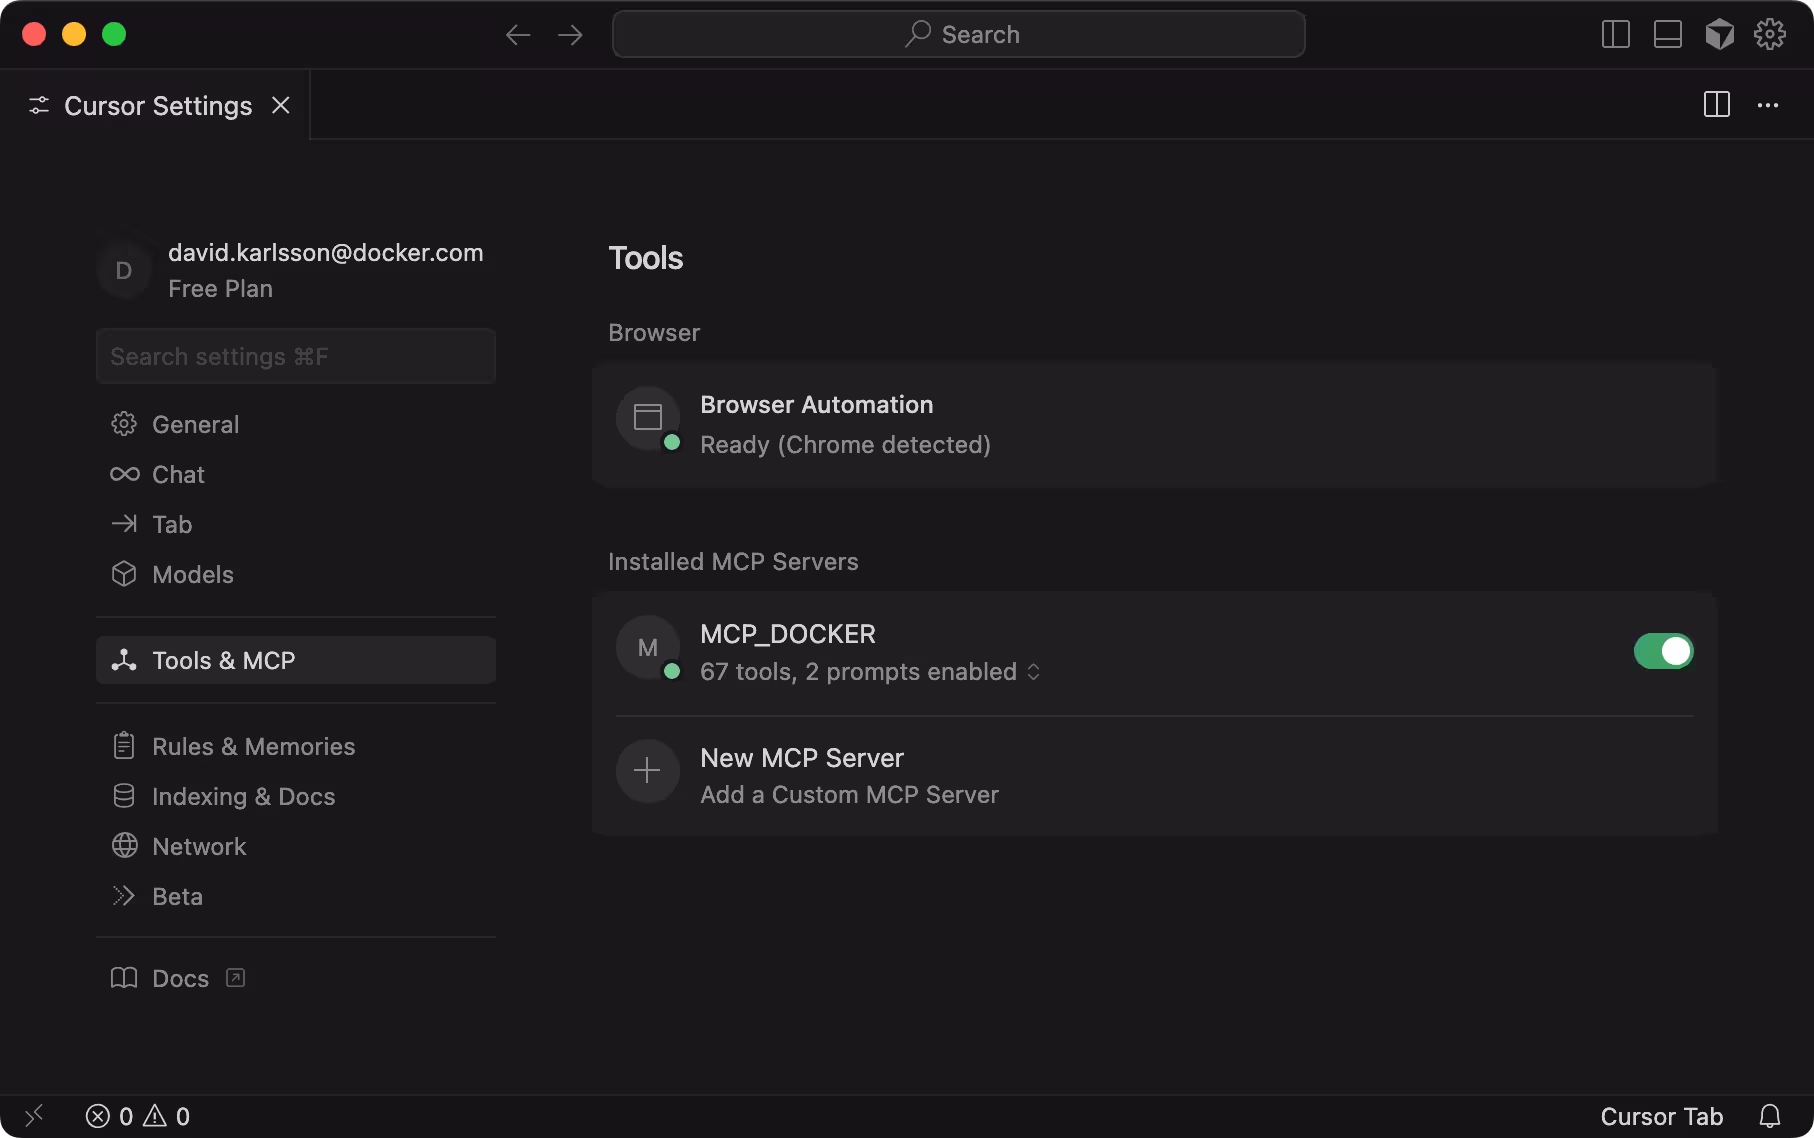
Cursor
Open Cursor. If you configured the MCP Toolkit for a specific project, open the
relevant project directory. Then navigate to Cursor Settings > Tools & MCP.
You should see MCP_DOCKER under Installed MCP Servers:
Test the connection by submitting a prompt that invokes one of your installed MCP servers:
Use the GitHub MCP server to show me my open pull requestsGemini
Run gemini mcp list to view active MCP servers and their statuses. The
MCP_DOCKER should appear in the list with a "connected" status.
$ gemini mcp list
Configured MCP servers:

✓ MCP_DOCKER: docker mcp gateway run (stdio) - Connected
Test the connection by submitting a prompt that invokes one of your installed MCP servers:
$ gemini "Use the GitHub MCP server to show me my open pull requests"
Goose
Open the Goose desktop application and select Extensions in the sidebar.
Under Enabled Extensions, you should see an extension named Mcpdocker:

Run goose info -v and look for an entry named mcpdocker under extensions.
The status should show enabled: true:
$ goose info -v
…
    mcpdocker:
      args:
      - mcp
      - gateway
      - run
      available_tools: []
      bundled: null
      cmd: docker
      description: The Docker MCP Toolkit allows for easy configuration and consumption of MCP servers from the Docker MCP Catalog
      enabled: true
      env_keys: []
      envs: {}
      name: mcpdocker
      timeout: 300
      type: stdio
Test the connection by submitting a prompt that invokes one of your installed MCP servers:
Use the GitHub MCP server to show me my open pull requestsLM Studio
Restart LM Studio and start a new chat. Open the integrations menu and look for
an entry named mcp/mcp-docker. Use the toggle to enable the server:

Test the connection by submitting a prompt that invokes one of your installed MCP servers:
Use the GitHub MCP server to show me my open pull requestsOpenCode
The OpenCode configuration file (at ~/.config/opencode/opencode.json by
default) contains the setup for MCP Toolkit:
{
  "mcp": {
    "MCP_DOCKER": {
      "type": "local",
      "command": ["docker", "mcp", "gateway", "run"],
      "enabled": true
    }
  },
  "$schema": "https://opencode.ai/config.json"
}
Test the connection by submitting a prompt that invokes one of your installed MCP servers:
$ opencode "Use the GitHub MCP server to show me my open pull requests"
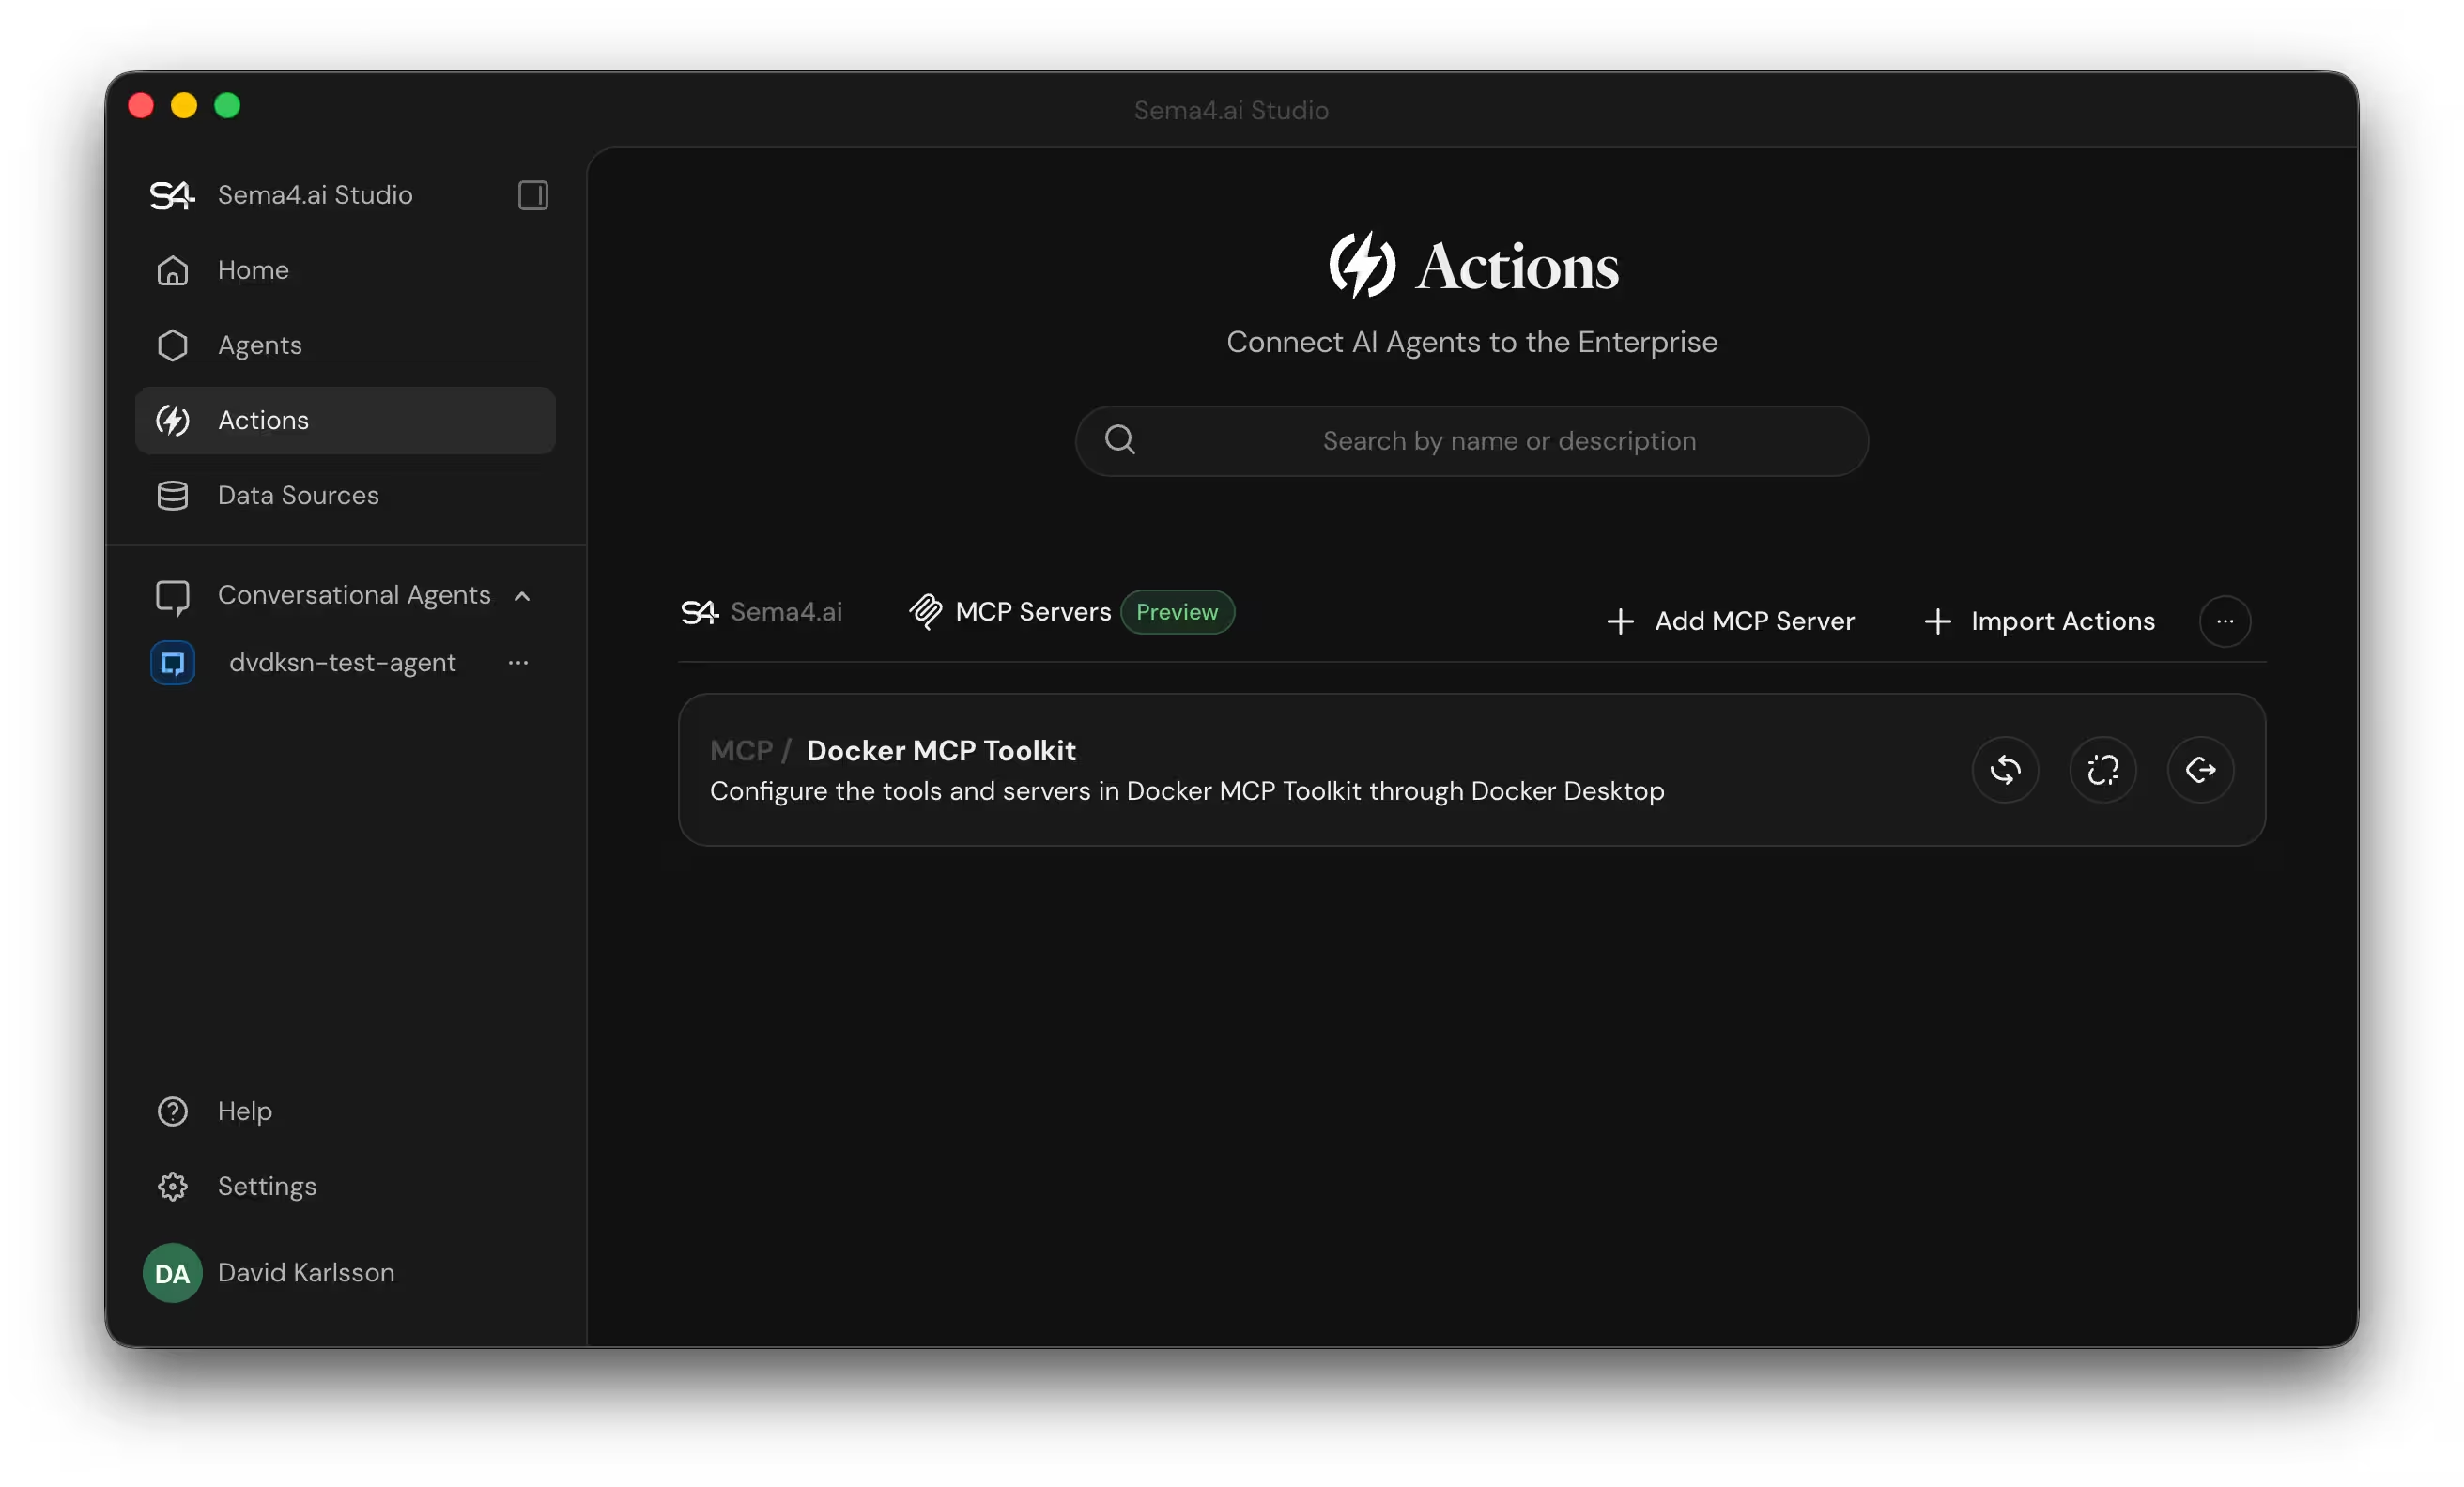
Sema4.ai Studio
In Sema4.ai Studio, select Actions in the sidebar, then select the MCP Servers tab. You should see Docker MCP Toolkit in the list:
To use MCP Toolkit with Sema4.ai, add it as an agent action. Find the agent you want to connect to the MCP Toolkit and open the agent editor. Select Add Action, enable Docker MCP Toolkit in the list, then save your agent:

Test the connection by submitting a prompt that invokes one of your installed MCP servers:
Use the GitHub MCP server to show me my open pull requestsVisual Studio Code
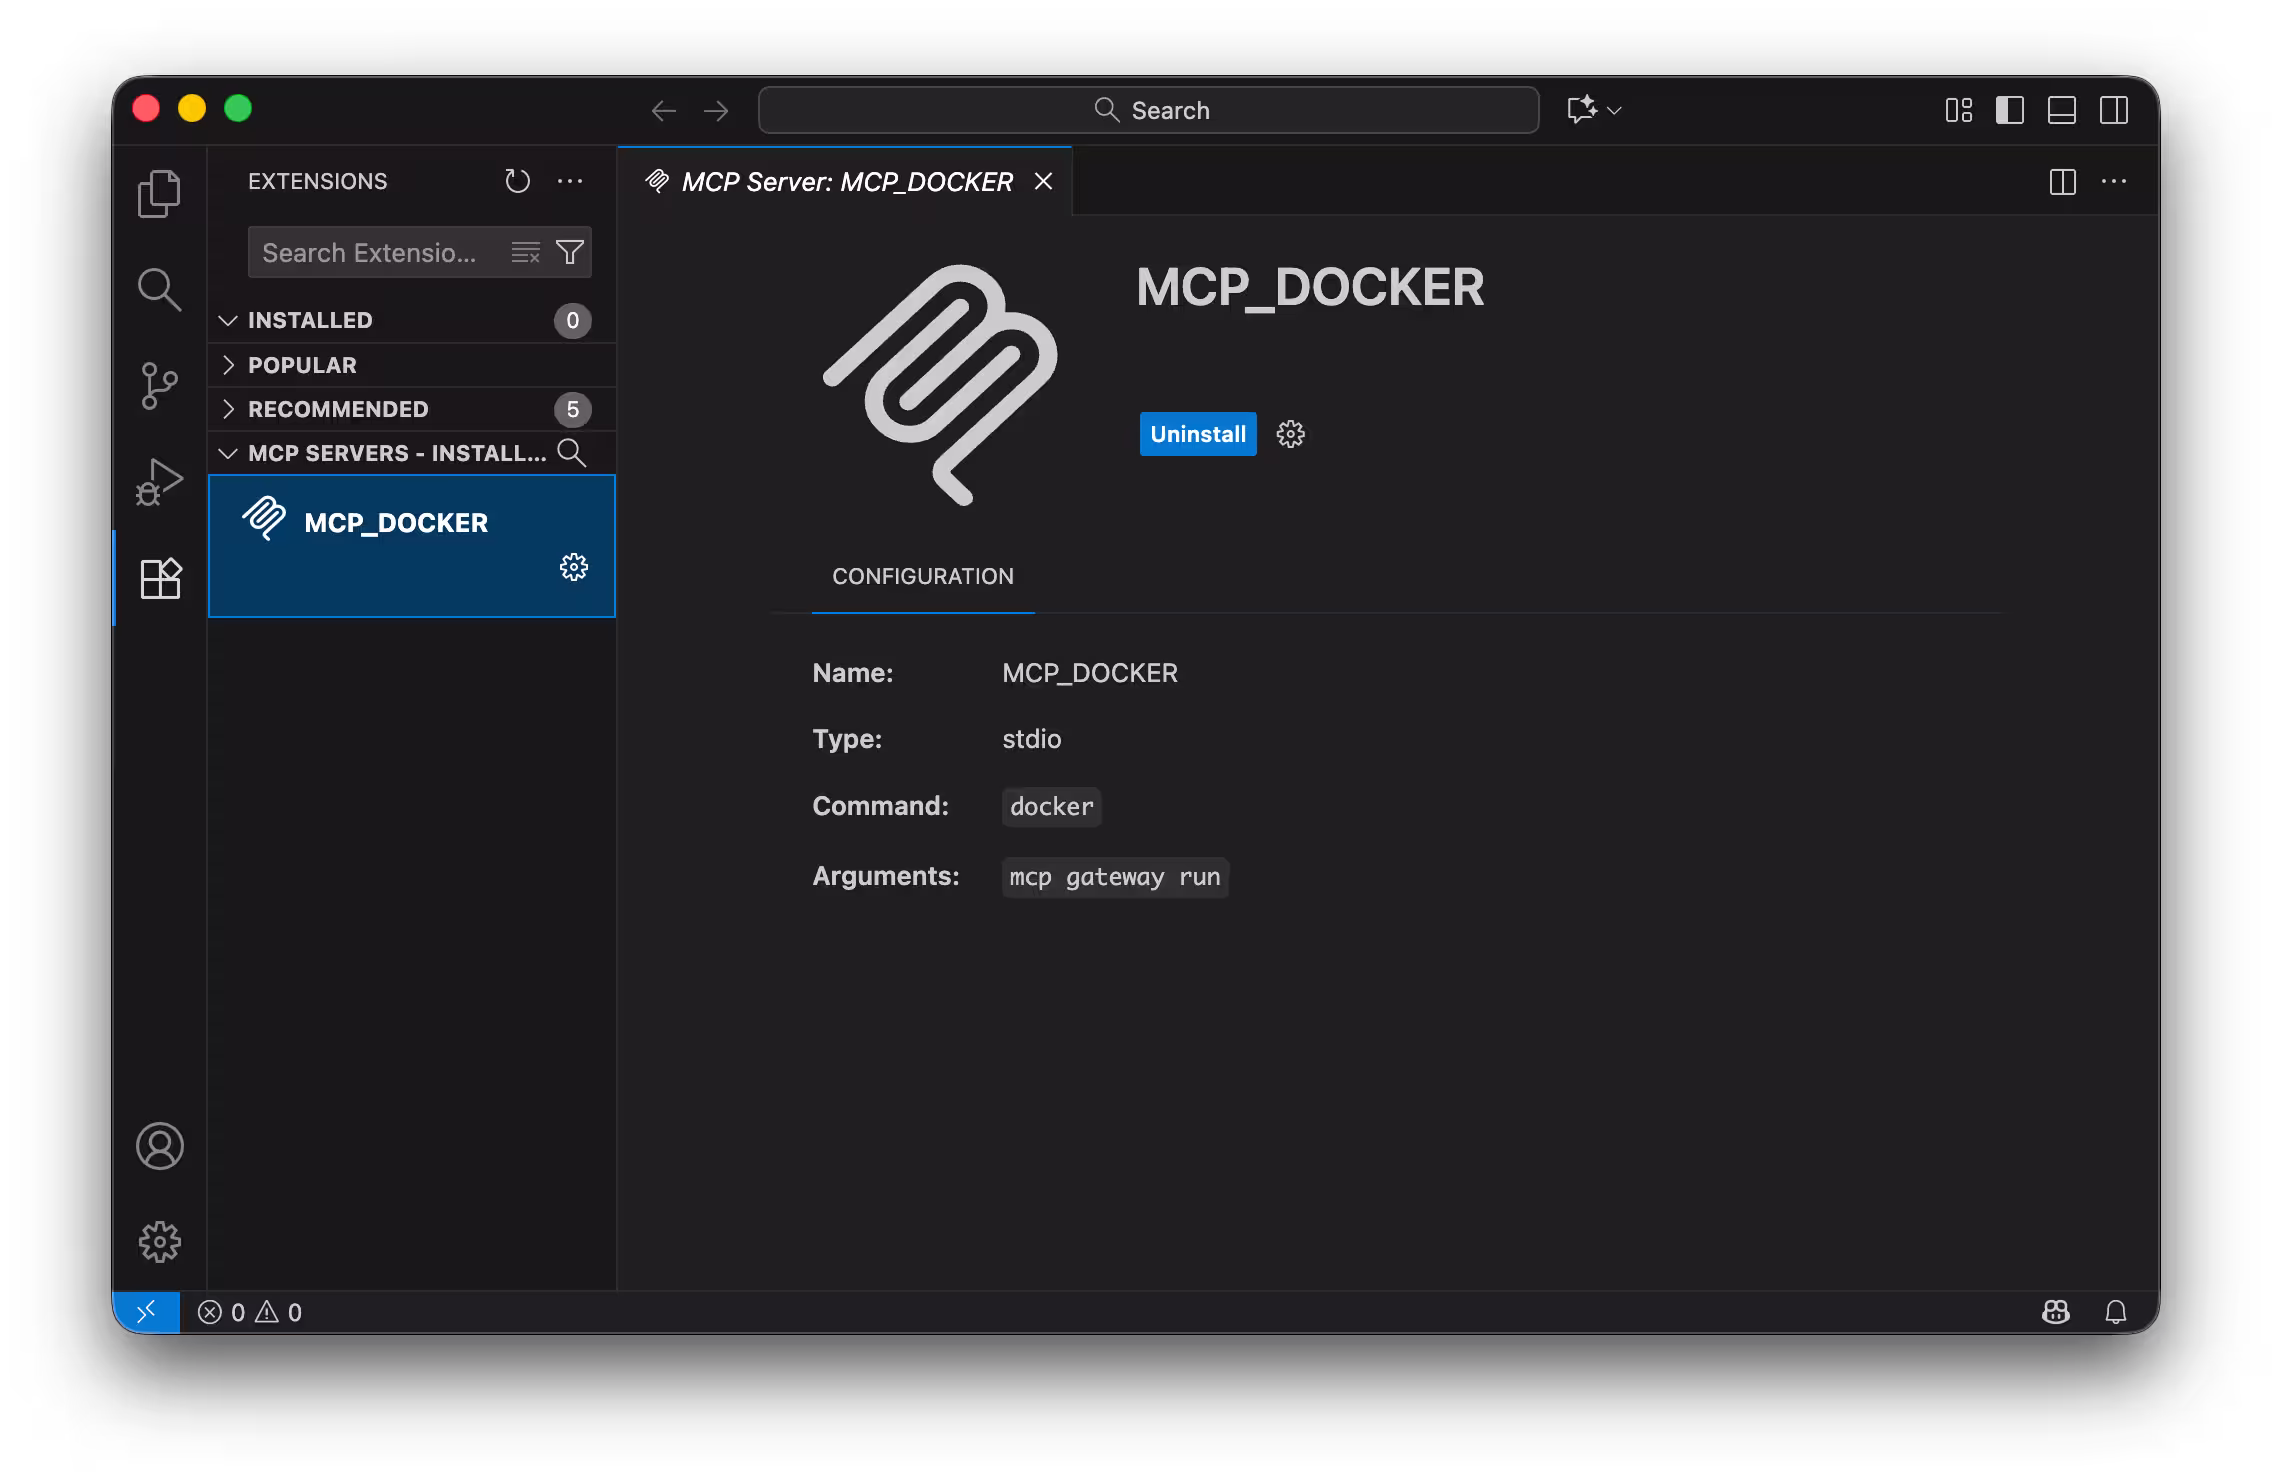
Open Visual Studio Code. If you configured the MCP Toolkit for a specific
project, open the relevant project directory. Then open the Extensions
pane. You should see the MCP_DOCKER server listed under installed MCP
servers.
Test the connection by submitting a prompt that invokes one of your installed MCP servers:
Use the GitHub MCP server to show me my open pull requestsZed
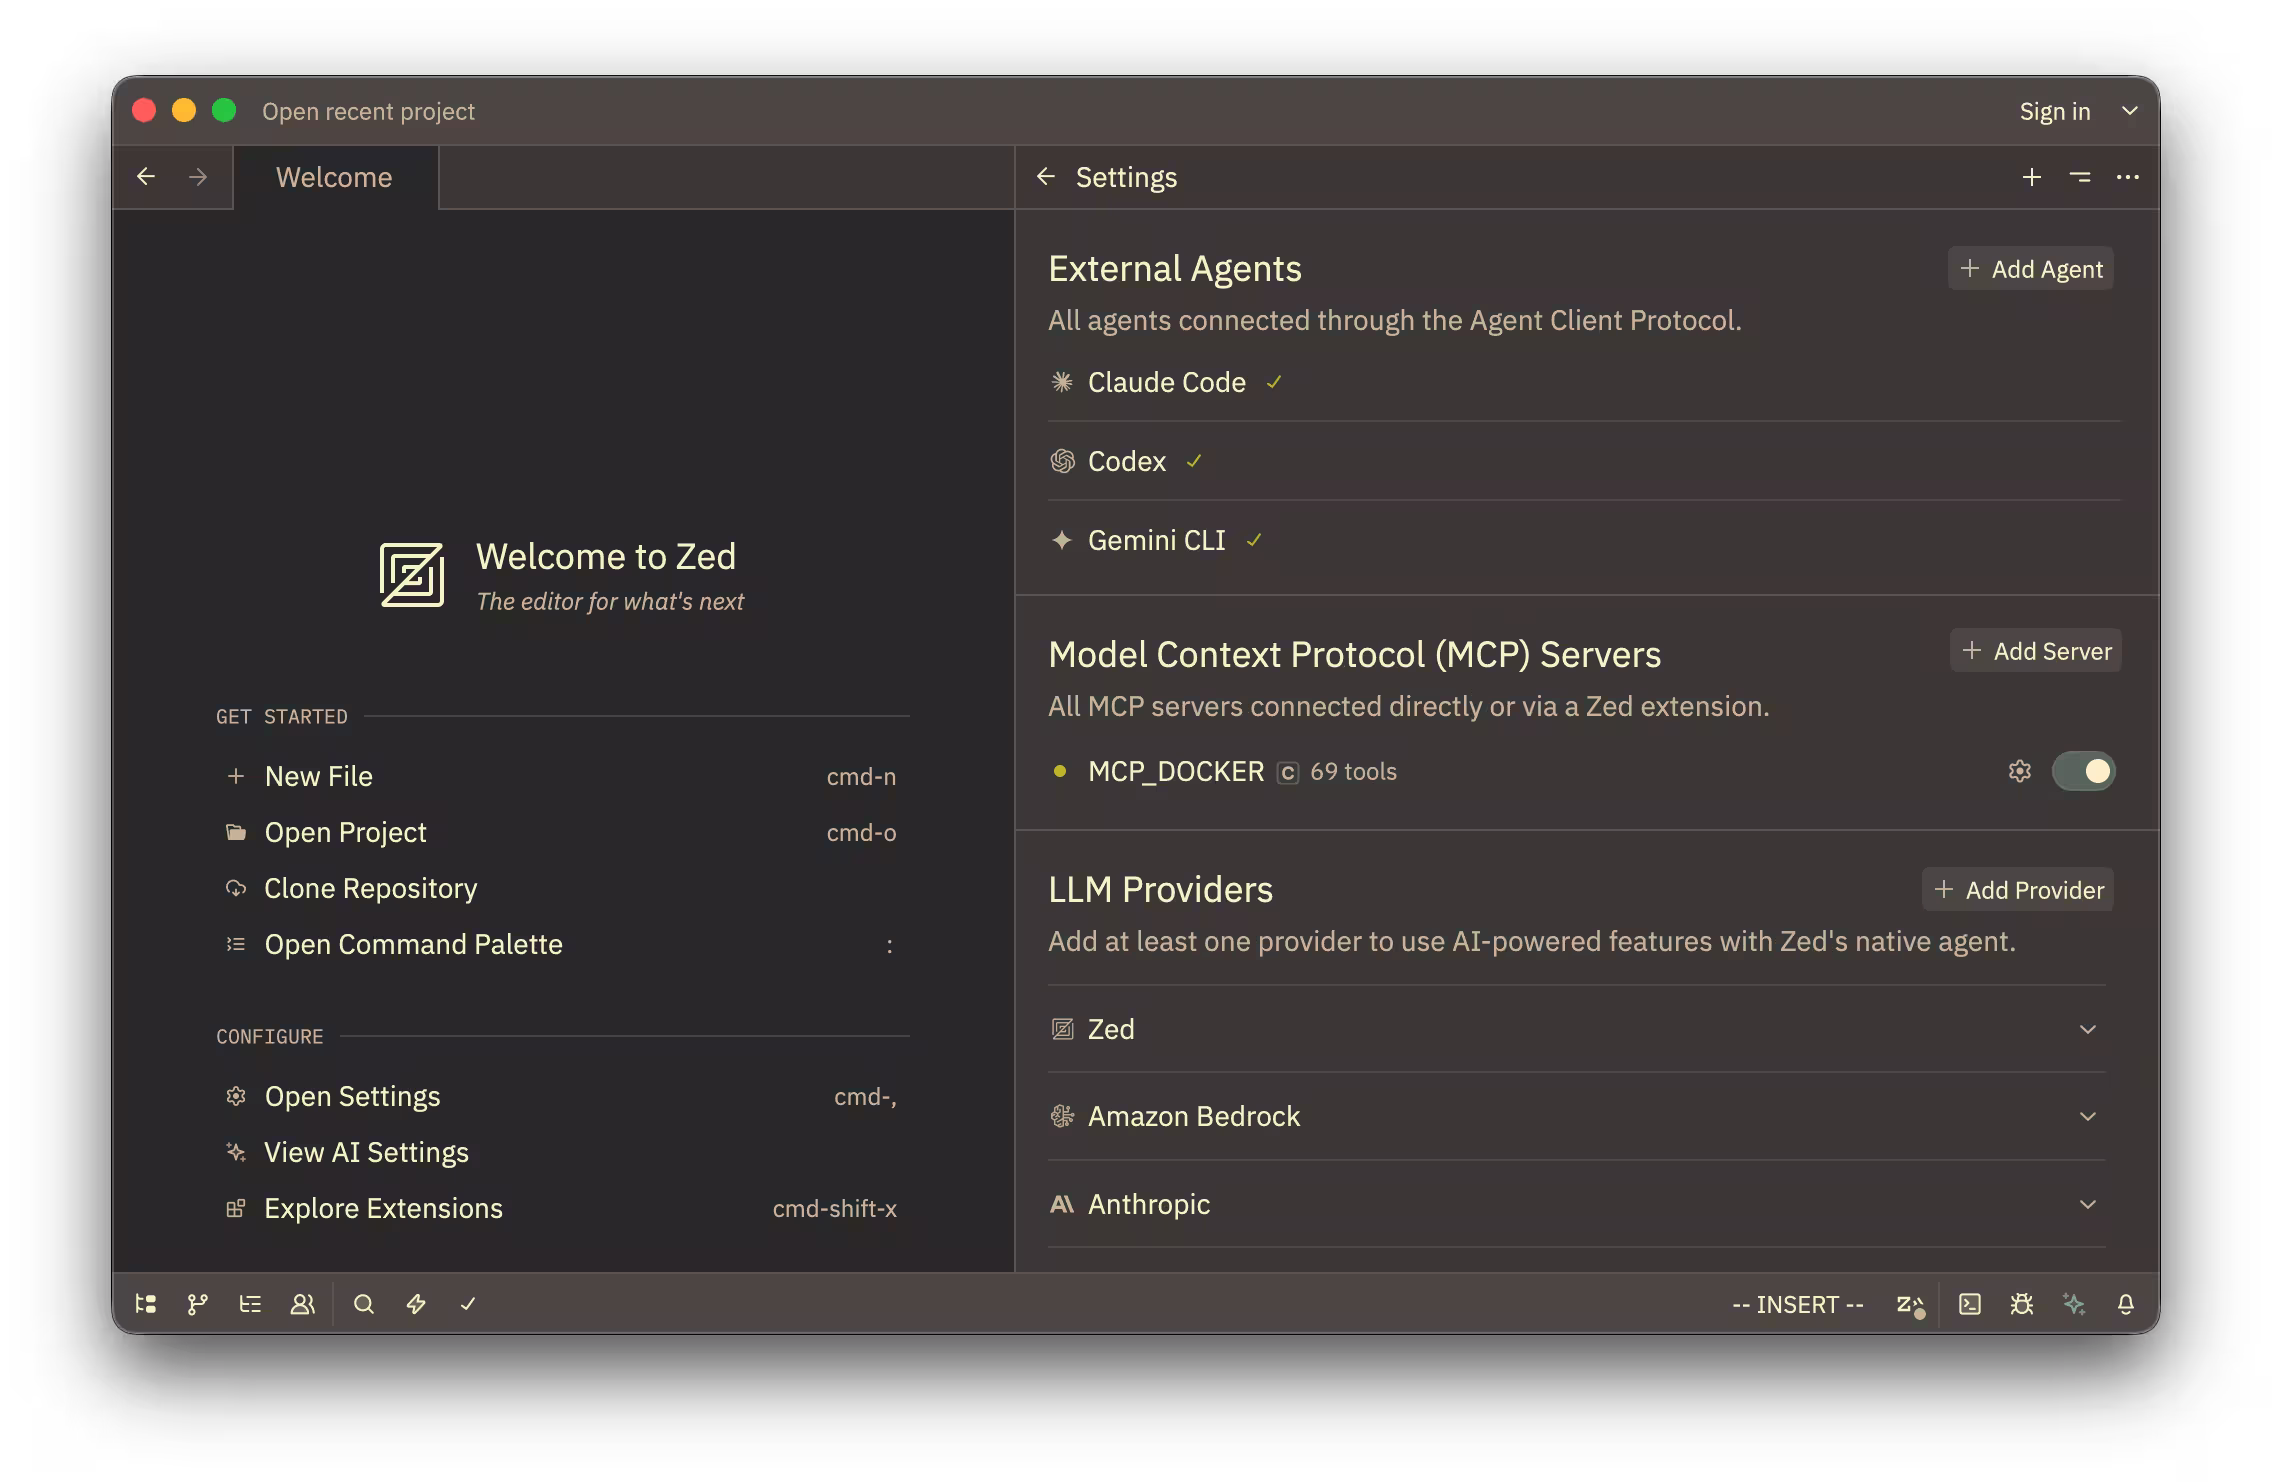
Launch Zed and open agent settings:
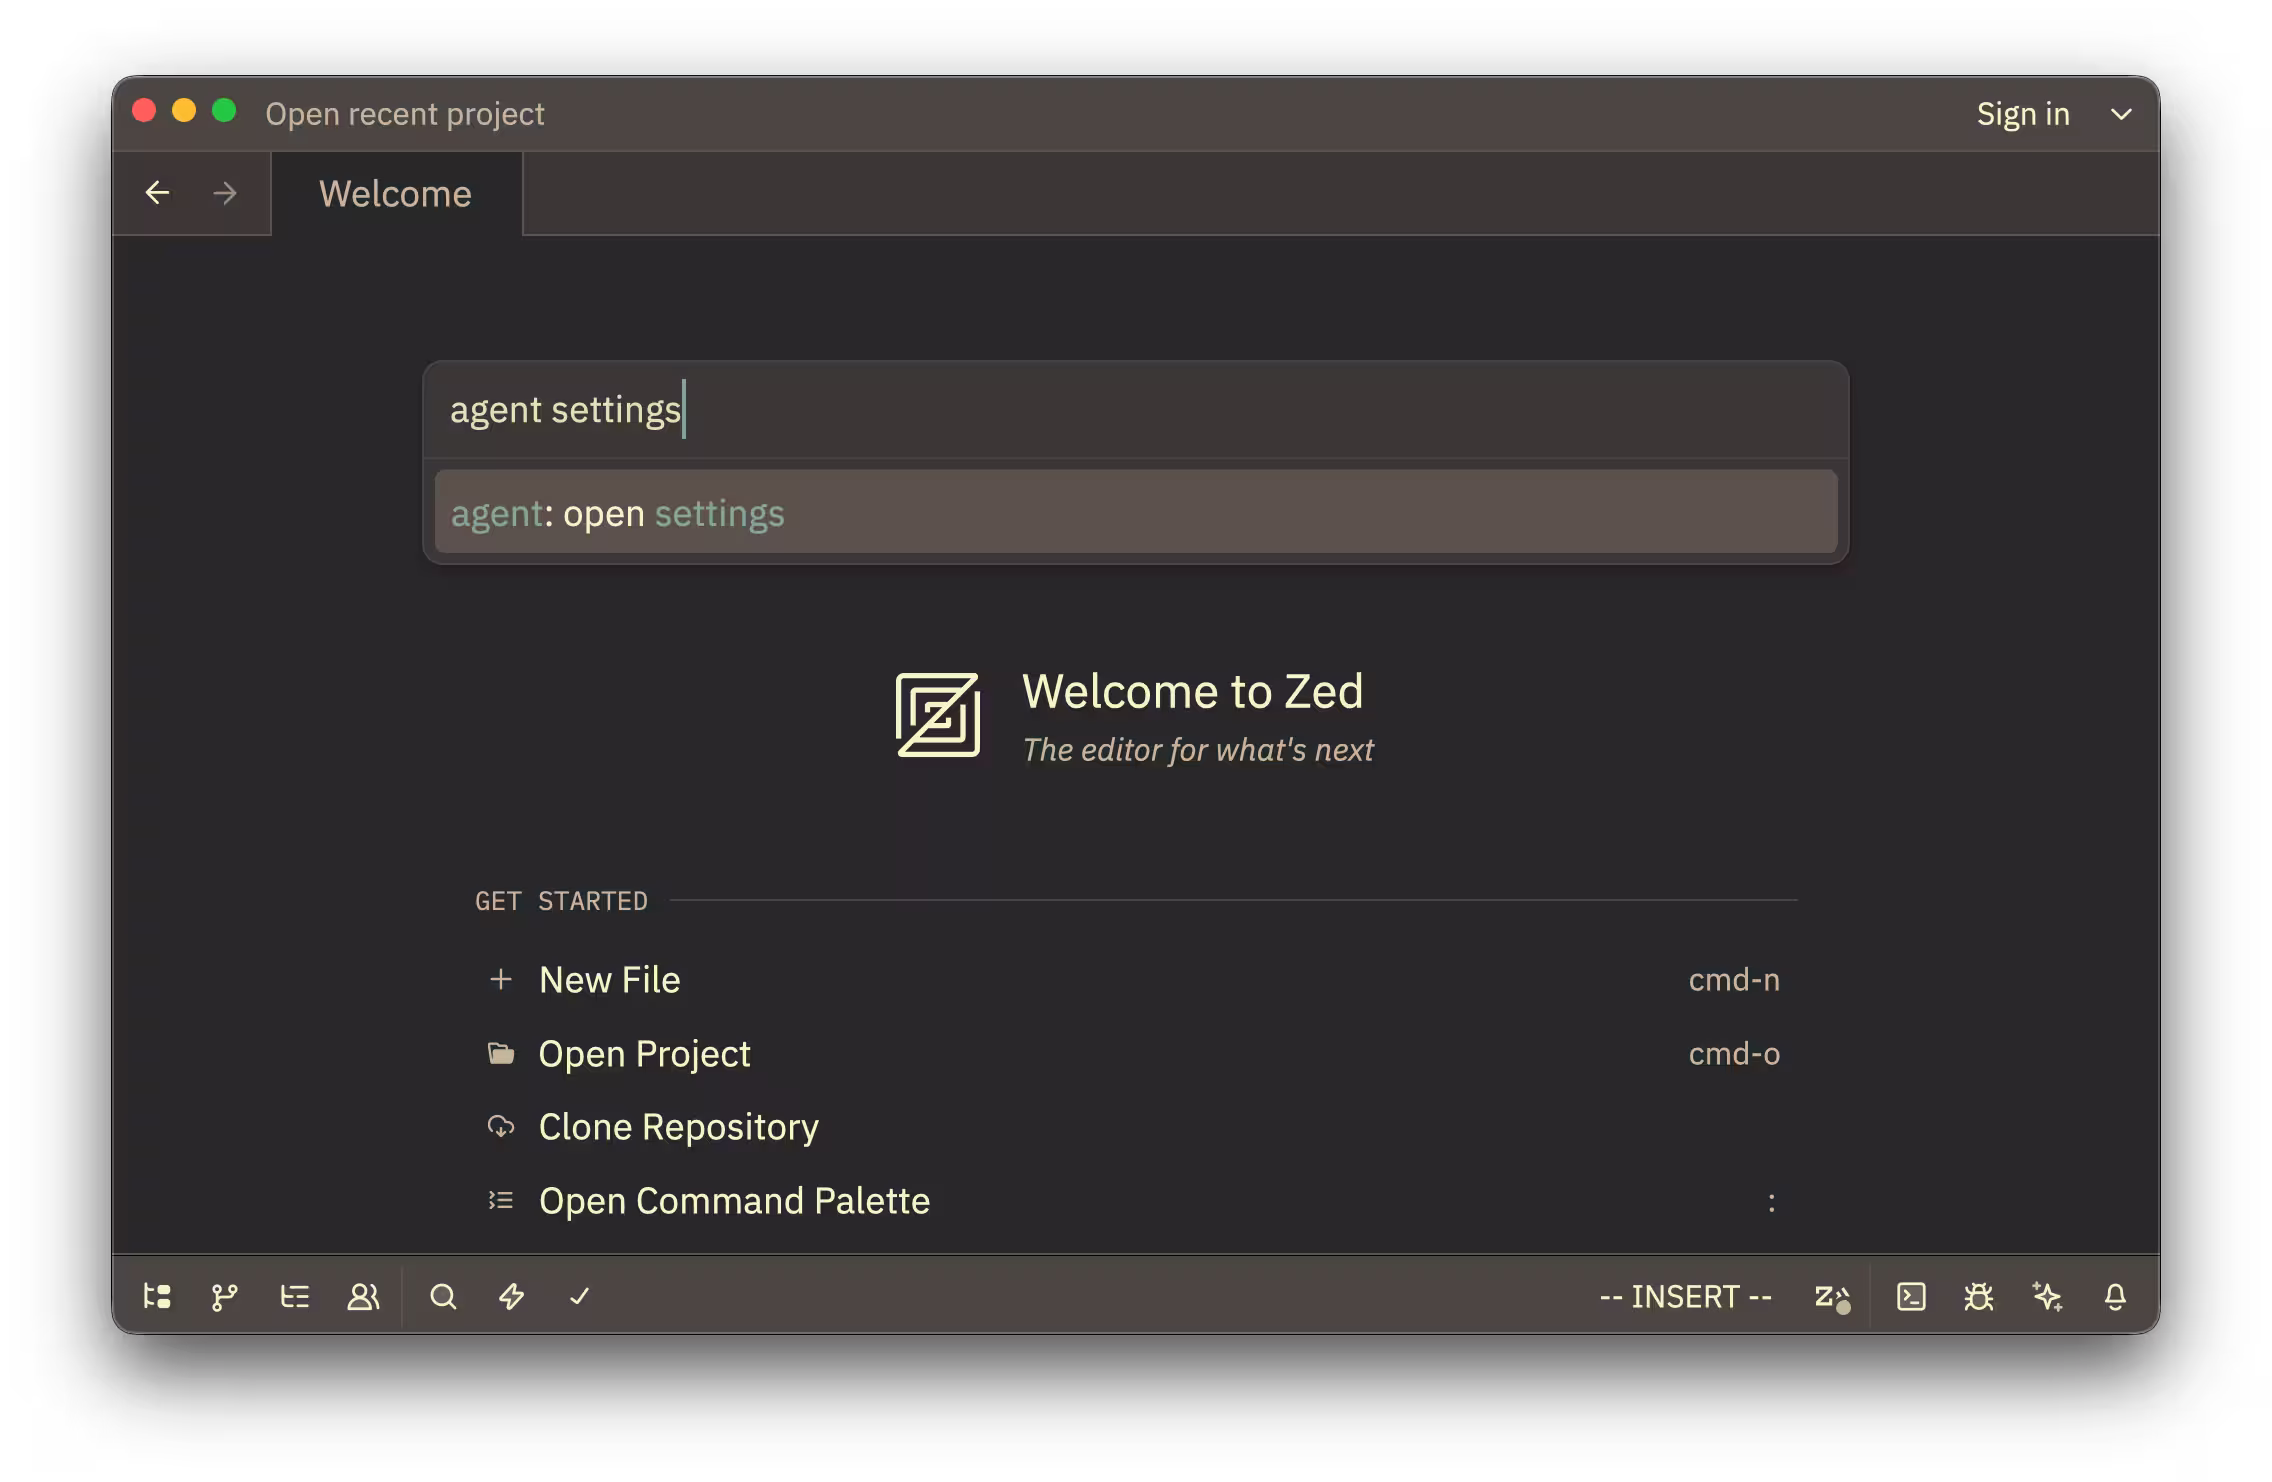
Ensure that MCP_DOCKER is listed and enabled in the MCP Servers section:
Test the connection by submitting a prompt that invokes one of your installed MCP servers:
Use the GitHub MCP server to show me my open pull requests