イメージレイヤーの理解
内容説明
コンテナーとは? において学んだように、コンテナーイメージは数々のレイヤーから構成されます。 ひとたびレイヤーが作り出されると、それ以降は不変です。 さてこれは実際には何を意味するのでしょう? このレイヤーは、どのようにしてコンテナーが利用するファイルシステムを作り出すのでしょう?
イメージレイヤー
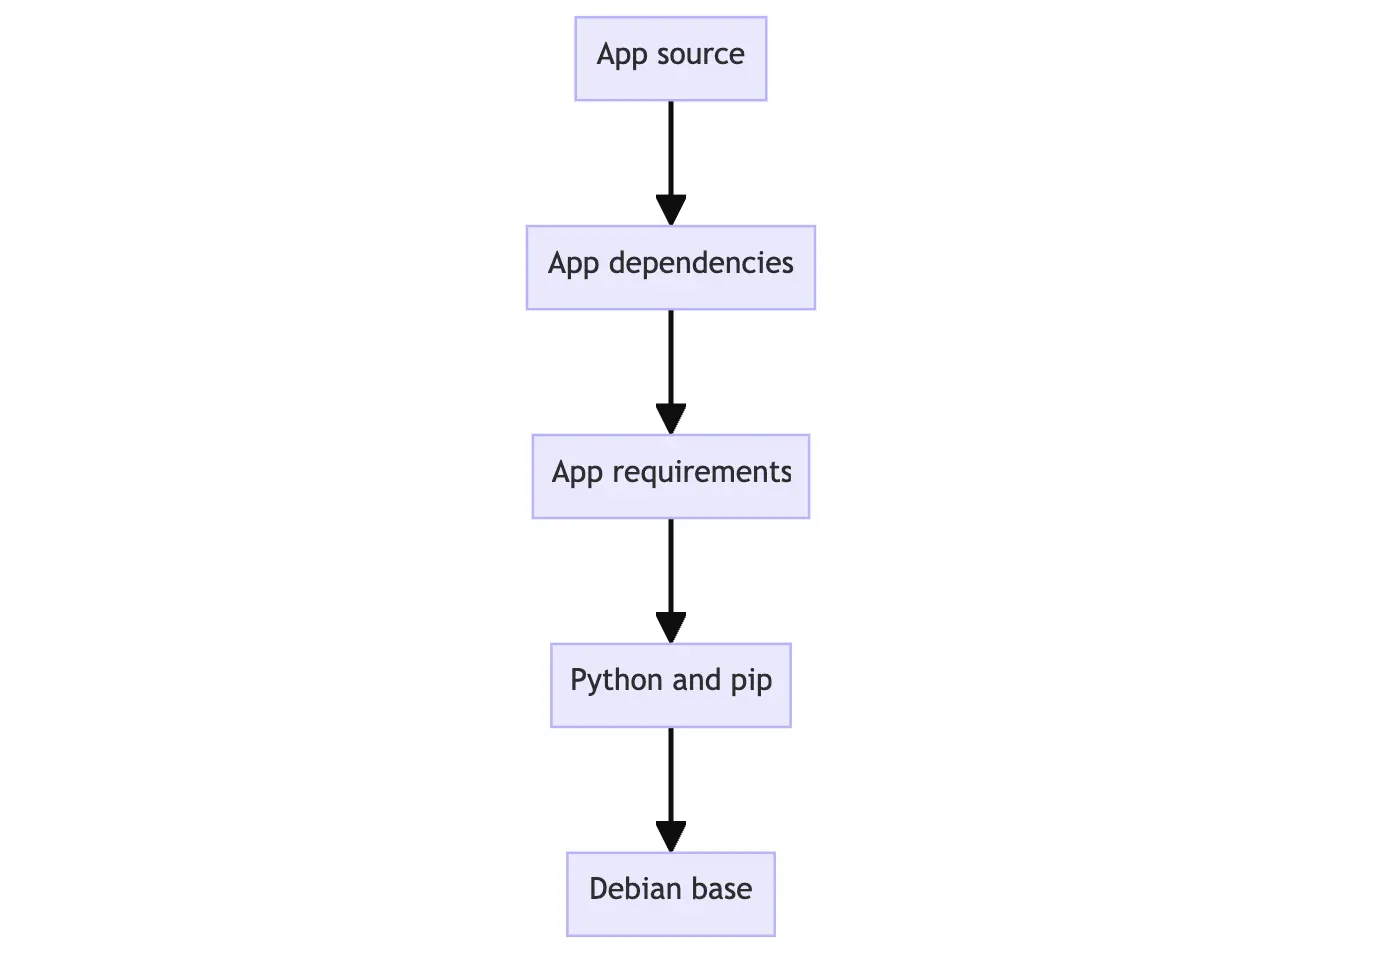
イメージ内にある各レイヤーには、ファイルシステムへの変更、つまり追加、削除、修正といった内容が含まれています。 では理論的にイメージを考えていきます。
- 1 つめのレイヤーでは、基本コマンドと apt のようなパッケージマネージャーを追加します。
- 2 つめのレイヤーでは、Python ランタイムと依存パッケージ管理を行う pip をインストールします。
- 3 つめのレイヤーでは、アプリケーションに固有の requirements.txt ファイルをコピーします。
- 4 つめのレイヤーでは、アプリケーションの依存パッケージをインストールします。
- 5 つめのレイヤーでは、そのアプリケーションのソースコードをコピーします。
この例は以下のようになります。


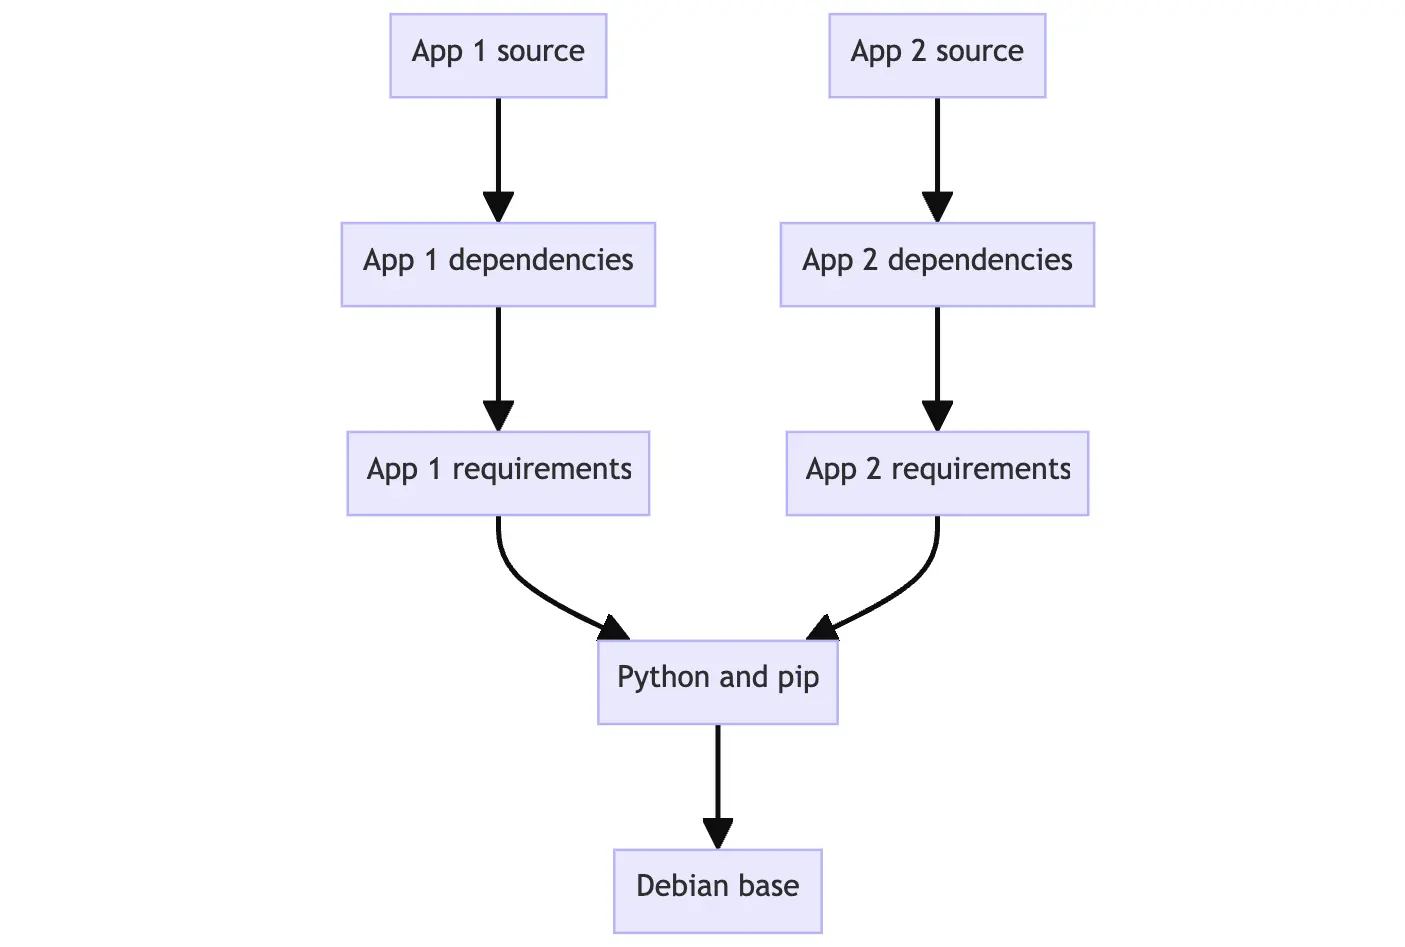
この形はイメージ間においてレイヤーを再利用できるものとして優れています。 たとえば別の Python アプリケーションを生成することを考えてみればわかります。 レイヤーに分けているからこそ、Python のベース部分を共有できます。 こうすればビルド時間はより早くなり、イメージを配布する際のストレージ容量や帯域幅を減らすことができます。 イメージレイヤーの様子は、以下のように示すこともできます。


レイヤーに分けているので、ベースとなっているレイヤーを再利用したイメージの拡張が可能です。 この場合は、アプリケーションが必要としているデータを追加するだけです。
積み上がったレイヤーの様子
レイヤー化は、コンテンツのアドレス指定可能なストレージとユニオンファイルシステムを用いることで実現されます。 これは少々技術的な話になりますが、どのように機能しているのかをここに説明します。
- 各レイヤーがダウンロードされると、ホストのファイルシステム上の所定のディレクトリごとに展開されます。
- イメージからコンテナーを実行すると、各レイヤーが積み重なったその上部に、ユニオンファイルシステムが生成され、新たにそれらが統合されたディレクトリビューが生成されます。
- コンテナーが実行されると、ルートディレクトリは
chrootを用いてその統合されたディレクトリに設定されます。
ユニオンファイルシステムが生成されると、イメージレイヤーとは別に、コンテナー実行用としてのディレクトリが生成されます。 このディレクトリを使うことで、コンテナーからのファイルシステムの変更が可能になります。 その場合に、オリジナルのイメージレイヤーは不変のままです。 この仕組みを使えば、同一のイメージから作り出されたコンテナーを複数実行することが可能になります。
やってみよう
このハンズオンガイドでは docker container commit コマンドを使って、新たなイメージレイヤーを手動で生成します。
なおこのようにしてイメージを生成することは、まずありません。
普通なら Dockerfile を利用します。
これを行う目的は、どのように動作しているのかを簡単に理解できるようにするためです。
ベースイメージの生成
はじめのステップとして、ここからの作業に利用するベースイメージの生成を行います。
Docker Desktop を ダウンロードおよびインストール します。
端末画面から以下のコマンドを実行して新たなコンテナーを起動します。
$ docker run --name=base-container -ti ubuntu対応するイメージがダウンロードされコンテナーが起動すると、新たなシェルプロンプトが表示されるはずです。 これはコンテナー内部です。 以下のような表示になっているでしょう (コンテナー ID は異なっているはずです)。
root@d8c5ca119fcd:/#コンテナーの中において以下のコマンドを実行して Node.js をインストールします。
$ apt update && apt install -y nodejsこのコマンドが実行されると Node のダウンロードとインストールがコンテナー内部において行われます。 ユニオンファイルシステムの中での変更は、このコンテナーに固有に割り当てられたディレクトリに対して行われます。
Node がインストールされたことを確認するために以下を実行します。
$ node -e 'console.log("Hello world!")'端末画面に “Hello world!”が表示されたはずです。
Node をインストールしたので、新たなイメージレイヤーに対して行った変更を保存できるようになりました。 このレイヤーから新たなコンテナーを起動したり新たなイメージをビルドできるわけです。 これを実際に行うには
docker container commitコマンドを実行します。 新たな端末画面を立ち上げて以下のコマンドを実行します。$ docker container commit -m "Add node" base-container node-basedocker image historyコマンドを実行して、イメージ内のレイヤーを確認します。$ docker image history node-base以下と同様の出力が得られるはずです。
IMAGE          CREATED          CREATED BY                                      SIZE      COMMENT
9e274734bb25   10 seconds ago   /bin/bash                                       157MB     Add node
cd1dba651b30   7 days ago       /bin/sh -c #(nop)  CMD ["/bin/bash"]            0B
<missing>      7 days ago       /bin/sh -c #(nop) ADD file:6089c6bede9eca8ec…   110MB
<missing>      7 days ago       /bin/sh -c #(nop)  LABEL org.opencontainers.…   0B
<missing>      7 days ago       /bin/sh -c #(nop)  LABEL org.opencontainers.…   0B
<missing>      7 days ago       /bin/sh -c #(nop)  ARG LAUNCHPAD_BUILD_ARCH     0B
<missing>      7 days ago       /bin/sh -c #(nop)  ARG RELEASE                  0B
最上位の行に“Add node”というコメントがあります。 このレイヤーには、先に行った Node.js のインストール内容が含まれているわけです。
To prove your image has Node installed, you can start a new container using this new image:
$ docker run node-base node -e "console.log('Hello again')"With that, you should get a “Hello again” output in the terminal, showing Node was installed and working.
Now that you’re done creating your base image, you can remove that container:
$ docker rm -f base-container
Base image definition
A base image is a foundation for building other images. It's possible to use any images as a base image. However, some images are intentionally created as building blocks, providing a foundation or starting point for an application.
In this example, you probably won’t deploy this
node-baseimage, as it doesn’t actually do anything yet. But it’s a base you can use for other builds.
アプリイメージのビルド
Now that you have a base image, you can extend that image to build additional images.
Start a new container using the newly created node-base image:
$ docker run --name=app-container -ti node-baseInside of this container, run the following command to create a Node program:
$ echo 'console.log("Hello from an app")' > app.jsTo run this Node program, you can use the following command and see the message printed on the screen:
$ node app.jsIn another terminal, run the following command to save this container’s changes as a new image:
$ docker container commit -c "CMD node app.js" -m "Add app" app-container sample-appThis command not only creates a new image named
sample-app, but also adds additional configuration to the image to set the default command when starting a container. In this case, you are setting it to automatically runnode app.js.In a terminal outside of the container, run the following command to view the updated layers:
$ docker image history sample-appYou’ll then see output that looks like the following. Note the top layer comment has “Add app” and the next layer has “Add node”:
IMAGE          CREATED              CREATED BY                                      SIZE      COMMENT
c1502e2ec875   About a minute ago   /bin/bash                                       33B       Add app
5310da79c50a   4 minutes ago        /bin/bash                                       126MB     Add node
2b7cc08dcdbb   5 weeks ago          /bin/sh -c #(nop)  CMD ["/bin/bash"]            0B
<missing>      5 weeks ago          /bin/sh -c #(nop) ADD file:07cdbabf782942af0…   69.2MB
<missing>      5 weeks ago          /bin/sh -c #(nop)  LABEL org.opencontainers.…   0B
<missing>      5 weeks ago          /bin/sh -c #(nop)  LABEL org.opencontainers.…   0B
<missing>      5 weeks ago          /bin/sh -c #(nop)  ARG LAUNCHPAD_BUILD_ARCH     0B
<missing>      5 weeks ago          /bin/sh -c #(nop)  ARG RELEASE                  0B
Finally, start a new container using the brand new image. Since you specified the default command, you can use the following command:
$ docker run sample-appYou should see your greeting appear in the terminal, coming from your Node program.
Now that you’re done with your containers, you can remove them using the following command:
$ docker rm -f app-container
さらなる情報
If you’d like to dive deeper into the things you learned, check out the following resources:
次のステップ
As hinted earlier, most image builds don’t use docker container commit. Instead, you’ll use a Dockerfile which automates these steps for you.