コンテナー化データベースの利用
Using a local containerized database offers flexibility and ease of setup, letting you mirror production environments closely without the overhead of traditional database installations. Docker simplifies this process, enabling you to deploy, manage, and scale databases in isolated containers with just a few commands.
このガイドでは以下について学びます。
- ローカルでのコンテナー化データベースの実行
- コンテナー化データベースへのシェルアクセス
- ホストからのコンテナー化データベースへの接続
- 別コンテナーからのコンテナー化データベースへの接続
- ボリューム内のデータベースデータの保存
- カスタマイズしたデータベースイメージのビルド
- Docker Compose を利用したデータベース実行
このガイドでは例として MySQL イメージを用います。 ただしその考え方は他のデータベースイメージにも適用することができます。
前提条件
このガイドの作業を進めるには Docker をすでにインストールしていることが必要です。 Docker のインストールについては Docker の入手 を参照してください。
ローカルでのコンテナー化データベースの実行
MySQL、PostgreSQL、MongoDB といった人気のデータベースシステムについては、そのほとんどが Docker Hub 上に Docker 公式イメージがあります。 そういったイメージはベストプラクティスを実現するものとして提供されており、最新機能やセキュリティアップデートが行われたものを利用することができます。 作業を進めるには Docker Hub にアクセスして、利用したいデータベースを検索します。 検索された各ページには、そのコンテナーを起動する手順、カスタマイズ方法、必要に応じたデータベース設定方法が詳細に示されています。 このガイドに示す MySQ についての情報は Docker Hub の MySQL イメージ ページを参照してください。
データベースコンテナーを起動するには Docker Desktop GUI か CLI を利用します。
CLI を使ってコンテナーを起動するには、端末から以下のコマンドを実行します。
$ docker run --name my-mysql -e MYSQL_ROOT_PASSWORD=my-secret-pw -e MYSQL_DATABASE=mydb -d mysql:latest
このコマンドは以下を行ないます。
--name my-mysqlはコンテナーに対して my-mysql という名前をつけることで参照しやすくします。-e MYSQL_ROOT_PASSWORD=my-secret-pwは MySQL の root パスワードを my-secret-pw に設定します。 my-secret-pw の部分は、環境に応じたセキュアなパスワードに置き換えてください。-e MYSQL_DATABASE=mydbの利用は任意であり、mydb という名前のデータベースを生成します。 mydb という名前は適宜変更してください。-dはコンテナーをデタッチモードで起動します。 これはつまりバックグラウンドで起動することです。mysql:latestは、MySQL イメージの最新バージョンを利用することを指示します。
コンテナーが起動しているかどうかは、端末から docker ps を実行して確認します。
GUI を使う場合、コンテナーの起動は以下のようにします。
Docker Desktop Dashboard において、画面最上段のグローバル検索欄を選びます。
検索欄に
mysqlを入力します。Images(イメージ) タブが選択されていない場合は選択します。mysqlイメージ上にマウスカーソルを移動させてRun(実行) を選びます。 Run a new container (新規コンテナーの実行) 画面が開きます。Optional settings (オプション設定) を展開します。
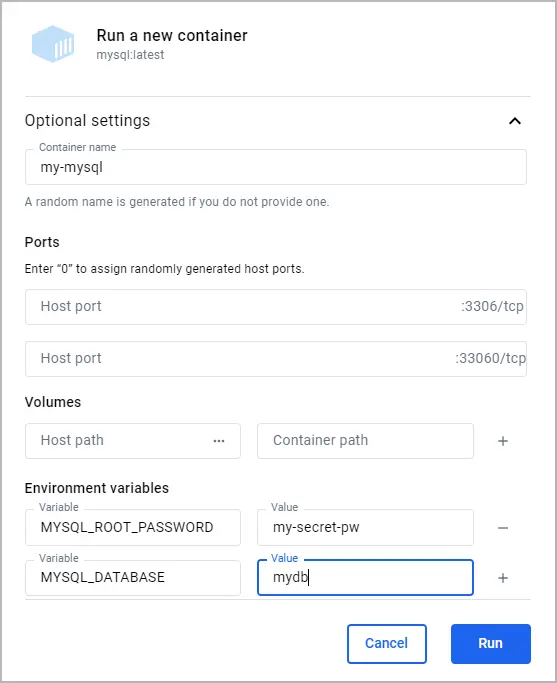
オプションの設定において以下を指定します。
- Container name (コンテナー名):
my-mysql - Environment variables (環境変数):
MYSQL_ROOT_PASSWORD:my-secret-pwMYSQL_DATABASE:mydb
- Container name (コンテナー名):
Run(実行) を選びます。Docker Dashboard Dashboard の Container (コンテナー) 画面を開いて、対象コンテナーが起動していることを確認します。
コンテナー化データベースへのシェルアクセス
Docker コンテナー内部でデータベースを起動したら、データベースの管理、コマンド実行、管理タスクの実現のため、データベースにアクセスするシェルの実行が必要になってきます。
Docker ではこれを行う簡単な方法として docker exec コマンドを提供しています。
またグラフィカルインターフェースを好むのであれば Docker Desktop GUI を利用することもできます。
データベースコンテナーをまだ起動していない場合は ローカルでのコンテナー化データベースの実行 を参照してください。
CLI を使って MySQL コンテナーの画面にアクセスするには、以下のような docker exec コマンドを実行します。
$ docker exec -it my-mysql bash
このコマンドは以下を行ないます。
docker execは、起動しているコンテナー内においてコマンド実行を行うために利用します。-itはアクセスするターミナルを対話モードとします。 そうすることでコマンド入力を行えるようにします。my-mysqlは MySQL コンテナー名です。 コンテナー実行時に別の名前としていた場合は、その名前に書き換えてください。bashはコンテナー内部で実行するコマンドです。 これによって bash シェルが開くので、コンテナー内のファイルシステムやインストール済アプリケーションとの対話的処理を行うことができます。
このコマンドの実行により、MySQL コンテナー内での bash シェルへのアクセスが可能となります。
そこから MySQL サーバーを直接管理できます。
exit を実行すれば、元のターミナル画面に戻ります。
- Docker Desktop Dashboard を開いて Containers (コンテナー) 画面を選びます。
- 対象コンテナーの Actions (動作) カラムにおいて Show container actions (コンテナー動作の確認) を選択します。 そして Open in terminal (端末を開く) を選びます。
この端末画面内において、MySQL コンテナー内部のシェルにアクセスすることができます。 そこから MySQL サーバーを直接管理できます。
コンテナーの端末にアクセスできたら、あとはコンテナー内で利用可能なツール類は何でも利用できます。
以下に示す例では、コンテナー内の mysql を使ってデータベースの一覧を表示しています。
# mysql -u root -p
Enter password: my-secret-pw

mysql> SHOW DATABASES;

+--------------------+
| Database           |
+--------------------+
| information_schema |
| mydb               |
| mysql              |
| performance_schema |
| sys                |
+--------------------+
5 rows in set (0.00 sec)
ホストからのコンテナー化データベースへの接続
コンテナー化したデータベースにホストから接続するには、コンテナー内部のポートとホストマシン上のポートをマッピングする必要があります。 そのプロセスを実現することで、コンテナー内にあるデータベースはホストマシンのネットワークからアクセス可能となります。 MySQL の場合、デフォルトのポートは 3306 です。 このポートを公開すれば、ホストマシン上にあるさまざまなデータベース管理ツールやアプリケーションが MySQL データベースとやり取りできるようになります。
作業を進めるにあたっては、本ガイドを通じて実行させてきた以前のコンテナーは削除してください。 コンテナーを停止させ削除するには、以下のいずれかを行います。
- 端末から
docker rm --force my-mysqlを実行してmy-mysqlという名前のコンテナーを削除します。 - または Docker Desktop Dashboard の Containers (コンテナー) 画面にて、対象コンテナーの横にある Delete (削除) アイコンをクリックします。
Next, you can use either the Docker Desktop GUI or CLI to run the container with the port mapped.
Run the following command in a terminal.
$ docker run -p 3307:3306 --name my-mysql -e MYSQL_ROOT_PASSWORD=my-secret-pw -e MYSQL_DATABASE=mydb -d mysql:latest
In this command, -p 3307:3306 maps port 3307 on the host to port 3306 in the container.
To verify the port is mapped, run the following command.
$ docker ps
You should see output like the following.
CONTAINER ID   IMAGE          COMMAND                  CREATED          STATUS          PORTS                               NAMES
6eb776cfd73c   mysql:latest   "docker-entrypoint.s…"   17 minutes ago   Up 17 minutes   33060/tcp, 0.0.0.0:3307->3306/tcp   my-mysql
To run a container using the GUI:
In the Docker Desktop Dashboard, select the global search at the top of the window.
Specify
mysqlin the search box, and select theImagestab if not already selected.Hover over the
mysqlimage and selectRun. The Run a new container modal appears.Expand Optional settings.
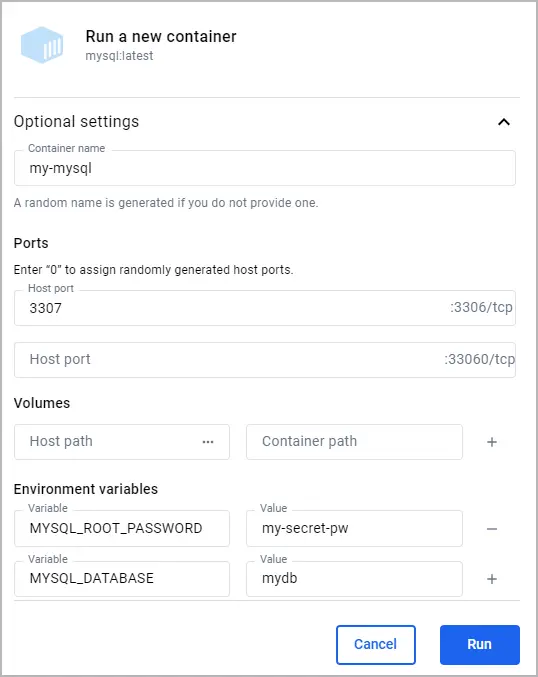
In the optional settings, specify the following:
- Container name:
my-mysql - Host port for the 3306/tcp port:
3307 - Environment variables:
MYSQL_ROOT_PASSWORD:my-secret-pwMYSQL_DATABASE:mydb
- Container name:
Select
Run.In the Containers view, verify that the port is mapped under the Port(s) column. You should see 3307:3306 for the my-mysql container.
At this point, any application running on your host can access the MySQL service in the container at localhost:3307.
Connect to a containerized database from another container
Connecting to a containerized database from another container is a common scenario in microservices architecture and during development processes. Docker's networking capabilities make it easy to establish this connection without having to expose the database to the host network. This is achieved by placing both the database container and the container that needs to access it on the same Docker network.
Before you begin, you must remove any containers you previously ran for this guide. To stop and remove a container, either:
- In a terminal, run
docker rm --force my-mysqlto remove the container namedmy-mysql. - Or, in the Docker Desktop Dashboard, select the Delete icon next to your container in the Containers view.
To create a network and run containers on it:
Run the following command to create a Docker network named my-network.
$ docker network create my-networkRun your database container and specify the network using the
--networkoption. This runs the container on the my-network network.$ docker run --name my-mysql -e MYSQL_ROOT_PASSWORD=my-secret-pw -e MYSQL_DATABASE=mydb --network my-network -d mysql:latestRun your other containers and specify the network using the
--networkoption. For this example, you'll run a phpMyAdmin container that can connect to your database.Run a phpMyAdmin container. Use the
--networkoption to specify the network, the-poption to let you access the container from your host machine, and the-eoption to specify a required environment variable for this image.$ docker run --name my-phpmyadmin -d --network my-network -p 8080:80 -e PMA_HOST=my-mysql phpmyadmin
Verify that the containers can communicate. For this example, you'll access phpMyAdmin and verify that it connects to the database.
- Open http://localhost:8080 to access your phpMyAdmin container.
- Log in using
rootas the username andmy-secret-pwas the password. You should connect to the MySQL server and see your database listed.
At this point, any application running on your my-network container network
can access the MySQL service in the container at my-mysql:3306.
Persist database data in a volume
Persisting database data in a Docker volume is necessary for ensuring that your data survives container restarts and removals. A Docker volume lets you store database files outside the container's writable layer, making it possible to upgrade the container, switch bases, and share data without losing it. Here’s how you can attach a volume to your database container using either the Docker CLI or the Docker Desktop GUI.
Before you begin, you must remove any containers you previously ran for this guide. To stop and remove a container, either:
- In a terminal, run
docker rm --force my-mysqlto remove the container namedmy-mysql. - Or, in the Docker Desktop Dashboard, select the Delete icon next to your container in the Containers view.
そこで Docker Desktop GUI または CUI を使って、ボリュームを使ったコンテナーを起動します。
To run your database container with a volume attached, include the -v option
with your docker run command, specifying a volume name and the path where the
database stores its data inside the container. If the volume doesn't exist,
Docker automatically creates it for you.
To run a database container with a volume attached, and then verify that the data persists:
Run the container and attach the volume.
$ docker run --name my-mysql -e MYSQL_ROOT_PASSWORD=my-secret-pw -e MYSQL_DATABASE=mydb -v my-db-volume:/var/lib/mysql -d mysql:latestThis command mounts the volume named
my-db-volumeto the/var/lib/mysqldirectory in the container.Create some data in the database. Use the
docker execcommand to runmysqlinside the container and create a table.$ docker exec my-mysql mysql -u root -pmy-secret-pw -e "CREATE TABLE IF NOT EXISTS mydb.mytable (column_name VARCHAR(255)); INSERT INTO mydb.mytable (column_name) VALUES ('value');"This command uses the
mysqltool in the container to create a table namedmytablewith a column namedcolumn_name, and finally inserts a value ofvalue.Stop and remove the container. Without a volume, the table you created would be lost when removing the container.
$ docker rm --force my-mysqlStart a new container with the volume attached. This time, you don't need to specify any environment variables as the configuration is saved in the volume.
$ docker run --name my-mysql -v my-db-volume:/var/lib/mysql -d mysql:latestVerify that the table you created still exists. Use the
docker execcommand again to runmysqlinside the container.$ docker exec my-mysql mysql -u root -pmy-secret-pw -e "SELECT * FROM mydb.mytable;"This command uses the
mysqltool in the container to select all the records from themytabletable.その出力結果は以下のようになるはずです。
column_name
value
To run a database container with a volume attached, and then verify that the data persists:
Run a container with a volume attached.
Docker Desktop Dashboard において、画面最上段のグローバル検索欄を選びます。
検索欄に
mysqlを入力します。 Images (イメージ) タブが選択されていない場合は選択します。msyql イメージ上にマウスカーソルを移動させて Run (実行) を選びます。 Run a new container (新規コンテナーの実行) 画面が開きます。
Optional settings (オプション設定) を展開します。
オプションの設定において以下を指定します。
- Container name (コンテナー名):
my-mysql - Environment variables (環境変数):
MYSQL_ROOT_PASSWORD:my-secret-pwMYSQL_DATABASE:mydb
- Volumes:
my-db-volume:/var/lib/mysql
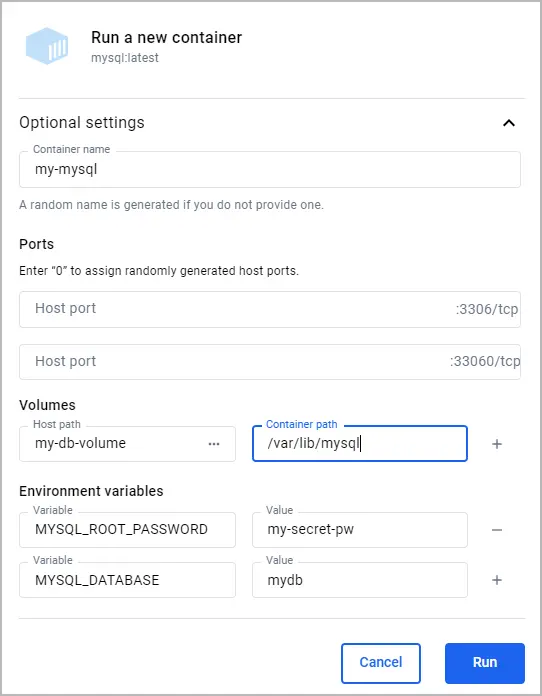
Here, the name of the volume is
my-db-volumeand it is mounted in the container at/var/lib/mysql.- Container name (コンテナー名):
Run(実行) を選びます。
Create some data in the database.
In the Containers view, next to your container select the Show container actions icon, and then select Open in terminal.
Run the following command in the container's terminal to add a table.
# mysql -u root -pmy-secret-pw -e "CREATE TABLE IF NOT EXISTS mydb.mytable (column_name VARCHAR(255)); INSERT INTO mydb.mytable (column_name) VALUES ('value');"This command uses the
mysqltool in the container to create a table namedmytablewith a column namedcolumn_name, and finally inserts a value of value`.
In the Containers view, select the Delete icon next to your container, and then select Delete forever. Without a volume, the table you created would be lost when deleting the container.
Run a container with a volume attached.
In the Docker Desktop Dashboard, select the global search at the top of the window.
Specify
mysqlin the search box, and select the Images tab if not already selected.Hover over the mysql image and select Run. The Run a new container modal appears.
Expand Optional settings.
In the optional settings, specify the following:
- Container name:
my-mysql - Environment variables:
MYSQL_ROOT_PASSWORD:my-secret-pwMYSQL_DATABASE:mydb
- Volumes:
my-db-volume:/var/lib/mysql
- Container name:
Select
Run.
Verify that the table you created still exists.
In the Containers view, next to your container select the Show container actions icon, and then select Open in terminal.
Run the following command in the container's terminal to verify that table you created still exists.
# mysql -u root -pmy-secret-pw -e "SELECT * FROM mydb.mytable;"This command uses the
mysqltool in the container to select all the records from themytabletable.You should see output like the following.
column_name
value
At this point, any MySQL container that mounts the my-db-volume will be able
to access and save persisted data.
Build a customized database image
Customizing your database image lets you include additional configuration, scripts, or tools alongside the base database server. This is particularly useful for creating a Docker image that matches your specific development or production environment needs. The following example outlines how to build and run a custom MySQL image that includes a table initialization script.
Before you begin, you must remove any containers you previously ran for this guide. To stop and remove a container, either:
- In a terminal, run
docker rm --force my-mysqlto remove the container namedmy-mysql. - Or, in the Docker Desktop Dashboard, select the Delete icon next to your container in the Containers view.
To build and run your custom image:
Create a Dockerfile.
Create a file named
Dockerfilein your project directory. For this example, you can create theDockerfilein an empty directory of your choice. This file will define how to build your custom MySQL image.Add the following content to the
Dockerfile.# syntax=docker/dockerfile:1 # Use the base image mysql:latest FROM mysql:latest # Set environment variables ENV MYSQL_DATABASE mydb # Copy custom scripts or configuration files from your host to the container COPY ./scripts/ /docker-entrypoint-initdb.d/In this Dockerfile, you've set the environment variable for the MySQL database name. You can also use the
COPYinstruction to add custom configuration files or scripts into the container. In this example, files from your host's./scripts/directory are copied into the container's/docker-entrypoint-initdb.d/directory. In this directory,.sh,.sql, and.sql.gzscripts are executed when the container is started for the first time. For more details about Dockerfiles, see the Dockerfile reference.Create a script file to initialize a table in the database. In the directory where your
Dockerfileis located, create a subdirectory namedscripts, and then create a file namedcreate_table.sqlwith the following content.
CREATE TABLE IF NOT EXISTS mydb.myothertable (
  column_name VARCHAR(255)
);

INSERT INTO mydb.myothertable (column_name) VALUES ('other_value');
You should now have the following directory structure.
├── your-project-directory/
│ ├── scripts/
│ │ └── create_table.sql
│ └── Dockerfile
Build your image.
In a terminal, change directory to the directory where your
Dockerfileis located.Run the following command to build the image.
$ docker build -t my-custom-mysql .In this command,
-t my-custom-mysqltags (names) your new image asmy-custom-mysql. The period (.) at the end of the command specifies the current directory as the context for the build, where Docker looks for the Dockerfile and any other files needed for the build.
Run your image as you did in Run a local containerized database. This time, specify your image's name instead of
mysql:latest. Also, you no longer need to specify theMYSQL_DATABASEenvironment variable as it's now defined by your Dockerfile.$ docker run --name my-mysql -e MYSQL_ROOT_PASSWORD=my-secret-pw -d my-custom-mysqlVerify that your container is running with the following command.
$ docker psYou should see output like the following.
CONTAINER ID   IMAGE              COMMAND                  CREATED        STATUS          PORTS                 NAMES
f74dcfdb0e59   my-custom-mysql   "docker-entrypoint.s…"    2 hours ago    Up 51 minutes   3306/tcp, 33060/tcp   my-mysql
Verify that your initialization script was ran. Run the following command in a terminal to show the contents of the
myothertabletable.$ docker exec my-mysql mysql -u root -pmy-secret-pw -e "SELECT * FROM mydb.myothertable;"You should see output like the following.
column_name
other_value
Any container ran using your my-custom-mysql image will have the table
initialized when first started.
Use Docker Compose to run a database
Docker Compose is a tool for defining and running multi-container Docker applications. With a single command, you can configure all your application's services (like databases, web apps, etc.) and manage them. In this example, you'll create a Compose file and use it to run a MySQL database container and a phpMyAdmin container.
To run your containers with Docker Compose:
Create a Docker Compose file.
Create a file named
compose.yamlin your project directory. This file will define the services, networks, and volumes.Add the following content to the
compose.yamlfile.services: db: image: mysql:latest environment: MYSQL_ROOT_PASSWORD: my-secret-pw MYSQL_DATABASE: mydb ports: - 3307:3306 volumes: - my-db-volume:/var/lib/mysql phpmyadmin: image: phpmyadmin/phpmyadmin:latest environment: PMA_HOST: db PMA_PORT: 3306 MYSQL_ROOT_PASSWORD: my-secret-pw ports: - 8080:80 depends_on: - db volumes: my-db-volume:For the database service:
dbis the name of the service.image: mysql:latestspecifies that the service uses the latest MySQL image from Docker Hub.environmentlists the environment variables used by MySQL to initialize the database, such as the root password and the database name.portsmaps port 3307 on the host to port 3306 in the container, allowing you to connect to the database from your host machine.volumesmountsmy-db-volumeto/var/lib/mysqlinside the container to persist database data.
In addition to the database service, there is a phpMyAdmin service. By default Compose sets up a single network for your app. Each container for a service joins the default network and is both reachable by other containers on that network, and discoverable by the service's name. Therefore, in the
PMA_HOSTenvironment variable, you can specify the service name,db, in order to connect to the database service. For more details about Compose, see the Compose file reference.
Run Docker Compose.
Open a terminal and change directory to the directory where your
compose.yamlfile is located.Run Docker Compose using the following command.
$ docker compose upYou can now access phpMyAdmin at http://localhost:8080 and connect to your database using
rootas the username andmy-secret-pwas the password.To stop the containers, press
ctrl+cin the terminal.
Now, with Docker Compose you can start your database and app, mount volumes, configure networking, and more, all with a single command.
Summary
This guide introduced you to the essentials of using containerized databases, specifically focusing on MySQL, to enhance flexibility, ease of setup, and consistency across your development environments. The use-cases covered in this guide not only streamline your development workflows but also prepare you for more advanced database management and deployment scenarios, ensuring your data-driven applications remain robust and scalable.
Related information: