ログとトラブルシューティング
読む時間の目安: 14 分
Docker Desktop では、有償サブスクリプション(Pro、Team、Business)を購入している開発者向けのサポートを提供していることをご存知ですか? Docker サポートを得るには既存プランを更新してください。詳しくは こちら を参照してください。
今すぐアップデート本ページでは Docker Desktop において問題が発生した際の分析方法や解決方法について示します。 Docker Desktop サポートへの要求を行ったり、Docker Desktop チームへログ送付してやりとりを行ったり、フォーラムや Success Center を活用したりしてください。 GitHub 上での issue の確認や情報収集を行って、既知の問題であればその回避策を探してください。
トラブルシューティング
メニューバーにある  > Troubleshoot からトラブルシューティングのオプションを確認してください。

トラブルシューティングページには以下のオプションがあります。
-
Restart Docker Desktop(Docker Desktop の再起動): Docker Desktop を再起動する場合に実行します。
-
Support(サポート): 有償の Docker サブスクリプションのユーザーは、このオプションを利用してサポートリクエストを送信することができます。 それ以外のユーザーはこのオプションによって Docker Desktop の issue 診断を行うことができます。 詳しくは 診断とフィードバック あるいは サポート を参照してください。
-
Reset Kubernetes cluster(Kubernetes クラスターのリセット): このオプションを選択すると、全スタックや Kubernetes リソースを削除します。 詳しくは Kubernetes を参照してください。
-
Clean / Purge data(): コンテナーとイメージデータを削除するときにこのオプションを実行します。 削除するデータが Hyper-V、WSL 2、Windows コンテナーのものかどうかを選び、Delete をクリックして確認します。
-
Reset to factory defaults(インストール時のデフォルトにリセット): Docker Desktop におけるオプションをすべて初期状態にリセットするときに、このオプションを実行します。 これにより Docker Desktop はインストール直後の状態と同じになります。
診断、フィードバック送信
アプリ内の診断
何か問題が発生したとして、その解決方法が本書ではわからなかったとします。 GitHub 上の Docker Desktop for Windows に対する issues や Docker Desktop for Windows フォーラム を見ても解決できなかったら、ログデータの解析をお手伝いします。 issue を報告する際には、本ページに示す情報をよく読んで、よく知られている問題に関して確認の上、報告することをお願いします。
- メニューから > Troubleshoot を実行します。
- 任意操作。Docker Desktop にサインインします。 さらに Docker アカウント にもサインインしていることを確認してください。
- Get Support をクリックします。
ここからアプリ内の Support(サポート)ページが開いて、診断情報の収集が始まります。
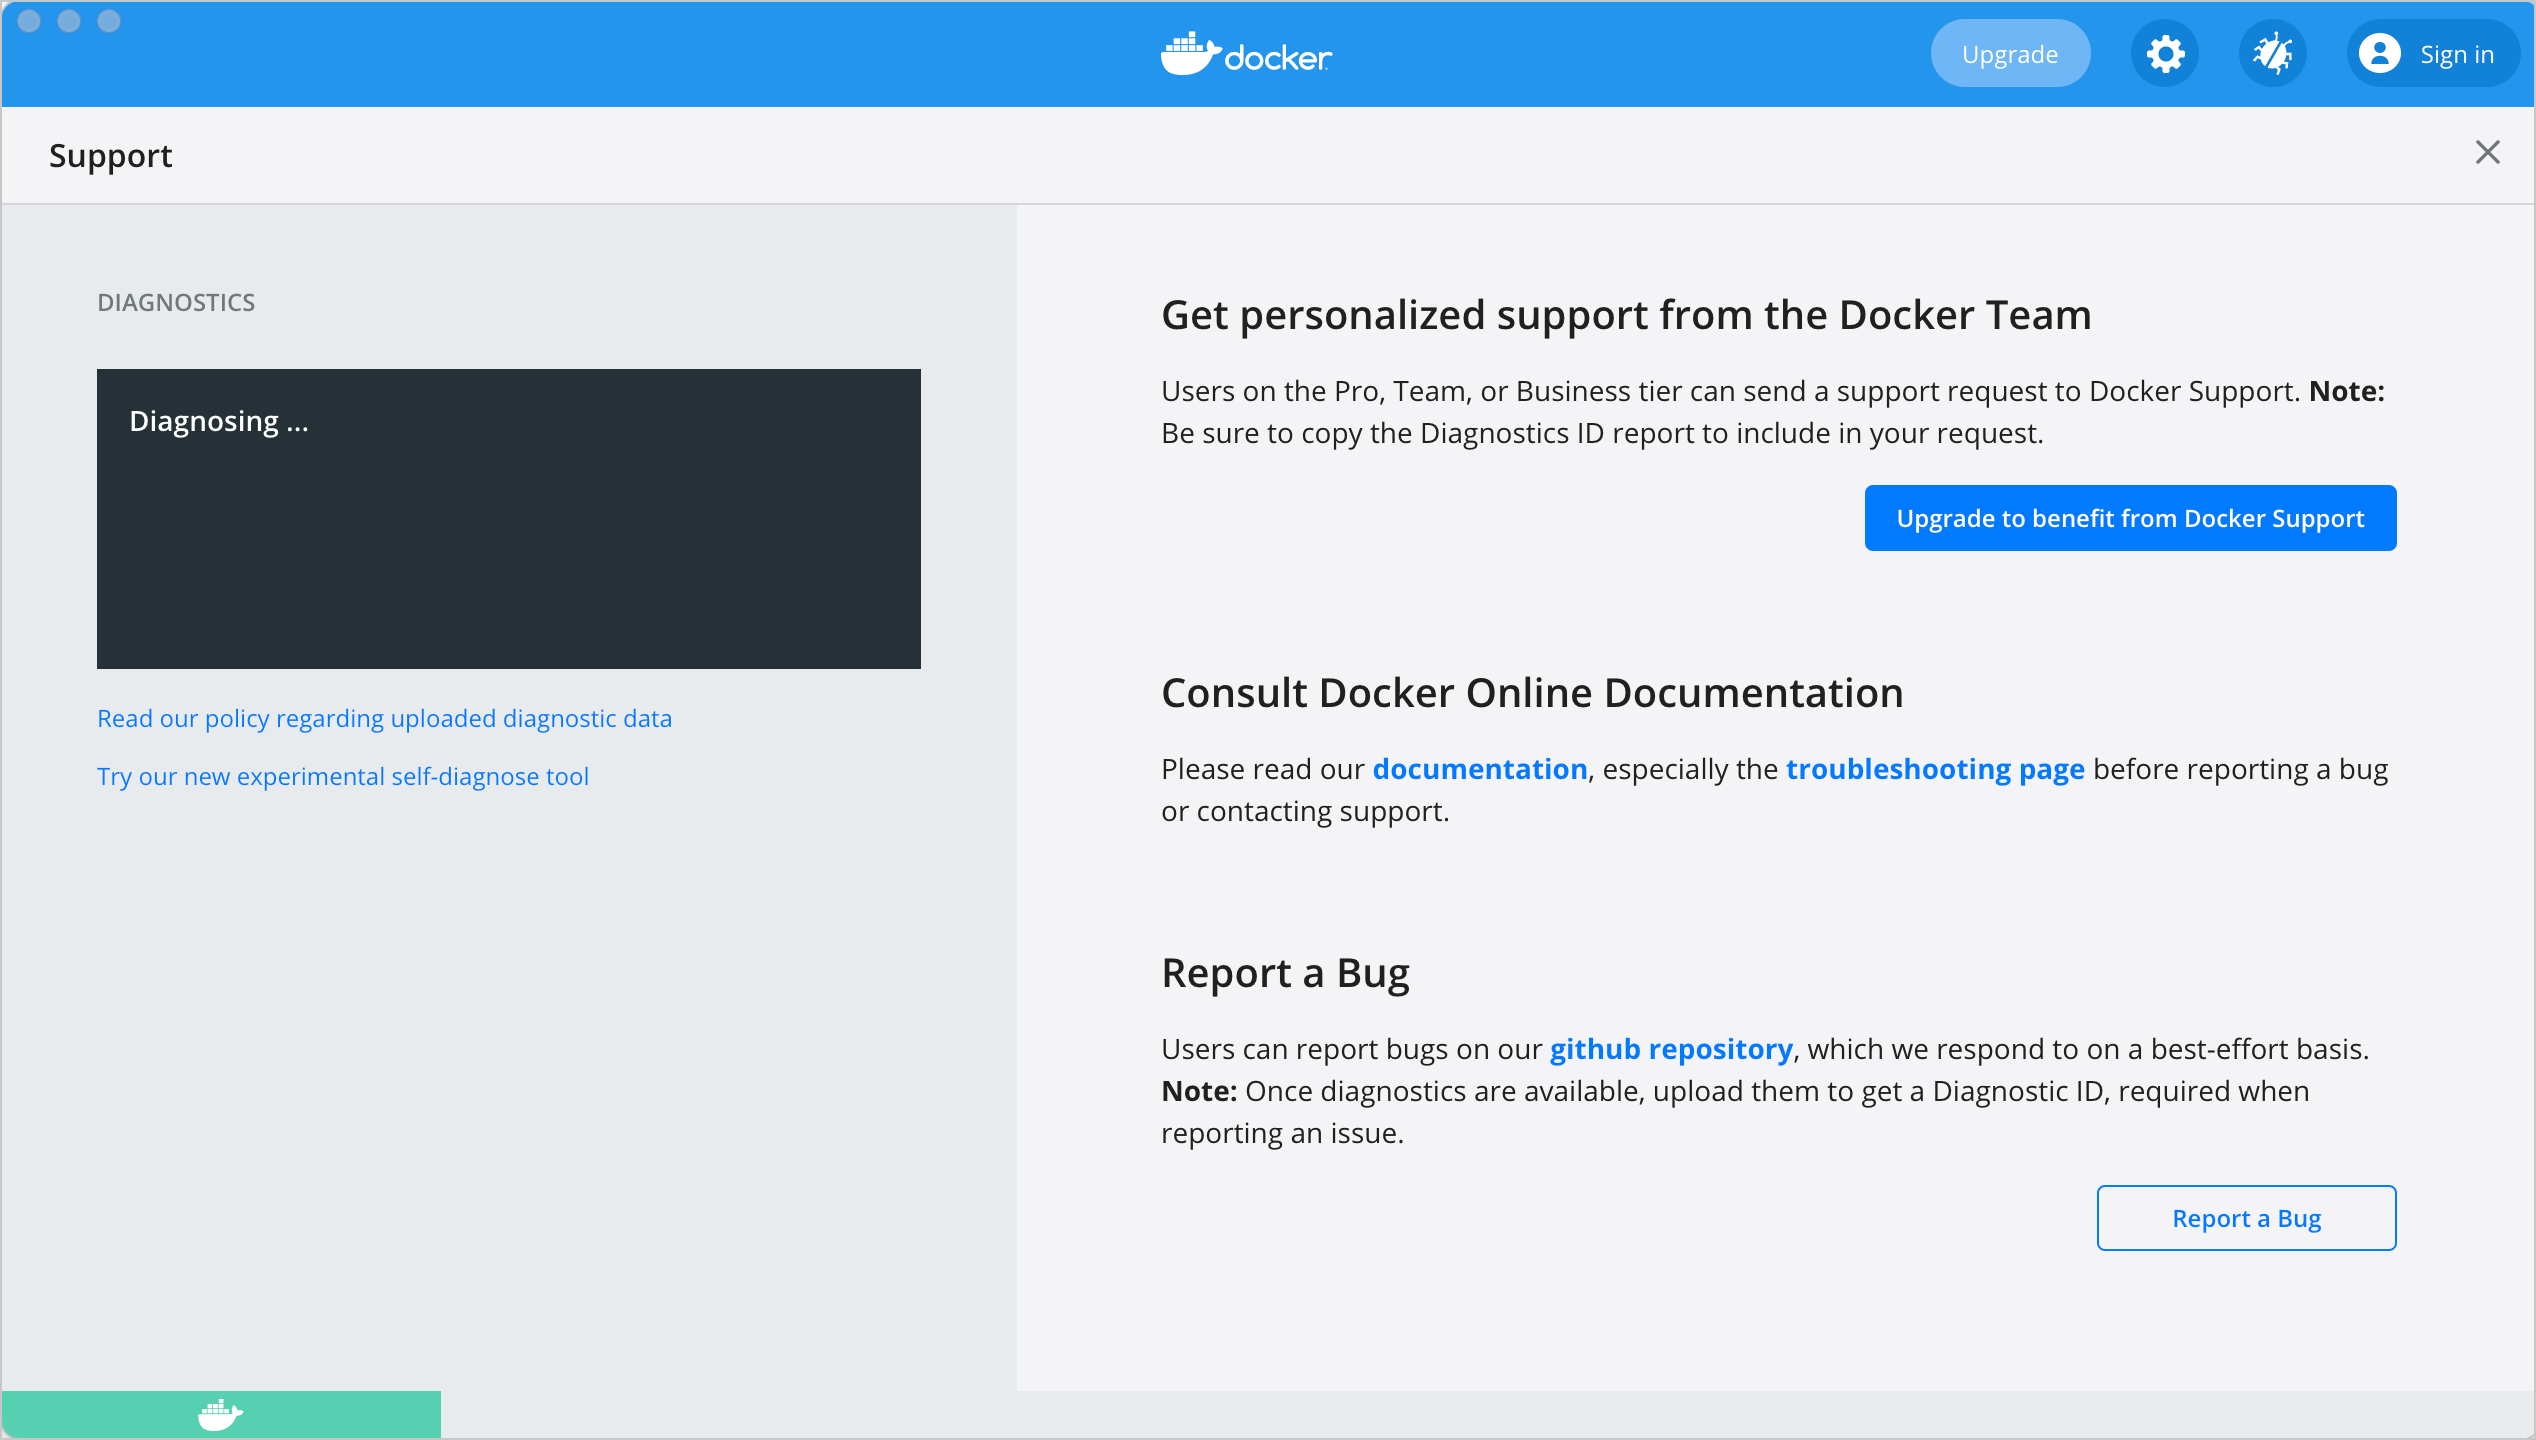
- 診断情報の収集処理が終了したら Upload to get a Diagnostic ID(アップロードと診断 ID の取得)をクリックします。
- 診断情報がアップロードされると Docker Desktop は診断 ID(Diagnostic ID)を出力するので、これをコピーします。
-
有償の Docker サブスクリプションを購入している場合は Contact support(サポートへの問い合わせ)をクリックします。 ここから Docker Desktop サポート 画面が開きます。 必要な情報を入力し、上でコピーした ID を診断 ID 欄に入力します。 そして Submit をクリックして Docker Desktop サポートへ送信します。
メモ
サポート画面にアクセスするためには、プロプランやチームプランの資格情報を利用して Docker Desktop にサインインしておく必要があります。Docker Desktop サポートに関する情報は サポート を参照してください。
- 有償の Docker サブスクリプションを購入していない場合は、Upgrade to benefit from Docker Support(アップグレードと Docker サポート取得)をクリックして既存のアカウントをアップグレードしてください。 こうすることとは別に Report a Bug(バグ報告)をクリックして GitHub 上に Docker Desktop の issue を開くこともできます。 この場合には、ウェブブラウザー上に GitHub の Docker Desktop for Windows に関する新たな issue のテンプレートが開きます。 必要な情報を書き入れた上で、上でコピーした診断 ID も忘れずに記入してください。 submit new issue をクリックして新たな issue を登録します。
ターミナルからの診断操作
診断処理は、自分で実行した方がよい場合があります。 たとえば Docker Desktop for Windows が起動できないときなどです。
まずcom.docker.diagnoseを探し出します。
おそらくC:\Program Files\Docker\Docker\resources\com.docker.diagnose.exeにあるはずです。
PowerShell において、以下のように診断情報の生成と アップロード を行います。
PS C:\> & "C:\Program Files\Docker\Docker\resources\com.docker.diagnose.exe" gather -upload
診断処理が終了すると、以下のような出力が得られます。 そこに診断 ID(Diagnostics ID)が示されます。
Diagnostics Bundle: C:\Users\User\AppData\Local\Temp\CD6CF862-9CBD-4007-9C2F-5FBE0572BBC2\20180720152545.zip
Diagnostics ID:     CD6CF862-9CBD-4007-9C2F-5FBE0572BBC2/20180720152545 (uploaded)
If you have a paid Docker subscription, open the Docker Desktop support form. Fill in the information required and add the ID to the Diagnostics ID field. Click Submit to request Docker Desktop support.
自己診断ツール
Docker Desktop には自己診断ツールが含まれます。
これを使えば、ごく普通の問題を特定できるようになります。
この自己診断ツールを実行するには、まずはcom.docker.diagnose.exeを探し出します。
通常これはC:\Program Files\Docker\Docker\resources\com.docker.diagnose.exeにあります。
自己診断ツールを PowerShell 内において実行します。
PS C:\> & "C:\Program Files\Docker\Docker\resources\com.docker.diagnose.exe" check
ツールでは一連のチェックが行われて、各チェックの後ろに PASS(成功) や FAIL(失敗) を表示します。 失敗が発生した場合、最も関連性の高いものが最後に強調して示されます。
フィードバック
フィードバックは、GitHub リポジトリの for-win に issue を生成してお知らせください。
トラブルシューティングのトピック
証明書の適切な設定確認
Docker Desktop では安全でないレジストリの証明書は無視します。
そういったレジストリに対しては、クライアント証明書を送信しません。
そのような場合、docker runのようなコマンドを使ってレジストリからプルを行おうとしても、コマンドライン上には以下のようなエラーメッセージが表示されます。
Error response from daemon: Get http://192.168.203.139:5858/v2/: malformed HTTP response "\x15\x03\x01\x00\x02\x02"
レジストリ側においても同じようにエラーになっています。
2017/06/20 18:15:30 http: TLS handshake error from 192.168.203.139:52882: tls: client didn't provide a certificate
2017/06/20 18:15:30 http: TLS handshake error from 192.168.203.139:52883: tls: first record does not look like a TLS handshake
クライアントやサーバーそれぞれの証明書の利用に関しては、導入ガイドのトピック、どうやって独自の CA 証明書を追加するか や どうやってクライアント証明書を追加するか を参照してください。
ボリューム
共有ボリューム上のデータディレクトリに対するパーミッションエラー
Windows からファイル共有を行う際、Docker Desktop は 共有ボリューム に対して、デフォルトとして 0777(userとgroupに対してread、write、execute)のパーミッションを設定します。
共有ボリュームにおけるこのデフォルトのパーミッションは、設定変更することができません。 共有ボリュームのデフォルト設定とは異なるパーミッションを必要とするアプリケーションを稼動させている場合は、ホストにマウントされていないボリュームを利用するか、デフォルトのパーミッションでも動作するようにアプリケーションの変更を行うしかありません。
FAQ にある コンテナー固有のデプロイ要件に従って共有ボリュームのパーミッションは変更できますか? も参考にしてください。
ボリュームマウントには Linux コンテナーに対する共有フォルダーが必要
ボリュームのマウントを利用しているときに、実行時エラーが発生したとします。 たとえば Docker Compose 利用時において、アプリケーションがファイルを見つけられない、ボリュームマウントに対してのアクセスが拒否される、サービスが起動しない、といったものです。 この場合は 共有フォルダー を有効にすることが必要かもしれません。
Hyper-V バックエンドを利用して Windows からファイルをマウントする場合には、Linux コンテナーに対しての共有フォルダーが必要になります。
をクリックして Settings > Shared Folders を実行し、Dockerfile やボリュームを含むフォルダーを共有してください。
シンボリックリンクのサポート
コンテナー内やコンテナー間ではシンボリックリンクが活用できます。 詳しくは FAQ 内にある Windows においてシンボリックリンクはどうやって動作するのか? を参照してください。
予期しない文法エラー回避のためコンテナー向けファイルの改行文字を Unix 風に
コンテナー内での動作に利用するファイルは、改行文字を Unix スタイルの \n にする必要があります。
これを行うべきファイルとして、ビルド時にコマンドラインから参照されるファイルや、Dockerfile 内の RUN コマンドにおいて参照されるファイルなどがあります。
Docker コンテナーやdocker buildコマンドは Unix 環境において動作しています。
したがってコンテナー内のファイルは Unix 風に行末を\nにする必要があります。
Windows スタイルの\r\nとしてはなりません。
ファイルを生成する際には十分に注意しておくことが必要です。
シェルスクリプトなどを生成するにあたって Windows ツールを使っていると、デフォルトで行末が Windows スタイルになってしまうことがあります。
そのようにして記述されたコマンドは、Unix ベースのコンテナー内において、最終的には Unix コマンドに受け渡されます。
(たとえばシェルスクリプトが/bin/shに受け渡されます。)
その際に Windows スタイルの改行文字を利用していると、docker runでは文法エラーが発生します。
この問題の利用例とその解決については、GitHub issue にある Docker RUN fails to execute shell script を参照してください。
Windows におけるパス変換
On Linux, the system takes care of mounting a path to another path. For example, when you run the following command on Linux:
$ docker run --rm -ti -v /home/user/work:/work alpine
It adds a /work directory to the target container to mirror the specified path.
However, on Windows, you must update the source path. For example, if you are using
the legacy Windows shell (cmd.exe), you can use the following command:
$ docker run --rm -ti -v C:\Users\user\work:/work alpine
This starts the container and ensures the volume becomes usable. This is possible because Docker Desktop detects the Windows-style path and provides the appropriate conversion to mount the directory.
Docker Desktop also allows you to use Unix-style path to the appropriate format. For example:
$ docker run --rm -ti -v /c/Users/user/work:/work alpine ls /work
Working with Git Bash
Git Bash (or MSYS) provides Unix-like environment on Windows. These tools apply their own preprocessing on the command line. For example, if you run the following command in Git Bash, it gives an error:
$ docker run --rm -ti -v C:\Users\user\work:/work alpine
docker: Error response from daemon: mkdir C:UsersUserwork: Access is denied.
This is because the \ character has a special meaning in Git Bash. If you are using Git Bash, you must neutralize it using \\:
$ docker run --rm -ti -v C:\\Users\\user\\work:/work alpine
Also, in scripts, the pwd command is used to avoid hardcoding file system locations. Its output is a Unix-style path.
$ pwd
/c/Users/user/work
Combined with the $() syntax, the command below works on Linux, however, it fails on Git Bash.
$ docker run --rm -ti -v $(pwd):/work alpine
docker: Error response from daemon: OCI runtime create failed: invalid mount {Destination:\Program Files\Git\work Type:bind Source:/run/desktop/mnt/host/c/Users/user/work;C Options:[rbind rprivate]}: mount destination \Program Files\Git\work not absolute: unknown.
You can work around this issue by using an extra /
$ docker run --rm -ti -v /$(pwd):/work alpine
Portability of the scripts is not affected as Linux treats multiple / as a single entry.
Each occurence of paths on a single line must be neutralized.
$ docker run --rm -ti -v /$(pwd):/work alpine ls /work
ls: C:/Program Files/Git/work: No such file or directory
In this example, The $(pwd) is not converted because of the preceding ‘/’. However, the second ‘/work’ is transformed by the
POSIX layer before passing it to Docker Desktop. You can also work around this issue by using an extra /.
$ docker run --rm -ti -v /$(pwd):/work alpine ls //work
To verify whether the errors are generated from your script, or from another source, you can use an environment variable. For example:
$ MSYS_NO_PATHCONV=1 docker run --rm -ti -v $(pwd):/work alpine ls /work
It only expects the environment variable here. The value doesn’t matter.
In some cases, MSYS also transforms colons to semicolon. Similar conversions can also occur
when using ~ because the POSIX layer translates it to a DOS path. MSYS_NO_PATHCONV also works in this case.
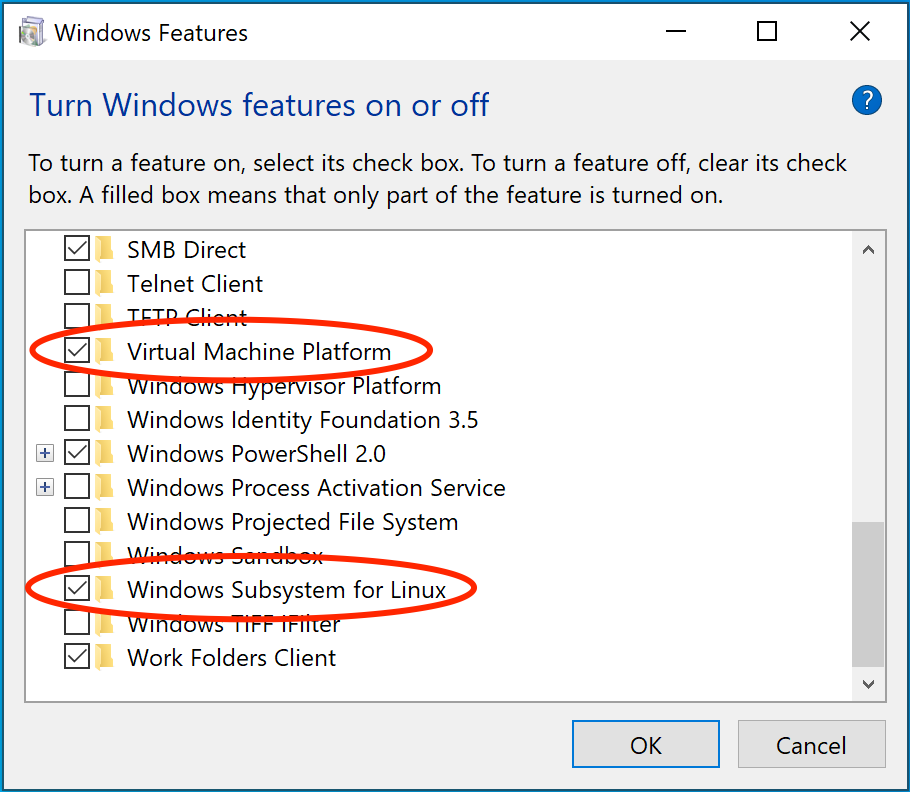
仮想化機能
Docker Desktop を正しく機能させるためには、マシンには以下の機能がなければなりません。
WSL 2 と Windows Home
- 仮想マシンプラットフォーム。
- Windows Subsystem for Linux。
- BIOS 内での仮想技術有効化。
- Windows 起動時のハイパーバイザー有効化。
Hyper-V
Windows 10 Pro または Enterprise の場合は、以下の機能を有効にした上で Hyper-V を利用することもできます。
- Hyper-V がインストールされ動作していること。
- BIOS 設定において仮想化機能(virtualization)が有効に設定されていること。
- Windows 起動時にハイパーバイザーが有効であること。
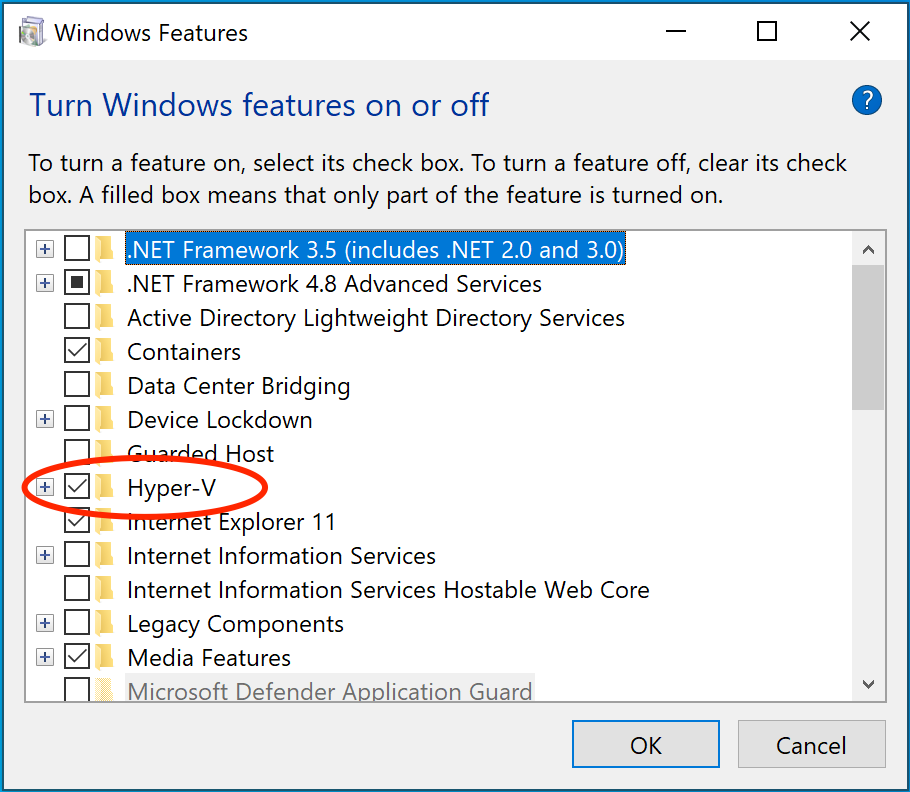
Docker Desktop では Hyper-V が必要です。 また Windows Powershell における Hyper-V モジュールがインストールされ有効であることも必要です。 Docker Desktop のインストーラーの操作時に、これらが有効になります。
Docker Desktop ではさらに、Hyper-V を利用するため、2 つの CPU ハードウェア機能も必要です。
仮想化機能(virtualization)と第 2 レベルアドレス変換機能(Second Level Address Translation; SLAT)です。
後者は RVI(Rapid Virtualization Indexing)とも呼ばれます。
システムによっては、仮想化機能は BIOS から設定しなければならないものがあります。
その設定手順はベンダー固有のものになります。
ただし通常、BIOS の設定オプションは仮想化技術(Virtualization Technology; VTx)やこれに似た用語で示されています。
systeminfoコマンドを実行して、必要となる Hyper-V 機能を確認してください。
詳しくは Pre-requisites for Hyper-V on Windows 10(Windows 10 における Hyper-V の前提条件)を参照してください。
Hyper-V を手動でインストールする場合は Install Hyper-V on Windows 10(Windows 10 における Hyper-V のインストール)を参照してください。 インストール後には再起動が 必要です。 Hyper-V のインストール後に再起動を行わないままでいると、Docker Desktop は正常に動作しません。
スタートメニューから Turn Windows features on or off と入力して ENTER キーを押してください。 表示される画面から Hyper-V が有効であることを確認してください。
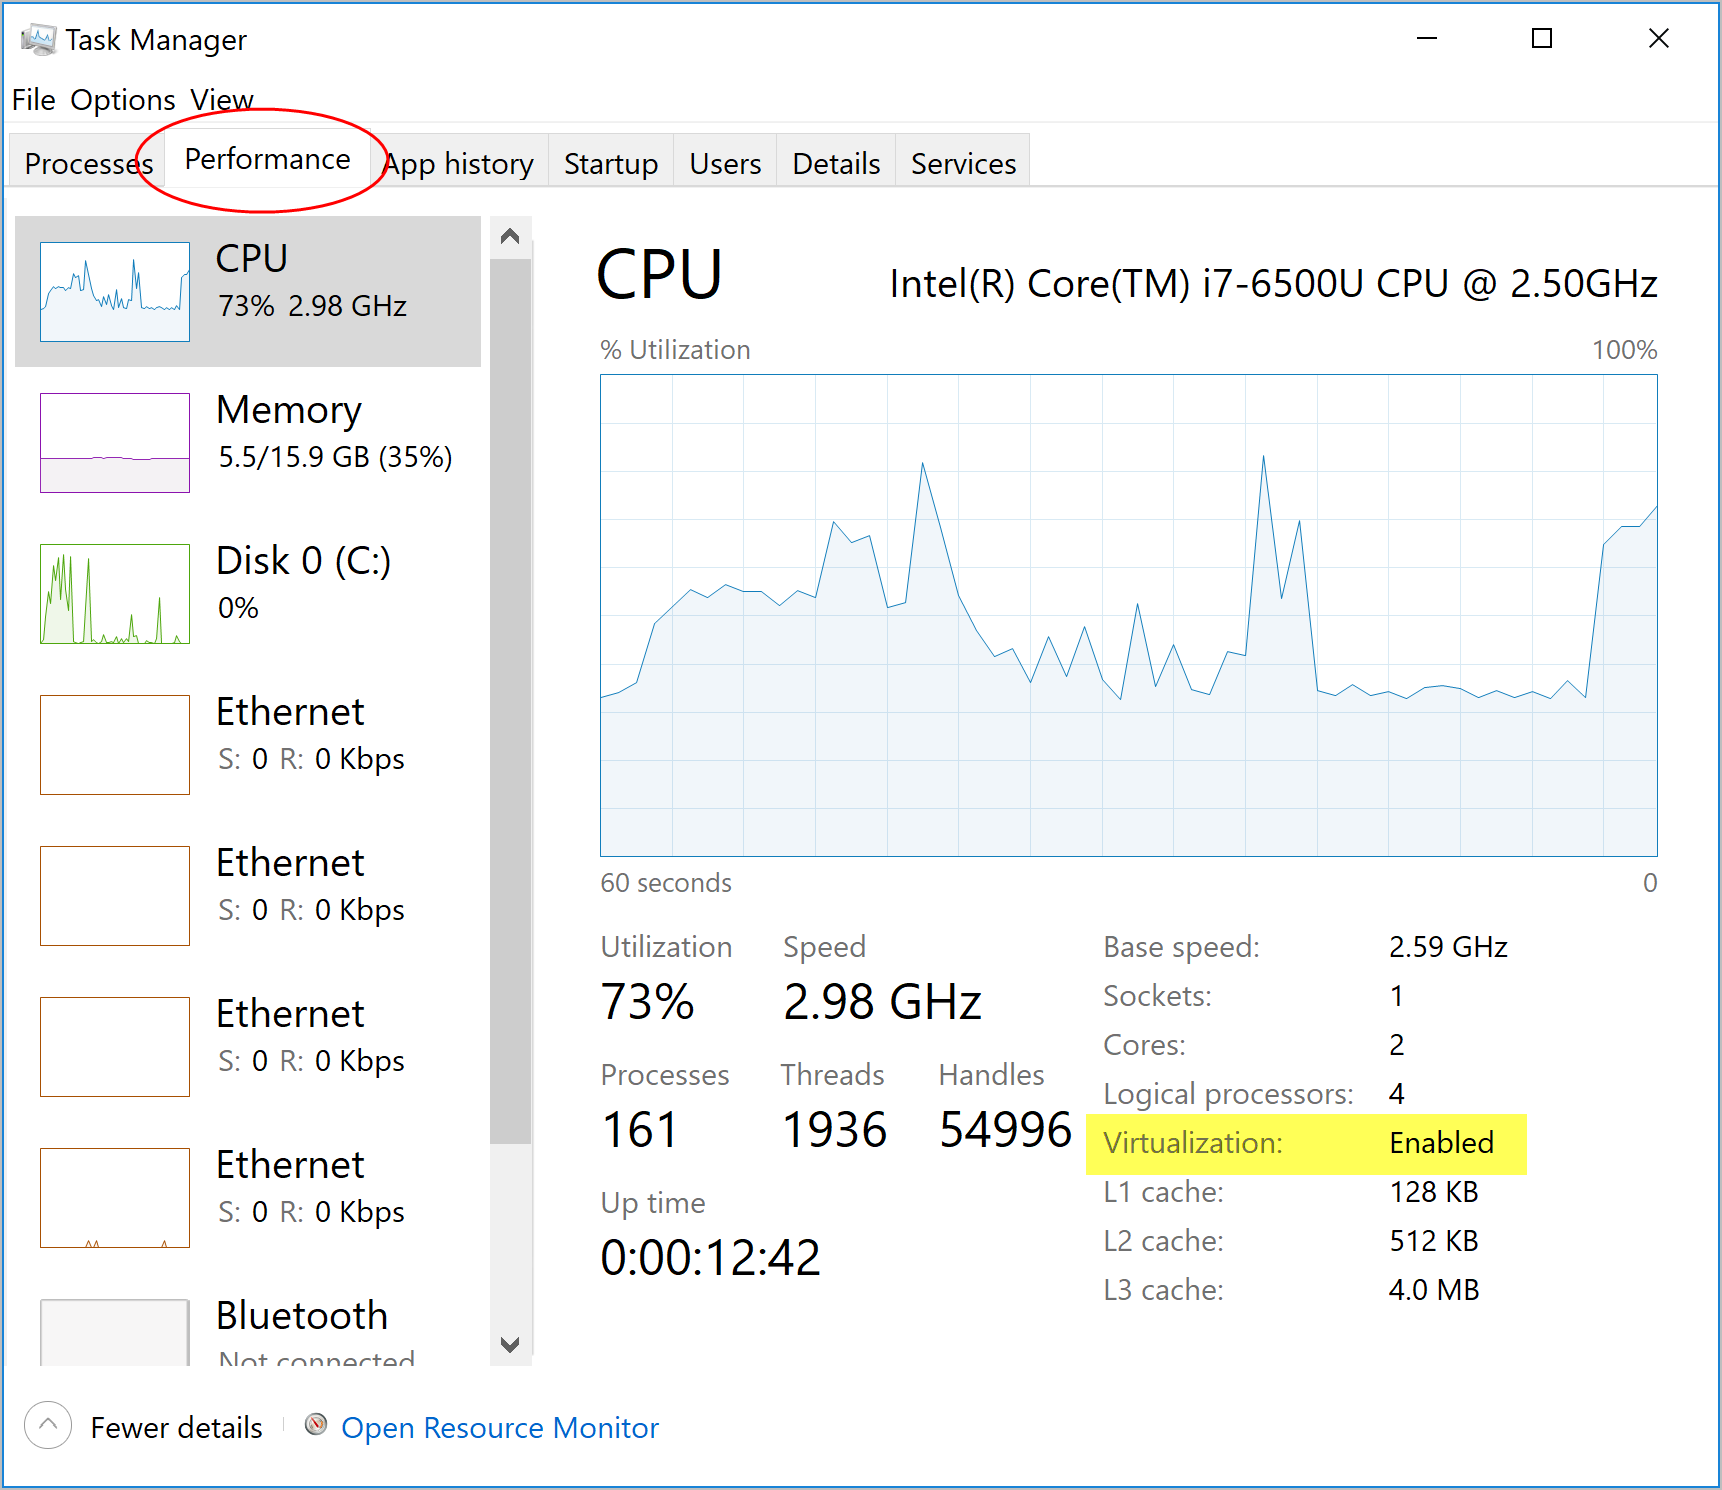
仮想化技術の有効化
Hyper-V や WSL 2 とともに、仮想化技術も有効でなければなりません。 タスクマネージャーのパフォーマンスタブを確認してください。
Hyper-V や WSL 2 を手動でアンインストールしたり、仮想化機能を無効にしていたりすると、Docker Desktop は起動しません。 Unable to run Docker for Windows on Windows 10 Enterprise(Windows 10 エンタープライズにおいて Docker for Windows が起動しない)を参照してください。
Windows 起動時のハイパーバイザーの有効化
ここまで説明している手順に従っているにも関わらず、Docker Desktop の起動に問題がある場合は、ハイパーバイザーがインストールされているものの、Windows 起動時にそれが起動されていないのかもしれません。 所定のツール(Virtual Box の旧バージョンなど)やビデオゲームのインストーラーの中には、ハイパーバイザーを起動時に無効化してしまうものがあります。 もう一度有効化するためには以下を行います。
- 管理コンソールプロンプトを開きます。
bcdedit /set hypervisorlaunchtype autoを実行します。- Windows を再起動します。
コードフローガード(Code flow guard; CFG)の設定に関しては Microsoft TechNet article も参照してください。
Windows コンテナーと Windows Server
Docker Desktop は Windows Server をサポートしていません。 Windows 10 上における Windows コンテナーの起動方法がわからない場合は、Windows と Linux の各コンテナー間の切り替え を参照してください。
docker/labs にある Getting Started with Windows Containers(Windows コンテナーをはじめよう)では、充実したチュートリアルが示されています。
Windows のネイティブなバイナリをインストールすることもできます。 これを使うと Docker Desktop を用いずに、Windows コンテナーの開発と起動が可能になります。 ただしこれを使って Docker をインストールした場合、Linux コンテナーの開発と起動ができなくなります。 Windows にネイティブな Docker デーモン上において Linux コンテナーを起動すると、以下のようなエラーが発生します。
C:\Program Files\Docker\docker.exe:
 image operating system "linux" cannot be used on this platform.
 See 'C:\Program Files\Docker\docker.exe run --help'.
ネストした仮想環境での Docker Desktop 実行
Docker Desktop は VM 環境内でも動作します。 たとえば Mac 上の Parallels や VMware Fusion といったアプリ内に、Windows 10 の VM 環境を構築して、適切な設定を行えばそこで Docker Desktop を動作させることができます。 ただしそういったアプリによるハードウェア仮想化の方式が原因で、支障が出たり断続的な障害が引き起こされる場合があります。 こういった理由から、Docker Desktop ではネスト化された仮想環境をサポートしません。 動く場合もあれば動かない場合もあるという状況です。
最適な答えは、ネイティブな Docker Desktop を動作させることです。 Docker Desktop on Windows であれば Windows コンテナーと Linux コンテナーを利用できます。 あるい Docker Desktop on Mac であれば Linux コンテナーを利用できます。
それでもネスト化仮想環境を利用したい場合
-
Make sure nested virtualization support is enabled in VMWare or Parallels. Check the settings in Hardware > CPU & Memory > Advanced Options > Enable nested virtualization (the exact menu sequence might vary slightly).
-
Configure your VM with at least 2 CPUs and sufficient memory to run your workloads.
-
システムに多少でも余裕があることを確認します。
-
Windows OS が最新であることを確認します。 インサイダービルド(Insider Build)では問題が発生する場合があります。
-
利用するプロセッサーも重要かもしれません。 たとえば Westmere ベースの Mac Pro には Nehalem ベースの Mac Pro に比べて、ハードウェア仮想機能が追加されています。 したがって、より最新に近い世代のインテルプロセッサーを利用してください。
Typical failures we see with nested virtualization
-
Slow boot time of the Linux VM. If you look in the logs and find some entries prefixed with
Moby. On real hardware, it takes 5-10 seconds to boot the Linux VM; roughly the time between theConnectedlog entry and the* Starting Docker ... [ ok ]log entry. If you boot the Linux VM inside a Windows VM, this may take considerably longer. We have a timeout of 60s or so. If the VM hasn’t started by that time, we retry. If the retry fails we print an error. You can sometimes work around this by providing more resources to the Windows VM. -
Sometimes the VM fails to boot when Linux tries to calibrate the time stamp counter (TSC). This process is quite timing sensitive and may fail when executed inside a VM which itself runs inside a VM. CPU utilization is also likely to be higher.
-
Ensure “PMU Virtualization” is turned off in Parallels on Macs. Check the settings in Hardware > CPU & Memory > Advanced Settings > PMU Virtualization.
ネットワークの問題
Docker Desktop では IPv6 は(まだ)サポートされていません。
回避策
再起動
Restart your PC to stop / discard any vestige of the daemon running from the previously installed version.
変数DOCKER_HOSTの設定解除
The DOCKER_HOST environmental variable does not need to be set. If you use
bash, use the command unset ${!DOCKER_*} to unset it. For other shells,
consult the shell’s documentation.
Make sure Docker is running for webserver examples
For the hello-world-nginx example and others, Docker Desktop must be
running to get to the webserver on http://localhost/. Make sure that the
Docker whale is showing in the menu bar, and that you run the Docker commands in
a shell that is connected to the Docker Desktop Engine. Otherwise, you might start the webserver container but get a “web page
not available” error when you go to docker.
How to solve port already allocated errors
If you see errors like Bind for 0.0.0.0:8080 failed: port is already allocated
or listen tcp:0.0.0.0:8080: bind: address is already in use ...
These errors are often caused by some other software on Windows using those
ports. To discover the identity of this software, either use the resmon.exe
GUI and click “Network” and then “Listening Ports” or in a Powershell use
netstat -aon | find /i "listening " to discover the PID of the process
currently using the port (the PID is the number in the rightmost column). Decide
whether to shut the other process down, or to use a different port in your
docker app.
アンチウィルスソフトのインストール時における Docker Desktop 起動の失敗
Some anti-virus software may be incompatible with Hyper-V and Microsoft Windows 10 builds. The conflict typically occurs after a Windows update and manifests as an error response from the Docker daemon and a Docker Desktop start failure.
For a temporary workaround, uninstall the anti-virus software, or explore other workarounds suggested on Docker Desktop forums.
サポート
This section contains instructions on how to get support, and covers the scope of Docker Desktop support.
Docker Desktop offers support for developers subscribed to a Pro, Team, or a Business tier. Upgrade now to benefit from Docker Support.
今すぐアップデートHow do I get Docker Desktop support?
If you have a paid Docker subscription, please raise a ticket through Docker Desktop support.
Docker Community users can get support through our Github repos for-win and for-mac, where we respond on a best-effort basis.
What support can I get?
If you have a paid Docker subscription, you can request for support on the following types of issues:
- Desktop upgrade issues
- Desktop installation issues
- Enabling virtualization in BIOS
- Enabling Windows features
- Installation crashes
- Failure to launch Docker Desktop on first run
- Usage issues
- Crash closing software
- Docker Desktop not behaving as expected
- Configuration issues
- Basic product ‘how to’ questions such as ‘how to work efficiently on WSL 2’
What is not supported?
Docker Desktop excludes support for the following types of issues:
- Use on or in conjunction with hardware or software other than that specified in the applicable documentation
- Running on unsupported operating systems, including beta/preview versions of operating systems
- Running containers of a different architecture using emulation
- Support for the Docker engine, Docker CLI, or other bundled Linux components
- Support for Kubernetes
- Features labeled as experimental
- System/Server administration activities
- Supporting Desktop as a production runtime
- Scale deployment/multi-machine installation of Desktop
- Routine product maintenance (data backup, cleaning disk space and configuring log rotation)
- Third-party applications not provided by Docker
- Altered or modified Docker software
- Defects in the Docker software due to hardware malfunction, abuse, or improper use
- Any version of the Docker software other than the latest version
- Reimbursing and expenses spent for third-party services not provided by Docker
- Docker Support excludes training, customization, and integration
What versions are supported?
We currently only offer support for the latest version of Docker Desktop. If you are running an older version, you may be asked to upgrade before we investigate your support request.
How many machines can I get support for Docker Desktop on?
As a Pro user you can get support for Docker Desktop on a single machine. As a Team, you can get support for Docker Desktop for the number of machines equal to the number of seats as part of your plan.
What OS’s are supported?
Docker Desktop is available for Mac and Windows. The supported version information can be found on the following pages:
Can I run Docker Desktop on Virtualized hardware?
No, currently this is unsupported and against the terms of use.
windows, troubleshooting, logs, issues