ストレージドライバーについて
読む時間の目安: 13 分
ストレージドライバーを効率よく利用するためには、Docker がどのようにしてイメージをビルドし保存するのか、またそのイメージをコンテナーがどのように利用するのかを理解しておくことが重要です。 これがわかっていれば、その知識に基づいた判断として、アプリケーションデータの適切な保存方法や、アプリケーション稼動中のパフォーマンス問題に対して、最良の方策をとることができます。
ストレージドライバー vs. Docker ボリューム
Docker uses storage drivers to store image layers, and to store data in the writable layer of a container. The container’s writable layer does not persist after the container is deleted, but is suitable for storing ephemeral data that is generated at runtime. Storage drivers are optimized for space efficiency, but (depending on the storage driver) write speeds are lower than native file system performance, especially for storage drivers that use a copy-on-write filesystem. Write-intensive applications, such as database storage, are impacted by a performance overhead, particularly if pre-existing data exists in the read-only layer.
Use Docker volumes for write-intensive data, data that must persist beyond the container’s lifespan, and data that must be shared between containers. Refer to the volumes section to learn how to use volumes to persist data and improve performance.
イメージとレイヤー
Docker イメージは一連のレイヤーから構成されます。 個々のレイヤーは、そのイメージの Dockerfile 内にある 1 つの命令に対応づいています。 一番最後にあるレイヤーを除き、これ以外はすべて読み込み専用のレイヤーです。 たとえば以下のような Dockerfile を考えてみます。
# syntax=docker/dockerfile:1
FROM ubuntu:18.04
LABEL org.opencontainers.image.authors="org@example.com"
COPY . /app
RUN make /app
RUN rm -r $HOME/.cache
CMD python /app/app.py
This Dockerfile contains four commands. Commands that modify the filesystem create
a layer. TheFROM statement starts out by creating a layer from the ubuntu:18.04
image. The LABEL command only modifies the image’s metadata, and does not produce
a new layer. The COPY command adds some files from your Docker client’s current
directory. The first RUN command builds your application using the make command,
and writes the result to a new layer. The second RUN command removes a cache
directory, and writes the result to a new layer. Finally, the CMD instruction
specifies what command to run within the container, which only modifies the
image’s metadata, which does not produce an image layer.
Each layer is only a set of differences from the layer before it. Note that both
adding, and removing files will result in a new layer. In the example above,
the $HOME/.cache directory is removed, but will still be available in the
previous layer and add up to the image’s total size. Refer to the
Best practices for writing Dockerfiles
and use multi-stage builds
sections to learn how to optimize your Dockerfiles for efficient images.
The layers are stacked on top of each other. When you create a new container,
you add a new writable layer on top of the underlying layers. This layer is often
called the “container layer”. All changes made to the running container, such as
writing new files, modifying existing files, and deleting files, are written to
this thin writable container layer. The diagram below shows a container based
on an ubuntu:15.04 image.
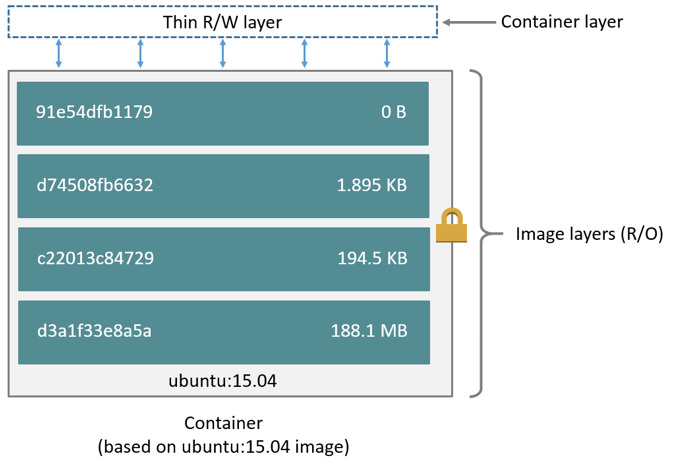
ストレージドライバー というものは、そういった各レイヤーが互いにやり取りできるようにします。 さまざまなストレージドライバーが利用可能であり、利用状況に応じて一長一短があります。
コンテナーとレイヤー
コンテナーとイメージの大きな違いは、最上部に書き込みレイヤーがあるかどうかです。 コンテナーに対して新たに加えられたり修正されたりしたデータは、すべてこの書き込みレイヤーに保存されます。 コンテナーが削除されると、その書き込みレイヤーも同じく削除されます。 ただしその元にあったイメージは、変更されずに残ります。
複数のコンテナーを見た場合、そのコンテナーごとに個々の書き込み可能なコンテナーレイヤーがあって、データ更新結果はそのコンテナーレイヤーに保存されます。 したがって複数コンテナーでは、同一のイメージを共有しながらアクセスすることができ、しかも個々に見れば独自の状態を持つことができることになります。 以下の図は、Ubuntu 15.04 という同一のイメージを共有する複数コンテナーを示しています。
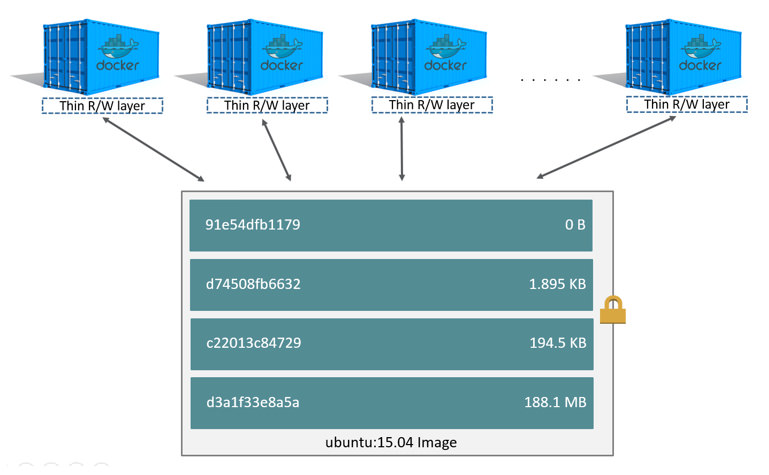
Docker はストレージドライバーを利用して、イメージレイヤーと書き込み可能なコンテナーレイヤーの各内容を管理します。 さまざまなストレージドライバーでは、異なる実装によりデータを扱います。 しかしどのようなドライバーであっても、積み上げ可能な(stackable)イメージレイヤーを取り扱い、コピーオンライト(copy-on-write; CoW)方式を採用します。
メモ
複数イメージを必要としていて、さらに同一のデータを共有してアクセスしたい場合は、Docker ボリュームを用いてください。 ボリュームについての詳細は ボリュームの節 を参照してください。
ディスク上のコンテナーサイズ
稼働中コンテナーの概算サイズを確認するにはdocker ps -sコマンドを実行します。
サイズに関連した 2 つのデータがカラム表示されます。
size=(ディスク上の)データ総量。 各コンテナーの書き込みレイヤーが利用するデータ部分です。virtual size= コンテナーにおいて利用されている読み込み専用のイメージデータと、コンテナーの書き込みレイヤーのsizeを足し合わせたデータ総量。 複数コンテナーにおいては、読み込み専用イメージデータの全部または一部を共有しているかもしれません。 1 つのイメージをベースとして作った 2 つのコンテナーでは、読み込み専用データを 100% 共有します。 一方で 2 つの異なるイメージが一部に共通するレイヤーを持っていて、そこからそれぞれに 2 つのコンテナーを作ったとすると、共有するのはその共通レイヤー部分のみです。 したがってvirtual sizeは単純に足し合わせで計算できるものではありません。 これはディスク総量を多く見積もってしまい、その量は無視できないほどになることがあります。
起動しているコンテナーすべてが利用するディスク総量は、各コンテナーのsizeとvirtual sizeを適宜組み合わせた値になります。
1 つのイメージだけに基づいた複数コンテナーの場合、そのディスク総量は、すべてのsizeの合計に 1 つのイメージサイズ(virtual size- size)を加えて得られます。
またコンテナーがディスク領域を消費するものであっても、以下に示す状況はディスク総量の算定には含まれません。
- ログドライバー を利用している場合に、そのログファイルが利用するディスク量。 コンテナーにおいてログ出力を大量に行っていて、ログローテーションを用いていない場合には、このディスク量は無視できないものになります。
- コンテナーが利用するボリュームやバインドマウント。
- コンテナーの設定ファイルが利用するディスク領域。 そのデータ容量は少ないのが普通です。
- (スワップが有効である場合に)ディスクに書き込まれるメモリデータ。
- 試験的な checkpoint/restore 機能を利用している場合のチェックポイント。
コピーオンライト方式
コピーオンライト(copy-on-write; CoW)は、ファイルの共有とコピーを最も効率よく行う方式です。 イメージ内の下の方にあるレイヤーに、ファイルやディレクトリが存在していた場合に、別のレイヤー(書き込みレイヤーを含む)からの読み込みアクセスが必要であるとします。 このときには、当然のことながら存在しているそのファイルを利用します。 そのファイルを修正する必要のある別のレイヤーがあったとすると、これを初めて修正するとき(イメージがビルドされたときやコンテナーが起動したときなど)、そのファイルはレイヤーにコピーされた上で修正されます。 こうすることで入出力を最小限に抑え、次に続くレイヤーの各サイズも増やさずに済みます。 この利点に関しては、さらに詳しく後述します。
共有によりイメージサイズはより小さく
docker pullを実行してリポジトリからイメージをプルするとき、あるいはイメージから新たにコンテナーを生成するにあたってそのイメージがまだローカルに生成されていないとき、各レイヤーはプルによって個別に取得されて、Docker のローカル保存領域、たとえば Linux では通常/var/lib/docker/に保存されます。
取得された各レイヤーは、以下の例のようにして確認することができます。
$ docker pull ubuntu:18.04
18.04: Pulling from library/ubuntu
f476d66f5408: Pull complete
8882c27f669e: Pull complete
d9af21273955: Pull complete
f5029279ec12: Pull complete
Digest: sha256:ab6cb8de3ad7bb33e2534677f865008535427390b117d7939193f8d1a6613e34
Status: Downloaded newer image for ubuntu:18.04
各レイヤーは、Docker ホストのローカル保存領域内にて、それぞれのディレクトリ配下に保存されます。
ファイルシステム上のレイヤーデータを確認するなら、/var/lib/docker/<storage-driver>の内容を一覧表示します。
以下はoverlay2ストレージドライバーに対する例です。
$ ls /var/lib/docker/overlay2
16802227a96c24dcbeab5b37821e2b67a9f921749cd9a2e386d5a6d5bc6fc6d3
377d73dbb466e0bc7c9ee23166771b35ebdbe02ef17753d79fd3571d4ce659d7
3f02d96212b03e3383160d31d7c6aeca750d2d8a1879965b89fe8146594c453d
ec1ec45792908e90484f7e629330666e7eee599f08729c93890a7205a6ba35f5
l
ディレクトリ名はレイヤー ID に対応するものではありません。
ここで 2 つの異なる Dockerfile を利用している状況を考えます。
1 つめの Dockerfile からはacme/my-base-image:1.0というイメージが作られるものとします。
# syntax=docker/dockerfile:1
FROM alpine
RUN apk add --no-cache bash
2 つめの Dockerfile はacme/my-base-image:1.0をベースとして、さらにレイヤーを追加するものとします。
# syntax=docker/dockerfile:1
FROM acme/my-base-image:1.0
COPY . /app
RUN chmod +x /app/hello.sh
CMD /app/hello.sh
2 つめのイメージには 1 つめのイメージが持つレイヤーがすべて含まれ、さらにCOPYとRUN命令による新たなレイヤーと、読み書き可能なコンテナーレイヤーが加わっています。
Docker にとって 1 つめのイメージにおけるレイヤーはすべて取得済であるため、再度プルによって取得する必要がありません。
2 つのイメージにおいて共通して存在しているレイヤーは、すべて共有します。
この 2 つの Dockerfile からイメージをビルドした場合、docker image lsやdocker image historyコマンドを使ってみると、共有されているレイヤーに対する暗号化 ID は同一になっていることがわかります。
-
新規に
cow-test/というディレクトリを生成して移動します。 -
cow-test/ディレクトリにて、以下の内容で新規ファイルhello.shを生成します。#!/usr/bin/env bash echo "Hello world" -
前述した 1 つめの Dockerfile の内容を、新規ファイル
Dockerfile.baseにコピーします。 -
前述した 2 つめの Dockerfile の内容を、新規ファイル
Dockerfileにコピーします。 -
cow-test/ディレクトリ内にて 1 つめのイメージをビルドします。 コマンドでは最後の.を記述するのを忘れないでください。 これはPATHを指定するものであり、イメージに対してファイルの追加が必要となる場合に、そのファイルを探し出す場所を Docker に指示するものです。$ docker build -t acme/my-base-image:1.0 -f Dockerfile.base . [+] Building 6.0s (11/11) FINISHED => [internal] load build definition from Dockerfile.base 0.4s => => transferring dockerfile: 116B 0.0s => [internal] load .dockerignore 0.3s => => transferring context: 2B 0.0s => resolve image config for docker.io/docker/dockerfile:1 1.5s => [auth] docker/dockerfile:pull token for registry-1.docker.io 0.0s => CACHED docker-image://docker.io/docker/dockerfile:1@sha256:9e2c9eca7367393aecc68795c671... 0.0s => [internal] load .dockerignore 0.0s => [internal] load build definition from Dockerfile.base 0.0s => [internal] load metadata for docker.io/library/alpine:latest 0.0s => CACHED [1/2] FROM docker.io/library/alpine 0.0s => [2/2] RUN apk add --no-cache bash 3.1s => exporting to image 0.2s => => exporting layers 0.2s => => writing image sha256:da3cf8df55ee9777ddcd5afc40fffc3ead816bda99430bad2257de4459625eaa 0.0s => => naming to docker.io/acme/my-base-image:1.0 0.0s -
2 つめのイメージをビルドします。
$ docker build -t acme/my-final-image:1.0 -f Dockerfile . [+] Building 3.6s (12/12) FINISHED => [internal] load build definition from Dockerfile 0.1s => => transferring dockerfile: 156B 0.0s => [internal] load .dockerignore 0.1s => => transferring context: 2B 0.0s => resolve image config for docker.io/docker/dockerfile:1 0.5s => CACHED docker-image://docker.io/docker/dockerfile:1@sha256:9e2c9eca7367393aecc68795c671... 0.0s => [internal] load .dockerignore 0.0s => [internal] load build definition from Dockerfile 0.0s => [internal] load metadata for docker.io/acme/my-base-image:1.0 0.0s => [internal] load build context 0.2s => => transferring context: 340B 0.0s => [1/3] FROM docker.io/acme/my-base-image:1.0 0.2s => [2/3] COPY . /app 0.1s => [3/3] RUN chmod +x /app/hello.sh 0.4s => exporting to image 0.1s => => exporting layers 0.1s => => writing image sha256:8bd85c42fa7ff6b33902ada7dcefaaae112bf5673873a089d73583b0074313dd 0.0s => => naming to docker.io/acme/my-final-image:1.0 0.0s -
2 つのイメージのサイズを確認します。
$ docker image ls REPOSITORY TAG IMAGE ID CREATED SIZE acme/my-final-image 1.0 8bd85c42fa7f About a minute ago 7.75MB acme/my-base-image 1.0 da3cf8df55ee 2 minutes ago 7.75MB -
それぞれのイメージの履歴を確認します。
$ docker image history acme/my-base-image:1.0

IMAGE          CREATED         CREATED BY                                      SIZE      COMMENT
da3cf8df55ee   5 minutes ago   RUN /bin/sh -c apk add --no-cache bash # bui…   2.15MB    buildkit.dockerfile.v0
<missing>      7 weeks ago     /bin/sh -c #(nop)  CMD ["/bin/sh"]              0B
<missing>      7 weeks ago     /bin/sh -c #(nop) ADD file:f278386b0cef68136…   5.6MB
処理ステップの中にはサイズを持たないもの (
0B) があります。 メタデータだけが変更されたものであって、イメージレイヤーが生成されたものではないため、メタデータそのものを除くと、容量をまったく取っていません。 上の出力結果から、このイメージは 2 つのイメージレイヤーから構成されることがわかります。$ docker image history acme/my-final-image:1.0 IMAGE CREATED CREATED BY SIZE COMMENT 8bd85c42fa7f 3 minutes ago CMD ["/bin/sh" "-c" "/app/hello.sh"] 0B buildkit.dockerfile.v0 <missing> 3 minutes ago RUN /bin/sh -c chmod +x /app/hello.sh # buil… 39B buildkit.dockerfile.v0 <missing> 3 minutes ago COPY . /app # buildkit 222B buildkit.dockerfile.v0 <missing> 4 minutes ago RUN /bin/sh -c apk add --no-cache bash # bui… 2.15MB buildkit.dockerfile.v0 <missing> 7 weeks ago /bin/sh -c #(nop) CMD ["/bin/sh"] 0B <missing> 7 weeks ago /bin/sh -c #(nop) ADD file:f278386b0cef68136… 5.6MBNotice that all steps of the first image are also included in the final image. The final image includes the two layers from the first image, and two layers that were added in the second image.
What are the
<missing>steps?The
<missing>lines in thedocker historyoutput indicate that those steps were either built on another system and part of thealpineimage that was pulled from Docker Hub, or were built with BuildKit as builder. Before BuildKit, the “classic” builder would produce a new “intermediate” image for each step for caching purposes, and theIMAGEcolumn would show the ID of that image. BuildKit uses its own caching mechanism, and no longer requires intermediate images for caching. Refer to build images with BuildKit to learn more about other enhancements made in BuildKit. -
Check out the layers for each image
Use the
docker image inspectcommand to view the cryptographic IDs of the layers in each image:$ docker image inspect --format "{{json .RootFS.Layers}}" acme/my-base-image:1.0 [ "sha256:72e830a4dff5f0d5225cdc0a320e85ab1ce06ea5673acfe8d83a7645cbd0e9cf", "sha256:07b4a9068b6af337e8b8f1f1dae3dd14185b2c0003a9a1f0a6fd2587495b204a" ]$ docker image inspect --format "{{json .RootFS.Layers}}" acme/my-final-image:1.0 [ "sha256:72e830a4dff5f0d5225cdc0a320e85ab1ce06ea5673acfe8d83a7645cbd0e9cf", "sha256:07b4a9068b6af337e8b8f1f1dae3dd14185b2c0003a9a1f0a6fd2587495b204a", "sha256:cc644054967e516db4689b5282ee98e4bc4b11ea2255c9630309f559ab96562e", "sha256:e84fb818852626e89a09f5143dbc31fe7f0e0a6a24cd8d2eb68062b904337af4" ]Notice that the first two layers are identical in both images. The second image adds two additional layers. Shared image layers are only stored once in
/var/lib/docker/and are also shared when pushing and pulling and image to an image registry. Shared image layers can therefore reduce network bandwidth and storage.Tip: format output of Docker commands with the
--formatoptionThe examples above use the
docker image inspectcommand with the--formatoption to view the layer IDs, formatted as a JSON array. The--formatoption on Docker commands can be a powerful feature that allows you to extract and format specific information from the output, without requiring additional tools such asawkorsed. To learn more about formatting the output of docker commands using the--formatflag, refer to the format command and log output section. We also pretty-printed the JSON output using thejqutility for readability.
コピーによりコンテナーを効率的に
コンテナーを起動すると、それまであったレイヤーの最上部に、書き込み可能な薄いコンテナーレイヤーが加えられます。 コンテナーがファイルシステムに対して行った変更は、すべてそこに保存されます。 コンテナーが変更を行っていないファイルは、その書き込みレイヤーにはコピーされません。 つまり書き込みレイヤーは、できるだけ容量が小さく抑えられることになります。
コンテナー内にあるファイルが修正されると、ストレージドライバーはコピーオンライト方式により動作します。
そこで実行される各処理は、ストレージドライバーによってさまざまです。
overlay2、overlay、aufsといったドライバーの場合、だいたい以下のような順にコピーオンライト方式による処理が行われます。
- 更新するべきファイルをイメージレイヤー内から探します。 この処理は最新のレイヤーから始まって、ベースレイヤーに向けて順に降りていき、一度に 1 つのレイヤーを処理していきます。 ファイルが見つかるとこれをキャッシュに加えて、次回以降の処理スピードを上げることに備えます。
- 見つかったファイルを初めてコピーするときには
copy_upという処理が行われます。 これによってそのファイルをコンテナーの書き込みレイヤーにコピーします。 - 修正が発生すると、コピーを行ったそのファイルが処理されます。 つまりコンテナーは、下位のレイヤー内に存在している読み込み専用のそのファイルを見にいくことはありません。
Btrfs, ZFS といったドライバーにおけるコピーオンライト方式は、これとは異なります。 そのようなドライバーが行う手法の詳細は、後述するそれぞれの詳細説明を参照してください。
データを大量に書き込むようなコンテナーは、そういった書き込みを行わないコンテナーに比べて、データ領域をより多く消費します。
コンテナーの最上位にある書き込み可能な薄いレイヤー上に対して、書き込み処理を行うことは、たいていが新たなデータ領域を必要とするためです。
Note that changing the metadata of files,
for example, changing file permissions or ownership of a file, can also result
in a copy_up operation, therefore duplicating the file to the writable layer.
Tip: Use volumes for write-heavy applications
For write-heavy applications, you should not store the data in the container. Applications, such as write-intensive database storage, are known to be problematic particularly when pre-existing data exists in the read-only layer.
Instead, use Docker volumes, which are independent of the running container, and designed to be efficient for I/O. In addition, volumes can be shared among containers and do not increase the size of your container’s writable layer. Refer to the use volumes section to learn about volumes.
copy_up処理は際立った性能のオーバーヘッドを招きます。
このオーバーヘッドは、利用しているストレージドライバーによってさまざまです。
大容量ファイル、多数のレイヤー、深いディレクトリ階層といったものが、さらに影響します。
copy_up処理は対象となるファイルが初めて修正されたときにだけ実行されるので、オーバーヘッドはそれでも最小限に抑えられています。
コピーオンライトが動作している様子を確認するため、以下の例においては、前述したacme/my-final-image:1.0イメージをベースとする 5 つのコンテナーを見ていきます。
そして各コンテナーがどれだけの容量を消費しているかを確認します。
-
Docker ホスト上の端末画面から、以下のような
docker runコマンドを実行します。 各行の終わりには、各コンテナーの ID を入力します。$ docker run -dit --name my_container_1 acme/my-final-image:1.0 bash \ && docker run -dit --name my_container_2 acme/my-final-image:1.0 bash \ && docker run -dit --name my_container_3 acme/my-final-image:1.0 bash \ && docker run -dit --name my_container_4 acme/my-final-image:1.0 bash \ && docker run -dit --name my_container_5 acme/my-final-image:1.0 bash 40ebdd7634162eb42bdb1ba76a395095527e9c0aa40348e6c325bd0aa289423c a5ff32e2b551168b9498870faf16c9cd0af820edf8a5c157f7b80da59d01a107 3ed3c1a10430e09f253704116965b01ca920202d52f3bf381fbb833b8ae356bc 939b3bf9e7ece24bcffec57d974c939da2bdcc6a5077b5459c897c1e2fa37a39 cddae31c314fbab3f7eabeb9b26733838187abc9a2ed53f97bd5b04cd7984a5a -
--sizeオプションを使ってdocker psコマンドを実行し、5 つのコンテナーが実行中であることを確認します。 そして各コンテナーのサイズを見てみます。$ docker ps --size --format "table {{.ID}}\t{{.Image}}\t{{.Names}}\t{{.Size}}" CONTAINER ID IMAGE NAMES SIZE cddae31c314f acme/my-final-image:1.0 my_container_5 0B (virtual 7.75MB) 939b3bf9e7ec acme/my-final-image:1.0 my_container_4 0B (virtual 7.75MB) 3ed3c1a10430 acme/my-final-image:1.0 my_container_3 0B (virtual 7.75MB) a5ff32e2b551 acme/my-final-image:1.0 my_container_2 0B (virtual 7.75MB) 40ebdd763416 acme/my-final-image:1.0 my_container_1 0B (virtual 7.75MB)The output above shows that all containers share the image’s read-only layers (7.75MB), but no data was written to the container’s filesystem, so no additional storage is used for the containers.
Advanced: metadata and logs storage used for containers
Note: This step requires a Linux machine, and does not work on Docker Desktop for Mac or Docker Desktop for Windows, as it requires access to the Docker Daemon’s file storage.
While the output of
docker psprovides you information about disk space consumed by a container’s writable layer, it does not include information about metadata and log-files stored for each container.More details can be obtained by exploring the Docker Daemon’s storage location (
/var/lib/dockerby default).$ sudo du -sh /var/lib/docker/containers/* 36K /var/lib/docker/containers/3ed3c1a10430e09f253704116965b01ca920202d52f3bf381fbb833b8ae356bc 36K /var/lib/docker/containers/40ebdd7634162eb42bdb1ba76a395095527e9c0aa40348e6c325bd0aa289423c 36K /var/lib/docker/containers/939b3bf9e7ece24bcffec57d974c939da2bdcc6a5077b5459c897c1e2fa37a39 36K /var/lib/docker/containers/a5ff32e2b551168b9498870faf16c9cd0af820edf8a5c157f7b80da59d01a107 36K /var/lib/docker/containers/cddae31c314fbab3f7eabeb9b26733838187abc9a2ed53f97bd5b04cd7984a5aEach of these containers only takes up 36k of space on the filesystem.
-
Per-container storage
To demonstrate this, run the following command to write the word ‘hello’ to a file on the container’s writable layer in containers
my_container_1,my_container_2, andmy_container_3:$ for i in {1..3}; do docker exec my_container_$i sh -c 'printf hello > /out.txt'; doneRunning the
docker pscommand again afterward shows that those containers now consume 5 bytes each. This data is unique to each container, and not shared. The read-only layers of the containers are not affected, and are still shared by all containers.$ docker ps --size --format "table {{.ID}}\t{{.Image}}\t{{.Names}}\t{{.Size}}" CONTAINER ID IMAGE NAMES SIZE cddae31c314f acme/my-final-image:1.0 my_container_5 0B (virtual 7.75MB) 939b3bf9e7ec acme/my-final-image:1.0 my_container_4 0B (virtual 7.75MB) 3ed3c1a10430 acme/my-final-image:1.0 my_container_3 5B (virtual 7.75MB) a5ff32e2b551 acme/my-final-image:1.0 my_container_2 5B (virtual 7.75MB) 40ebdd763416 acme/my-final-image:1.0 my_container_1 5B (virtual 7.75MB)
The examples above illustrate how copy-on-write filesystems help making containers efficient. Not only does copy-on-write save space, but it also reduces container start-up time. When you create a container (or multiple containers from the same image), Docker only needs to create the thin writable container layer.
If Docker had to make an entire copy of the underlying image stack each time it
created a new container, container create times and disk space used would be
significantly increased. This would be similar to the way that virtual machines
work, with one or more virtual disks per virtual machine. The vfs storage
does not provide a CoW filesystem or other optimizations. When using this storage
driver, a full copy of the image’s data is created for each container.