シングルサインオンの設定
読む時間の目安: 9 分
この節は、Business プランにおいて Docker SSO(Single Sign-on; シングルサインオン)を必要とする管理者向けのものです。 Docker SSO は、Docker へのアクセスにおいて IdPs (identity providers; アイデンティティープロバイダー) を使った認証を求めます。 Docker では今のところ、SAML 2.0 と Azure AD の認証方法をサポートしています。 SSO は Docker Business サブスクリプション内の組織に対して有効にできます。 現アカウントを Business サブスクリプションにアップグレードするには、サブスクリプションのアップグレード を参照してください。
SSO が有効であると、ユーザーのアクセスはプロバイダーの認証画面にリダイレクトされて、SSO を使ったログインを行います。 そこでは個人ログイン情報(Docker ID とパスワード)を使った認証はできません。 Docker では現在、Service Provider Initiated SSO フローをサポートしています。 所属ユーザーは SSO 認証プロセスを初期化を通じて Docker Hub や Docker Desktop へサインインすることが必要になります。
Docker Hub における SSO を有効にするためには、アイデンティティープロバイダーとの間で Docker Hub において用いる IdP が動作するように、管理者があらかじめ設定しておかなければなりません。 Docker では ACS(Assertion Consumer Service)URL とエンティティー ID を提供しています。 管理者はこの情報を用いて、IdP サーバーと Docker Hub 間の接続を構築します。
IdP サーバーと Docker Hub 間の接続を構築したら、Docker Hub 内の組織にログインして、SSO 確立プロセスを完了させます。 詳しい手順は、Docker Hub における SSO の有効化 の節を参照してください。
Docker Hub において SSO を有効にするには、以下に示すようにプロバイダーから提供される自分のアイデンティティ情報が必要です。
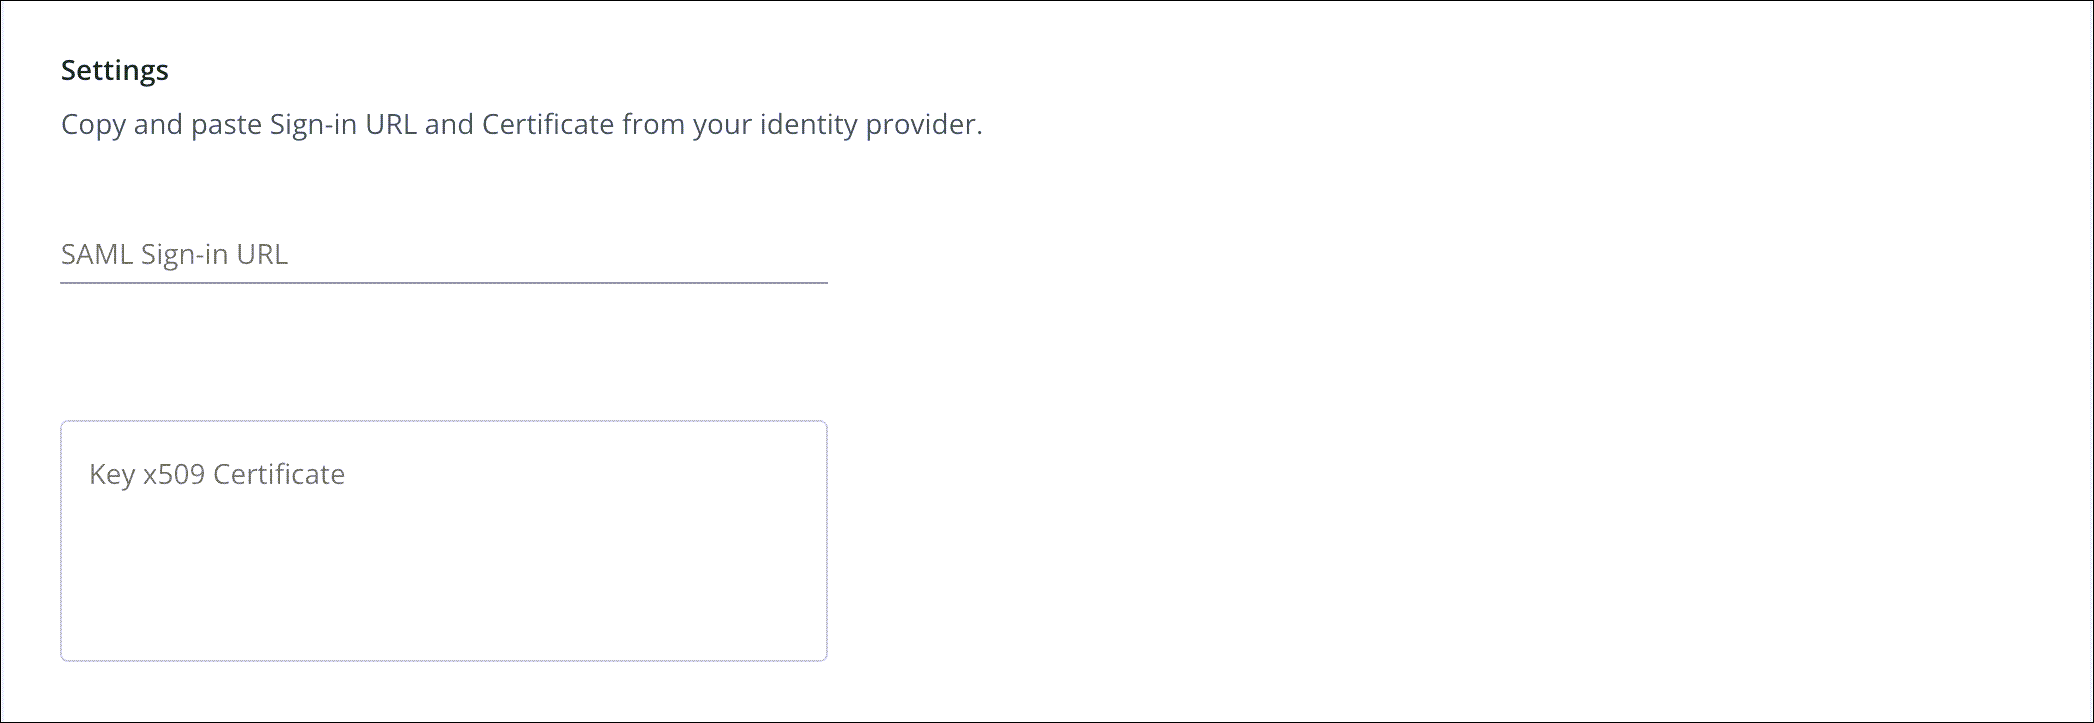
- SAML 2.0 の場合、シングルサインオン URL、X.509 署名証明書
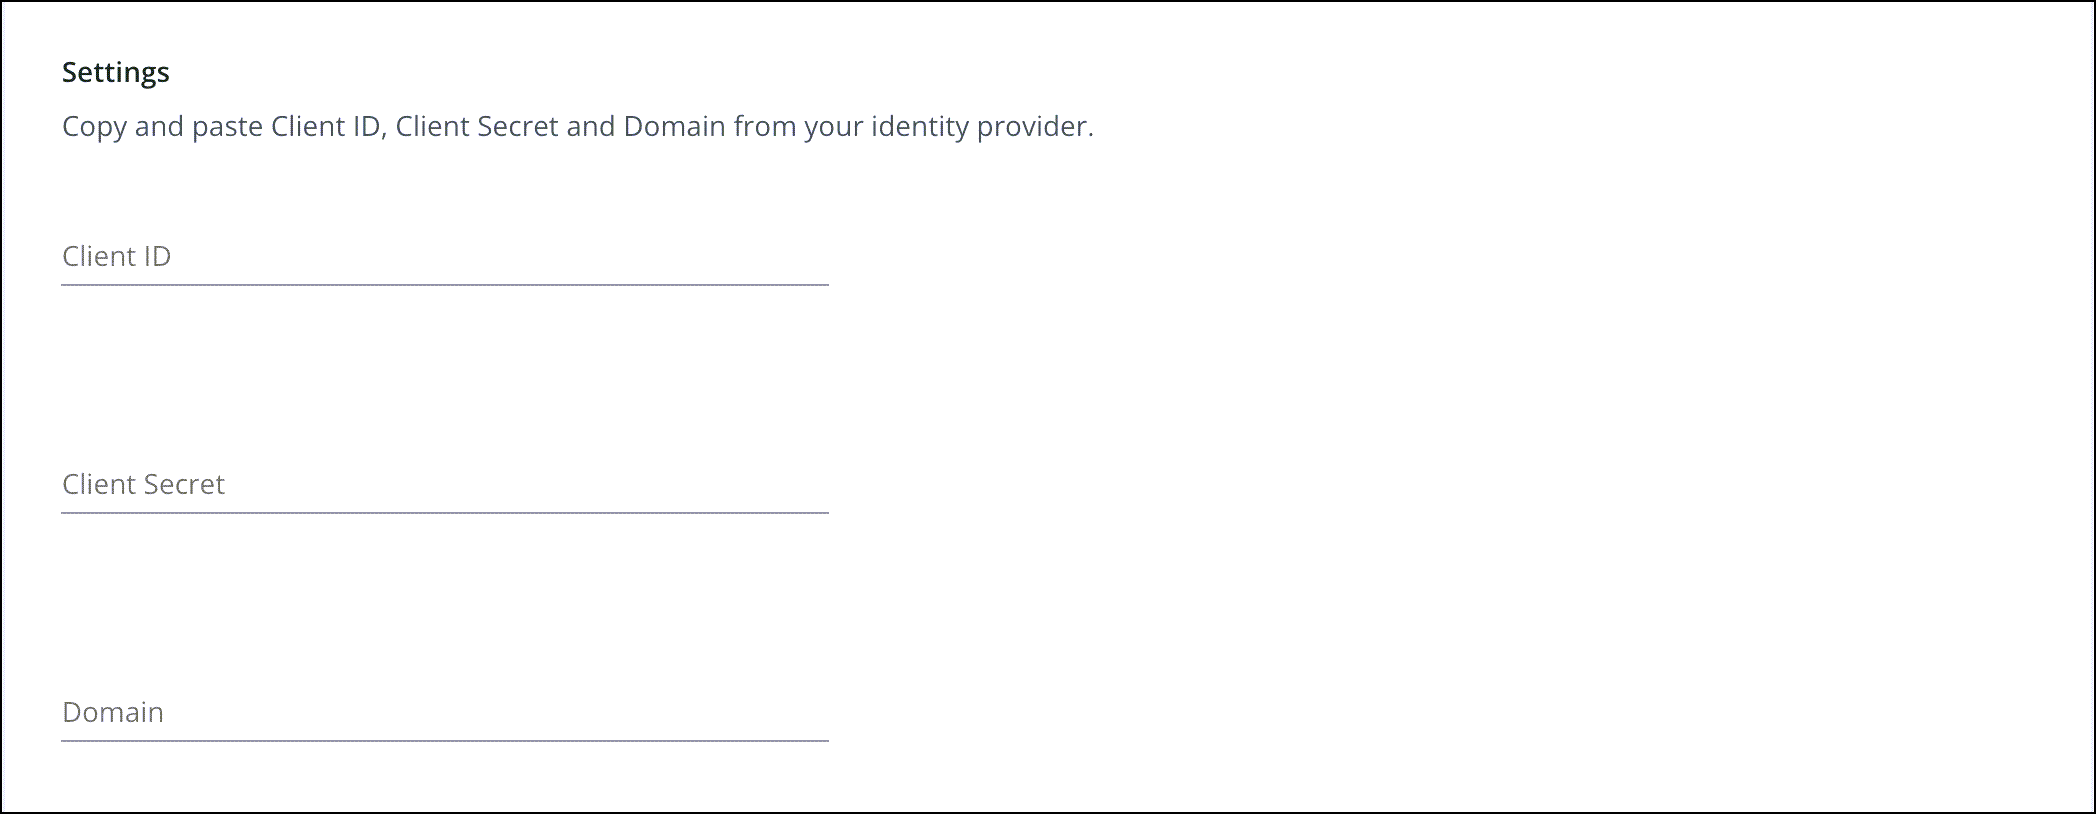
- Azure AD の場合、クライアント ID(登録 AD アプリケーションに対する一意な識別子), クライアントのシークレット(登録 Azure AD アプリケーションへのアクセスを実現するための文字列), AD ドメインの詳細情報
現在のところ SSO の有効化は 1 つの組織についてのみ対応しています。 ただしシングルログアウトには対応していません。 組織内のユーザーが別のドメイン(ソーシャルドメインを含む)にも属している場合、そのユーザーは組織に対してはゲストとして参加することになります。 この Docker ログイン資格情報を利用し、ゲストは Docker を通じて認証が継続します。
前提条件
- You must first notify your company about the new SSO login procedures
- Verify that your org members have Docker Desktop version 4.4.2 installed on their machines
- New org members must create a PAT to log in to the CLI, however existing users can currently use their username and password during the grace period as specified below
- Confirm that all CI/CD pipelines have replaced their passwords with PATs
- For your service accounts, add your additional domains or enable it in your IdP
- Test SSO using your domain email address and IdP password to successfully log in and log out of Docker Hub
パーソナルアクセストークン(PAT)の生成
Before you configure SSO for your organization, new members of your organization must create an access token to log in to the CLI. There is currently a grace period for existing users, which will expire in the near future. Before the grace period ends, your users will be able to log in from Docker Desktop CLI using their previous credentials until PATs are mandatory. In addition, all email addresses should be added to your IdP.
設定
To configure SSO, log in to Docker Hub to complete the IdP server configuration process. You can only configure SSO with a single IdP. When this is complete, log back in to Docker Hub and complete the SSO enablement process.
重要
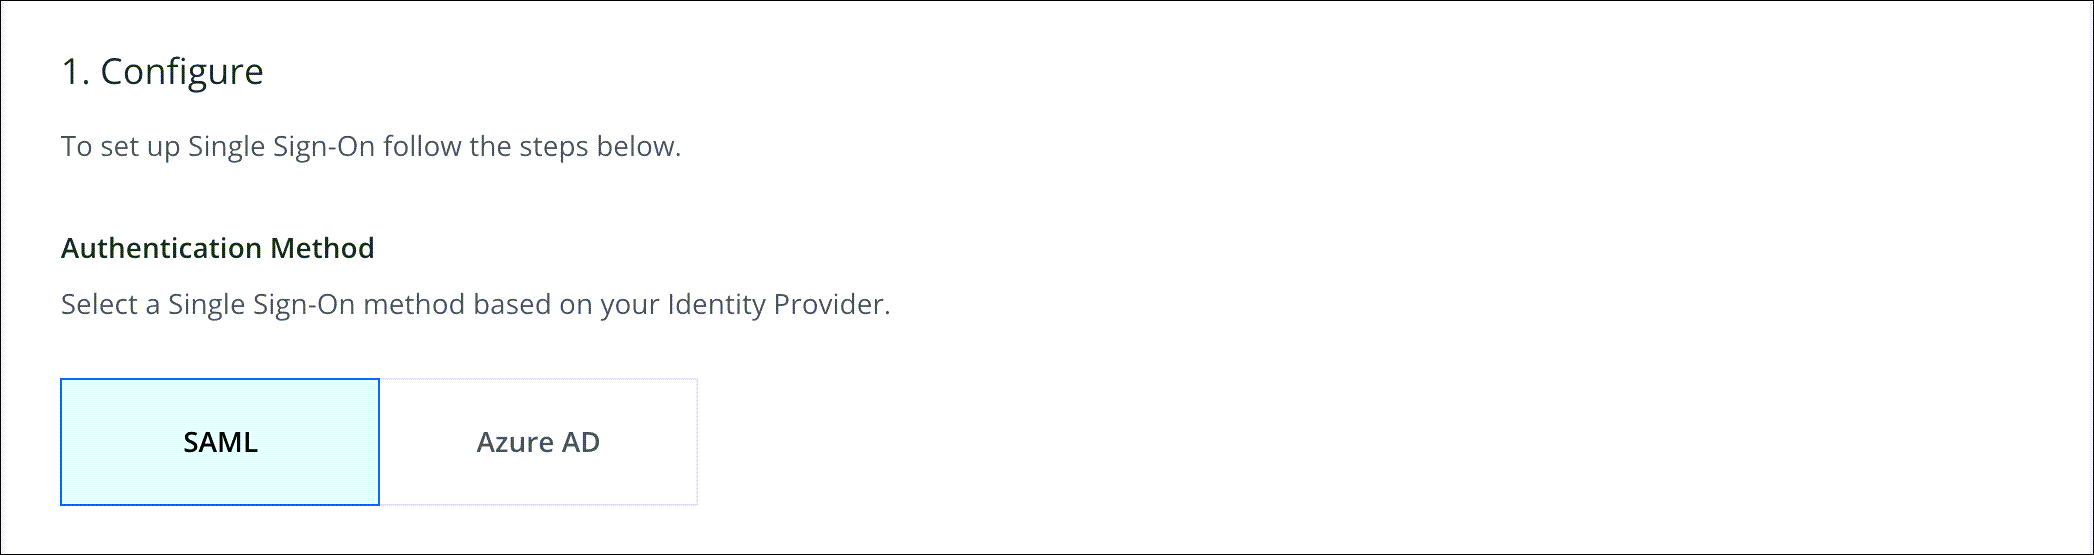
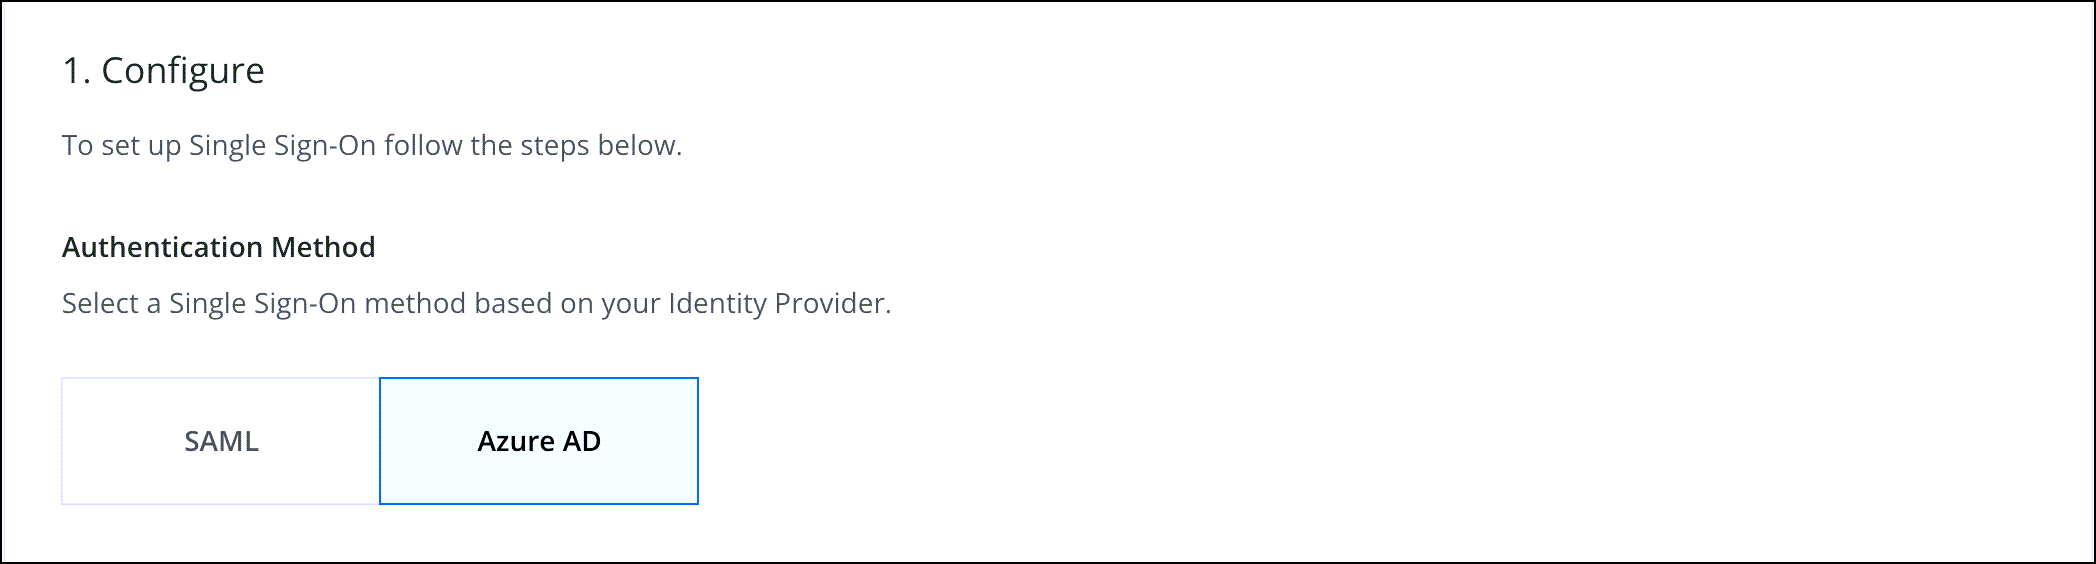
If your IdP setup requires an Entity ID and the ACS URL, you must select the SAML tab in the Authentication Method section. For example, if your Azure AD setup uses SAML configuration within Azure AD, you must select SAML. If you are configuring Open ID Connect with Azure AD select Azure AD as the authentication method. Also, IdP initiated connections are not supported at this time.
The following video walks you through the process of configuring SSO.
SAML 2.0 IdP の設定
- Log in to Docker Hub as an administrator and navigate to Organizations and select the organization that you want to enable SSO on.
- Click Settings and select the Security tab.
-
Select an authentication method for SAML 2.0.
-
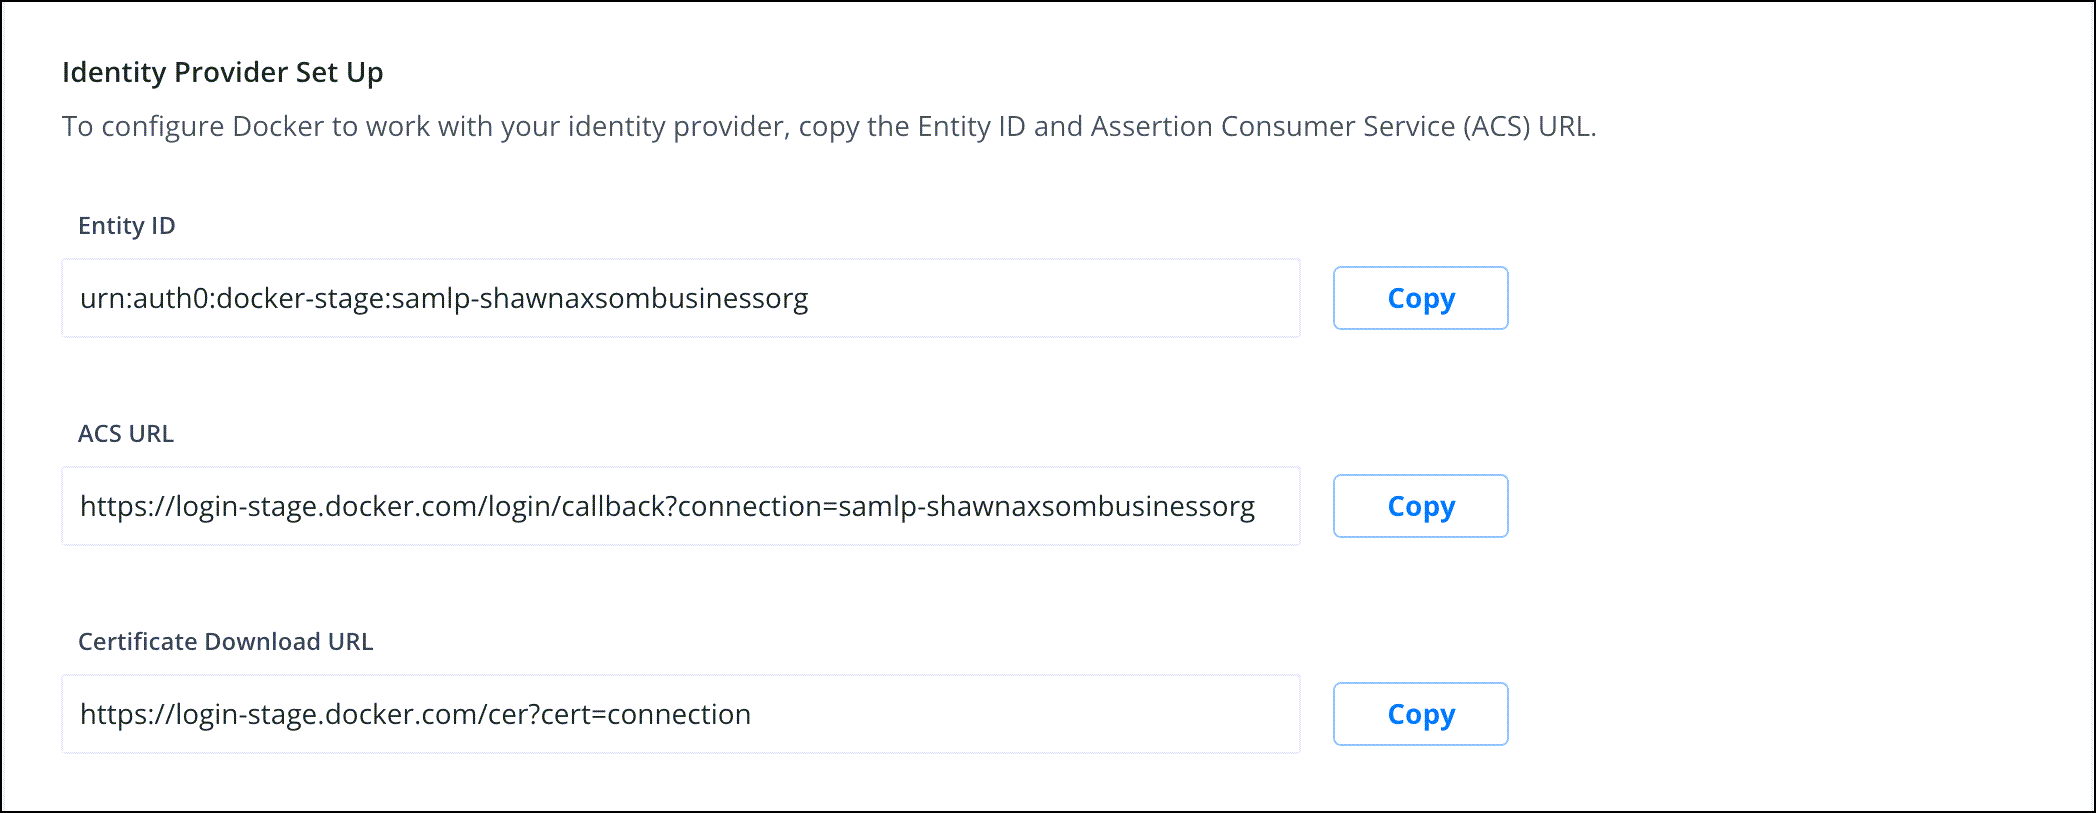
In the Identity Provider Set Up, copy the Entity ID, ACS URL and Certificate Download URL.
-
Log in to your IdP to complete the IdP server configuration process. Refer to your IdP documentation for detailed instructions.
Note
The NameID is your email address and is set as the default. For example, yourname@mycompany.com. We also support the optional
nameattribute. This attribute name must be lower-cased. The following is an example of this attribute in Okta.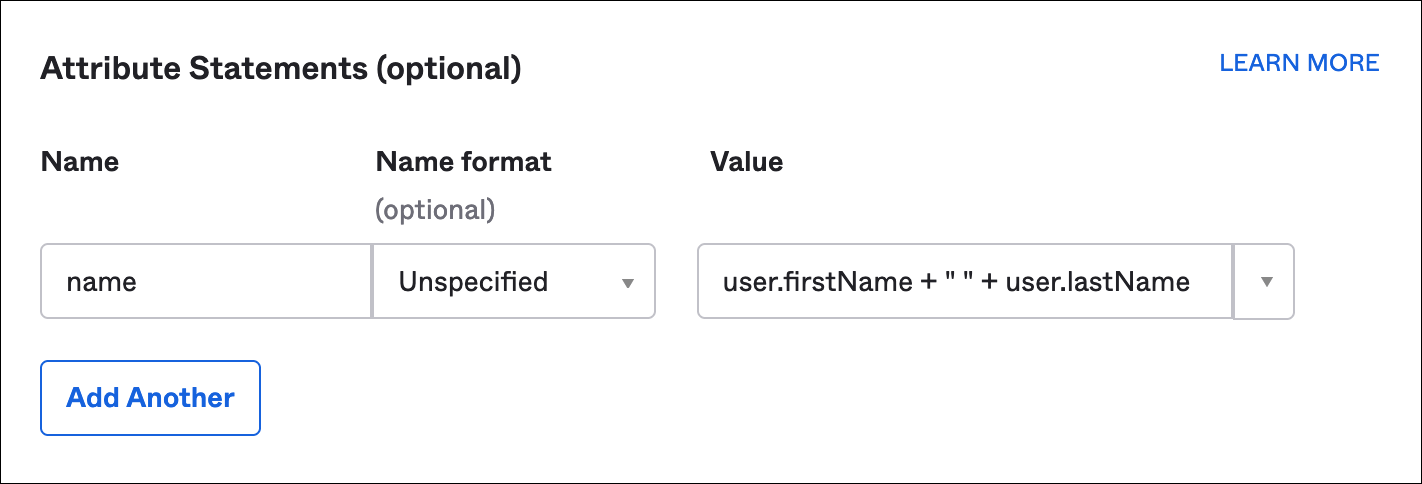
-
Complete the fields in the Configuration Settings section and click Save. If you want to change your IdP, you must delete your existing provider and configure SSO with your new IdP.
- Proceed to add your domain before you test and enforce SSO.
Open ID Connect を使った Azure AD IdP の設定
メモ
This section is for users who only want to configure Open ID Connect with Azure AD. This connection is a basic OIDC connection, and there are no special customizations available when using it.
- Log in to Docker Hub as an administrator and navigate to Organizations and select the organization that you want to enable SSO on.
- Click Settings and select the Security tab.
-
Select an authentication method for Azure AD.
-
In the Identity Provider Set Up, copy the Redirect URL / Reply URL.

-
Log in to your IdP to complete the IdP server configuration process. Refer to your IdP documentation for detailed instructions.
Note
The NameID is your email address and is set as the default. For example: yourname@mycompany.com.
-
Complete the fields in the Configuration Settings section and click Save. If you want to change your IdP, you must delete your existing provider and configure SSO with your new IdP.
- Proceed to add your domain before you test and enforce SSO.
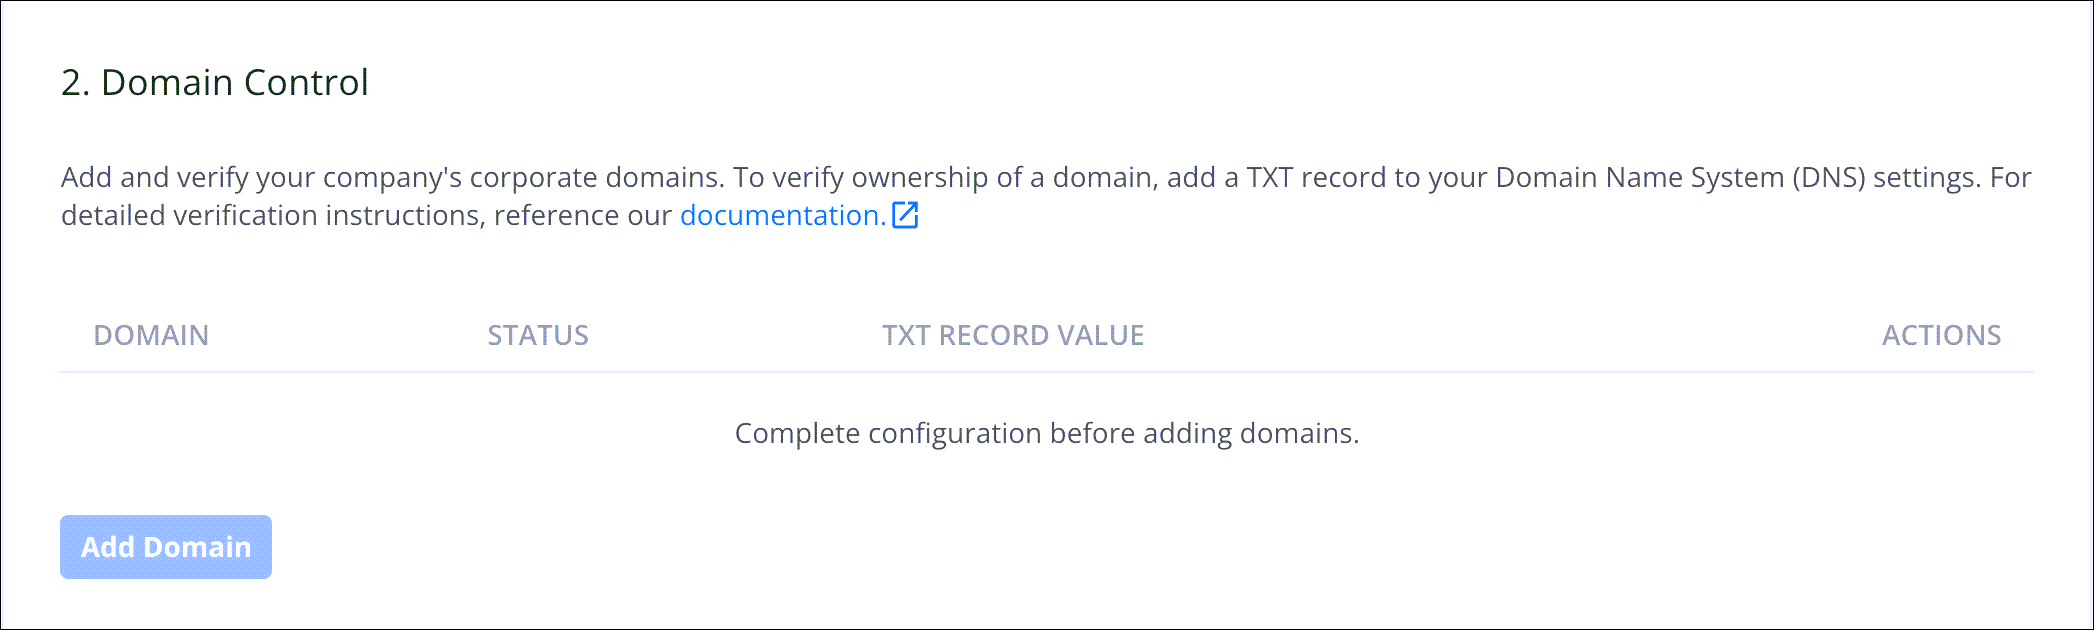
ドメインの制御
Click Add Domain and specify the corporate domain you’d like to manage with SSO. Domains should be formatted without protocol or www information, for example, yourcompany.com. Docker currently supports multiple domains that are part of your IdP. Make sure that your domain is reachable through email.
Note
This should include all email domains and sub-domains users will use to access Docker. Public domains such as gmail.com, outlook.com, etc are not permitted. Also, the email domain should be set as the primary email.
ドメインの確認
To verify ownership of a domain, add a TXT record to your Domain Name System (DNS) settings.
- Copy the provided TXT record value and navigate to your DNS host and locate the Settings page to add a new record.
-
Select the option to add a new record and paste the TXT record value into the applicable field. For example, the Value, Answer or Description field.
Your DNS record may have the following fields:
- Record type: enter your ‘TXT’ record value
- Name/Host/Alias: leave the default (@ or blank)
- Time to live (TTL): enter 86400
-
After you have updated the fields, click Save.
Note
It can take up to 72 hours for DNS changes to take effect, depending on your DNS host. The Domains table will have an Unverified status during this time.
- In the Security section of your Docker organization, click Verify next to the domain you want to verify after 72 hours.
SSO 設定のテスト
After you’ve completed the SSO configuration process in Docker Hub, you can test the configuration when you log in to Docker Hub using an incognito browser. Login using your domain email address and IdP password. You will then get redirected to your identity provider’s login page to authenticate.
- Authenticate through email instead of using your Docker ID, and test the login process.
- To authenticate through CLI, your users must have a PAT before you enforce SSO for CLI users.
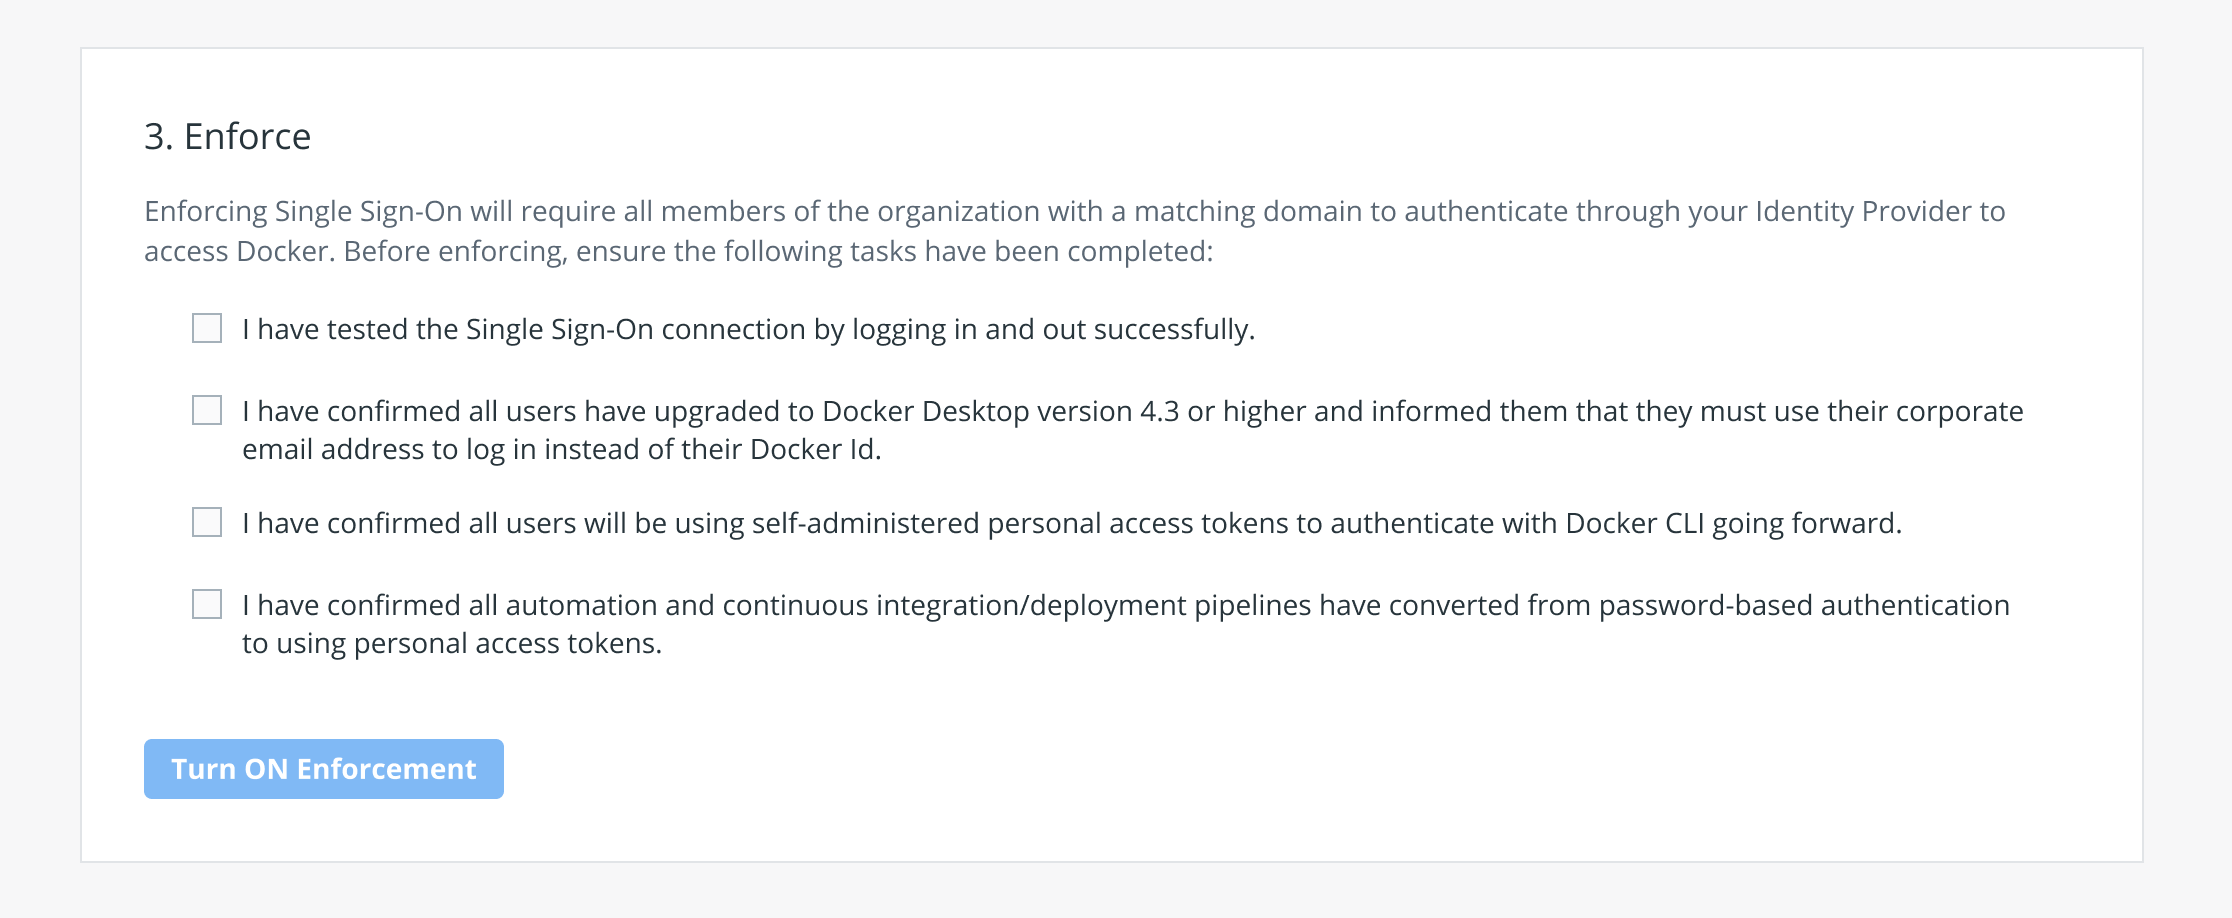
Docker Hub における強制的な SSO
Before you enforce SSO in Docker Hub, you must complete the following: Test SSO by logging in and out successfully, confirm that all members in your org have upgraded to Docker Desktop version 4.4.2, PATs are created for each member, CI/CD passwords are converted to PAT. Also, when using Docker partner products (for example, VS Code), you must use a PAT when you enforce SSO. For your service accounts add your additional domains in Add Domains or enable the accounts in your IdP.
Admins can force users to authenticate with Docker Desktop by provisioning a registry.json configuration file. The registry.json file will force users to authenticate as a user that is configured in the allowedOrgs list in the registry.json file. For info on how to configure a registry.json file see Configure registry.json
- On the Single Sign-On page in Docker Hub, click Turn ON Enforcement to enable your SSO.
- When SSO is enforced, your members are unable to modify their email address and password, convert a user account to an organization, or set up 2FA through Docker Hub. You must enable 2FA through your IdP.
Note
If you want to turn off SSO and revert back to Docker’s built-in authentication, click Turn OFF Enforcement. Your members aren’t forced to authenticate through your IdP and can log in to Docker using their personal credentials.
SSO 有効時のユーザー管理
You don’t need to add users to your organization in Docker Hub manually. You just need to make sure an account for your users exists in your IdP. When users sign in to Docker Hub, they’re automatically assigned to the organization using their domain email address.
Note
When the first-time user logs in to Docker using their domain email address, they are then added to your organization.
To add a guest to your organization in Docker Hub if they aren’t verified through your IdP:
- Go to Organizations in Docker Hub, and select your organization.
- Click Add Member, enter the email address, and select a team from the drop-down list.
- Click Add to confirm.
SSO 組織からのメンバー削除
To remove a member from an organization:
- Log in to Docker Hub as an administrator of your organization.
- Select the organization from the list. The organization page displays a list of members.
- Click the x next to a member’s name to remove them from all the teams in the organization.
- Click Remove to confirm. The member will receive an email notification confirming the removal.
Note
When you remove a member from an SSO organization, they are unable to log in using their email address.
FAQ
To learn more see our FAQs.
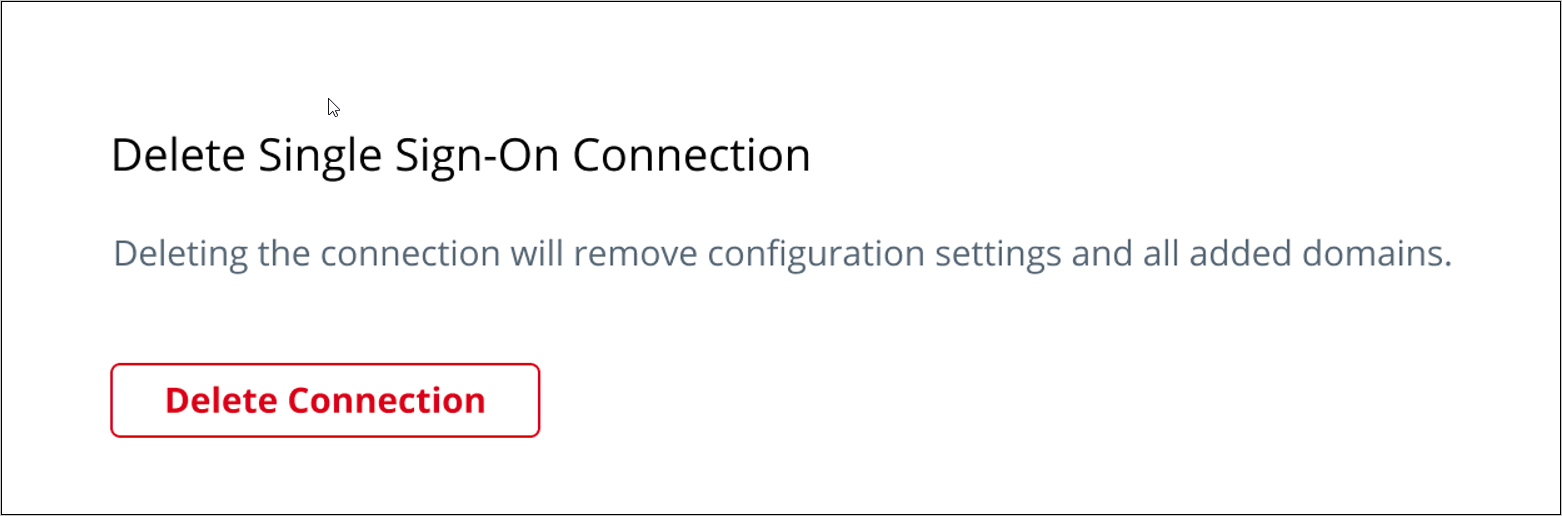
SSO の削除
When you disable SSO, you can delete the connection to remove the configuration settings and the added domains. Once you delete this connection, it cannot be undone. Users must authenticate with their Docker ID and password or create a password reset if they do not have one.